Proxy Not Working on Windows 11: Easy Fixes

Is your proxy not working on Windows 11?
Don’t worry. Follow these step-by-step instructions, starting with the basics and moving to more advanced fixes.
Table of contents
- Step 1: Test Your Internet Connection
- Step 2: Verify Proxy Settings in Windows
- Step 3: Reset or Change Proxy Configuration
- Step 4: Run Windows Troubleshooter
- Step 5: Update or Repair Network Settings
- Step 6: Clear Network Cache (DNS & Winsock)
- Step 7: Check Firewall or VPN Conflicts
- Step 8: Confirm the Proxy Server Is Online
- FAQs
Step 1: Test Your Internet Connection
- Disconnect from Wi-Fi or unplug your Ethernet cable.
- Reconnect after a few seconds.
- Open your browser and try loading a site without the proxy enabled.
If the page loads fine, the issue is with the proxy. If not, fix your internet first.
Step 2: Verify Proxy Settings in Windows
- Press Windows + I to open Settings.
- Go to Network & Internet > Proxy.
- Under Manual proxy setup, ensure the Address and Port are correct.
If you’re unsure what to check, see this guide on how to check proxy settings.
Step 3: Reset or Change Proxy Configuration
- Open Settings > Network & Internet > Proxy.
- Toggle Use a proxy server Off.
- Restart your PC.
- Toggle it On again and re-enter your details.
Need a fresh setup? Learn how to change proxy settings or configure from scratch with how to set up a proxy server.
Step 4: Run Windows Troubleshooter
- Press Windows + I.
- Go to System > Troubleshoot > Other troubleshooters.
- Click Run next to Internet Connections and follow the prompts.
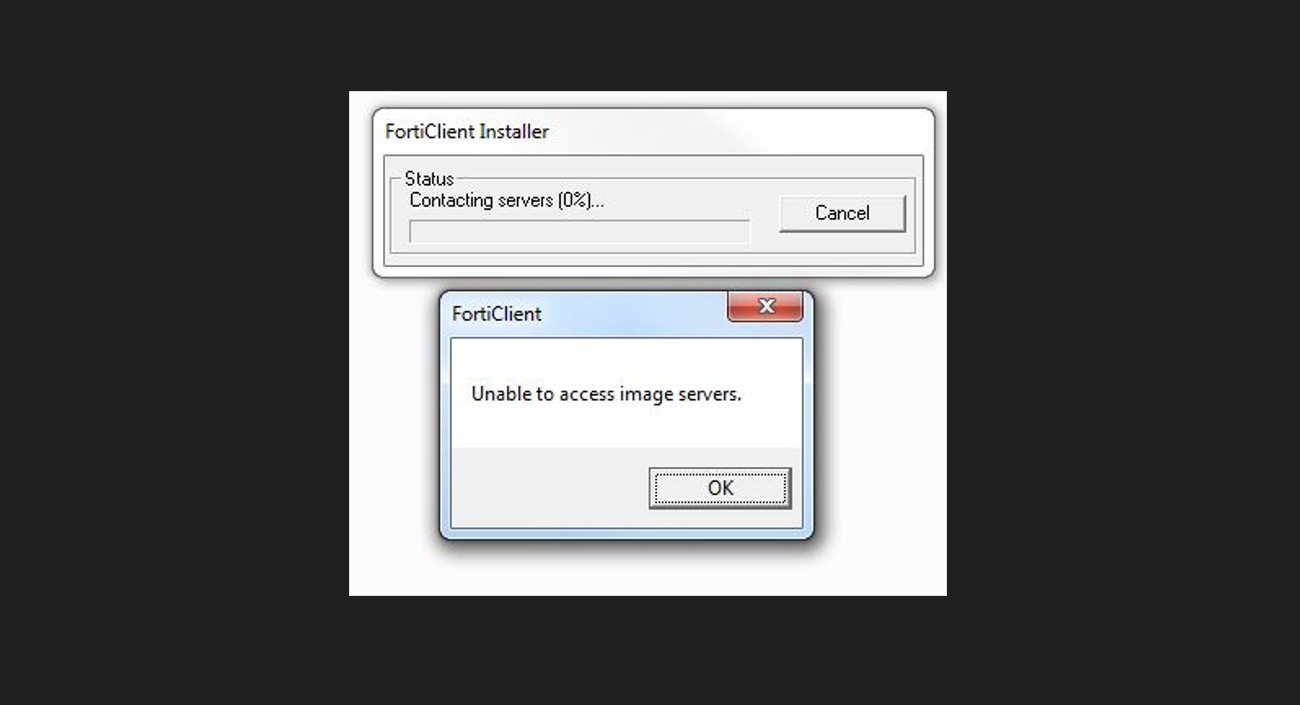
If the tool says your proxy is locked or managed, it may be a proxy not controllable issue.
Step 5: Update or Repair Network Settings
- Press Windows + X and select Device Manager.
- Expand Network adapters.
- Right-click your main adapter → Update driver → Search automatically.
- Restart your PC.
If problems persist, follow this fix for a common IP conflict: repairing IP address proxy error.
Step 6: Clear Network Cache (DNS & Winsock)
- Type cmd in search, right-click Command Prompt, choose Run as administrator.
- Run each command and press Enter:
ipconfig /flushdns netsh winsock reset - Restart your PC.
Step 7: Check Firewall or VPN Conflicts
- Open Settings > Privacy & security > Windows Security.
- Choose Firewall & network protection and temporarily turn it off (for testing).
- Try your proxy again. Re-enable security after testing.
Confirm rules and ports by reviewing your proxy and firewall settings. Using a VPN too? See what to do when VPN is not working on Windows 11.
Step 8: Confirm the Proxy Server Is Online
- Try a second proxy server or provider.
- If you see a proxy not found message, the server may be offline or misconfigured.
- Contact the provider or switch servers.
FAQs
Updates can reset network config. Recheck and re-enable your proxy after updating.
Yes, for flushing DNS and updating drivers. Basic checks don’t require admin.
Yes. Don’t run both together. Disable one while testing the other.
Read our disclosure page to find out how can you help VPNCentral sustain the editorial team Read more

Improve this guide


User forum
0 messages