Private Internet Access vs AirVPN: Tested in 2026

This PIA vs AirVPN comparison will help you choose between these 2 top services.
By the end of this, you’ll know everything about these VPNs: features, speed rates, streaming performance, privacy, and pricing. Let’s get started.

Access content across the globe at the highest speed rate.
70% of our readers choose Private Internet Access
70% of our readers choose ExpressVPN
Browse the web from multiple devices with industry-standard security protocols.

Faster dedicated servers for specific actions (currently at summer discounts)
AirVPN vs PIA: Quick Overview
Here’s a quick glance at what each VPN offers in terms of features as well as our test results.
| Feature | Private Internet Access (PIA) | AirVPN |
|---|---|---|
| Countries | 80+ | 25 |
| Servers | 35,000+ | 240+ |
| Maximum connections | Unlimited | 5 |
| Average download speed | 28.95 Mbps | 23.11 Mbps |
| Average upload speed | 71.60 Mbps | 64.06 Mbps |
| Ping | 119 | 117 |
| Protocols | OpenVPN & WireGuard | OpenVPN |
| Logs | ❌ | ❌ |
| Kill switch | ✔️ | ✔️ |
| Port forwarding | ✔️ | ✔️ |
| Split tunneling | ✔️ | ✔️ |
| P2P & torrenting | ✔️ | ✔️ |
| Free trial | ❌ | ✔️ (3-day) |
| 30-day money-back | ✔️ | ✔️ |
| 24/7 live chat support | ✔️ | ✔️ |
AIRVPN vs Private Internet Access: Which One is Better?
PIA comes out on top. It has lots of servers in many countries, ensuring you can connect easily and quickly. Plus, it takes your privacy seriously, keeping no logs and using strong encryption.
While AirVPN fights for online freedom, PIA offers a better balance of server availability and privacy protection, making it the top pick for most people.
Keep reading for our in-depth analysis of the features and first-hand test results.
PIA VPN vs AirVPN: Main Differences
Private Internet Access
Interface: minimalistic and user-friendly
As you will see, Private Internet Access has a minimalistic user interface (UI) which will provide a great user experience (UX) to the common user who is not required to be tech-savvy to use this VPN hassle-free.
The PIA VPN client has a main dashboard that allows you to quickly connect to a server and a settings section from where you can configure your VPN according to your preferred choices.
Dashboard
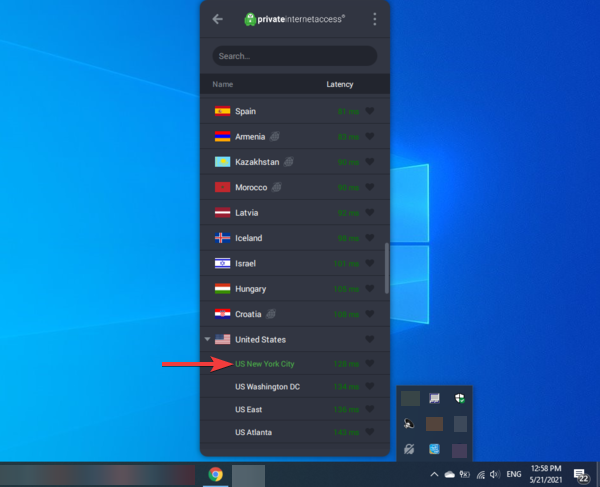
If you’re a Windows 10 user, you can easily launch your Private Internet Access VPN application. You should first click on its icon, then go to the system tray (systray) and click the PIA padlock icon.
After you launched the client, you can see the status of your VPN connection (whether you are connected or not to a server) or you can go to the list of available servers to pick one to which you wish to connect.
Also, by going to the three dots menu icon/kebab menu, you can access the settings section, log out of your PIA account, or quit the currently running session.

After you go to the list of servers, you can just scroll between the many countries available, click on one of them and select your preferred server according to your needs.
With more than 30,000 servers in 100+ locations across 78 countries, you’ll surely have plenty to choose from – and this is one of the main awesome features that makes PIA so special.
Once you select a server, you will be taken back to the main window from where you can quickly connect to the server by clicking on the power button.
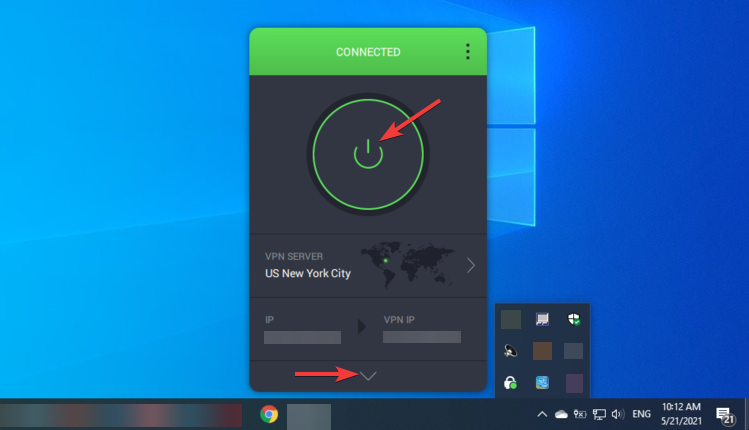
After that – if the connection was successful – you will be shown a Connected top bar with a green background, the name of the current server to which you’re connected as well as your ISP IP address and the new VPN-assigned IP.
Furthermore, by clicking on the arrow at the bottom of the above window, you can find additional information regarding your VPN server connection, and account and can quickly configure some settings.
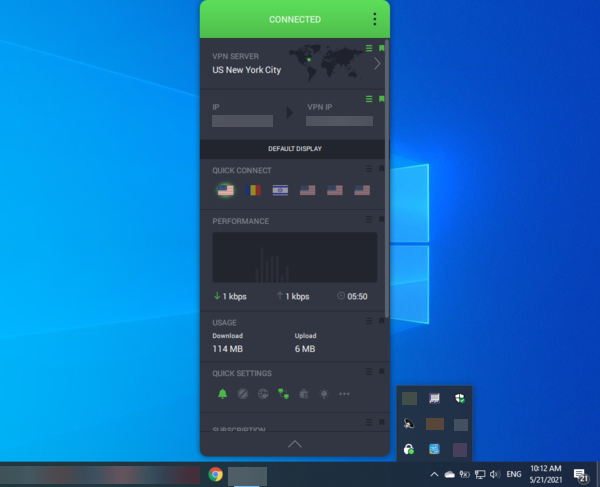
Firstly you are shown again your current VPN Server, IP, and VPN IP and also some suggestions to which you can QUICK CONNECT based on your previous connections.
Then it comes to a Performance section where you can see your download and upload speed, your current connection time as well as your download and upload bandwidth USAGE.
The Quick Settings section lets you enable desktop notifications, MACE (we’ll discuss it a bit later), port forwarding, allow LAN, enable debug logging and also switch your current theme; then, you can click on the three dots menu to view all settings.
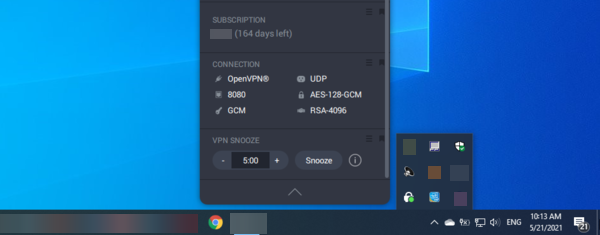
As you scroll down, you can see your Subscription and the number of days left until renewal.
Under Connection, there is some info related to your connection. This includes protocol, connection type, remote port number, data encryption, data authentication, and handshake which is an encryption type that determines the protocol used for security confirmation upon establishing the connection.
The last one is the VPN Snooze option which disconnects the VPN temporarily and reconnects it automatically when the timer elapses.
Settings
The General tab takes you to the General Preferences. There, you can choose to launch the PIA client on system startup, connect on launch, select to show desktop notifications, choose a language, change theme, tray icon style, and dashboard appearance.
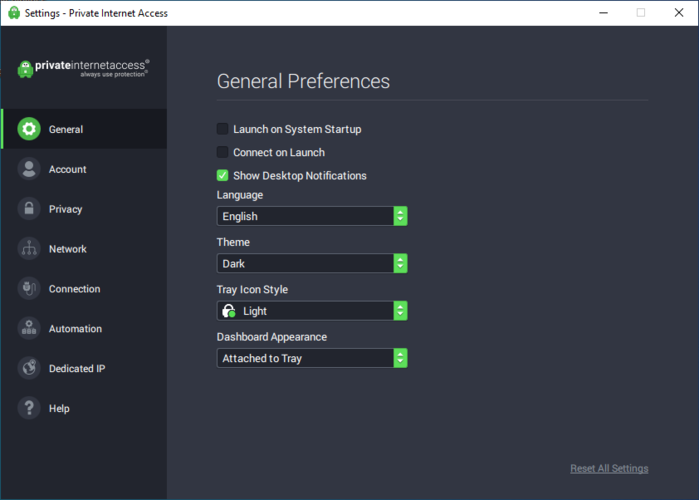
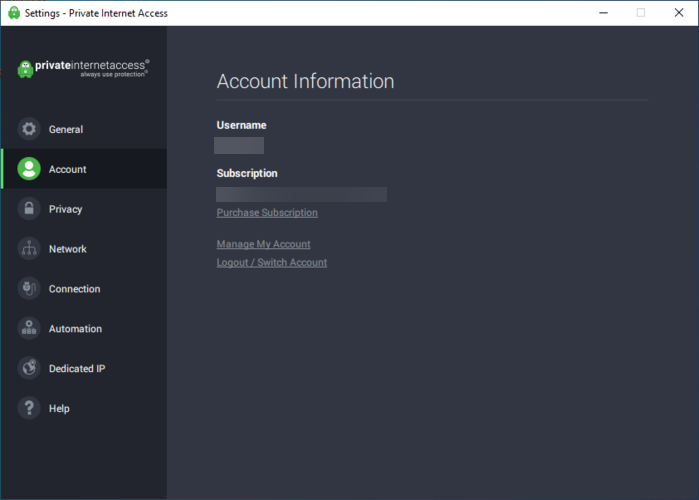
In the Account tab, you can find Account Information details such as your username and subscription info (type and expiration date) as well as options to purchase a subscription, manage your account, log out of or switch your account.
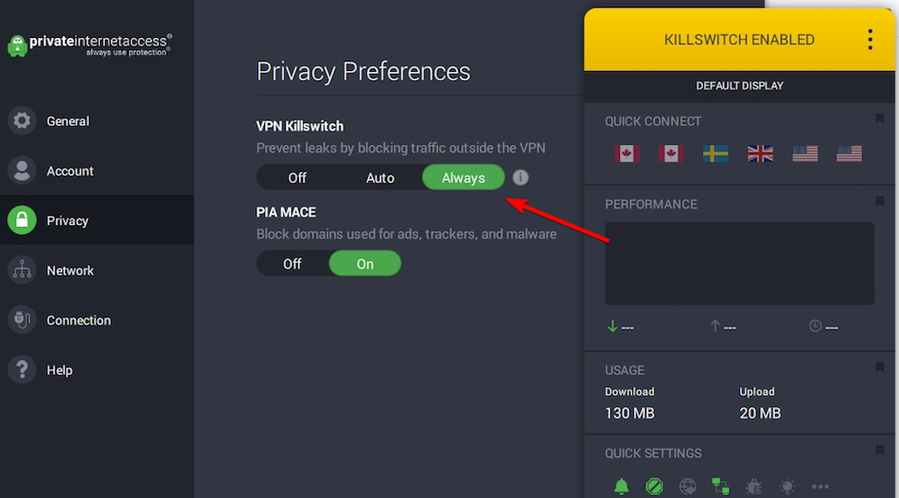
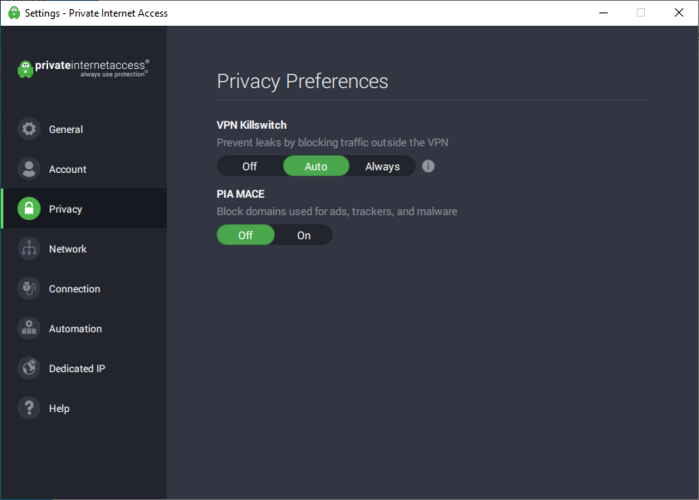
The Privacy tab shows you the Privacy Preferences where you can turn on/off the VPN Killswitch or PIA MACE.
Kill Switch
This is a great preventive feature that automatically disconnects you from the internet until the VPN connection is resumed. Therefore, there is no risk of your IP address being exposed, which will ensure your online privacy, anonymity, and security.
You have three options with the PIA kill switch:
- Off: no traffic will be blocked; this is not recommended, as it will expose your IP and traffic.

- Auto: this blocks outside traffic when the VPN is on.

- Always: also blocks all traffic when the VPN if off.
The MACE system helps protect your privacy and security by blocking domains used for ads, trackers, and malware regardless of what browser you’re using.
To some extent it is similar to an adblocker software/extension, only it’s more effective. So, you can easily turn your PIA MACE on if you have concerns about your online activity being tracked.
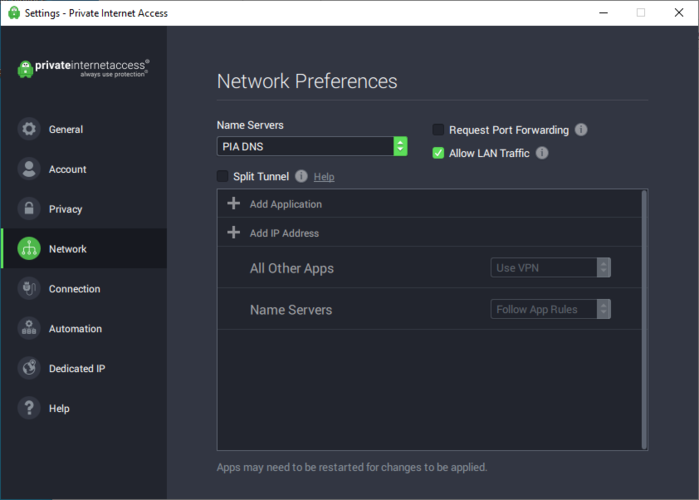
The Network tab allows you to configure certain Network Preferences. For example, you can change your DNS (you can use PIA DNS, built-in resolver, existing DNS, or set a custom DNS) by going to Name Servers and picking an option.
You can also Request Port Forwarding which will forward a port from the VPN IP to your device; the port will be selected for you and not all locations support port forwarding.
What a VPN port forwarding does is it reroutes your traffic so that it bypasses the NAT firewall and thus will keep unwanted traffic and access off your network. It can also help increase very useful connection speed.
Under port forwarding, you have the option Allow Lan Traffic which always allows traffic between devices on your local network, even when you’re using the kill switch.
Lastly, you can activate split tunneling by going to Split Tunnel and checking it off. With split tunneling, you can route some of your traffic through an encrypted VPN tunnel, while the rest is routed through a separate tunnel on the open network.
You can choose what application or IP address will use split tunneling by adding them from the corresponding fields.
Once you’ve chosen an application, you can either select Bypass VPN which will allow the app to always connect directly to the internet or Only VPN which will only allow the app to connect when PIA is open and the VPN is connected.
With the Connections tab, you can change your Connection Preferences depending on your specific needs.
Firstly, you can choose what VPN Protocol to use. PIA currently offers two VPN protocols: OpenVPN which is reliable, stable, and secure, or WireGuard which is newer, more efficient, and has the potential for increased performance.
Depending on what protocol you choose, you’ll have some settings that you can configure. For example, if you choose the OpenVPN protocol, you can select your Connection Type protocol: UDP (User Datagram Protocol) or TCP (Transmission Control Protocol).
Then, if you go to Remote Port, you can pick your port number – you have 4 options to choose from here. You shouldn’t be concerned about Local Port since the application will randomly select the local port used.
If you have connection problems, you can change your Configuration Method; here you can either select DHCP (Dynamic Host Configuration Protocol) or Static. In other words, you can have a dynamic or static IP address.
Under Data Encryption, you can select your encryption type: you can choose either AES-128 (GCM) or AES-256 (GCM). PIA also allows you to connect via a Proxy, so you have two options here – Shadowsocks or SOCKS5 Proxy.
Furthermore, you can check off Use Small Packets. This will modify the MTU (maximum transmission unit) – a measurement in bytes of the maximum data packets that a device connected to the internet can accept. This can cause lower transfer speeds but can resolve packet loss issues.
Last but not least, if you check off Try Alternate Settings, the application will automatically change the connection type and remote port until a connection is established.

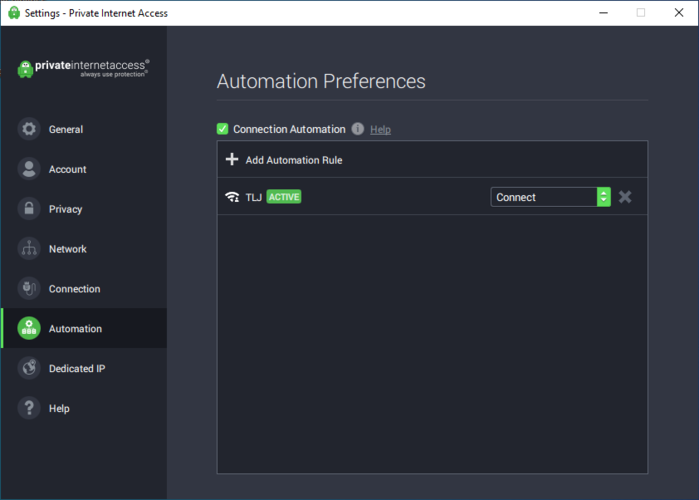
The Automation tab will introduce you to a new PIA feature – Connection Automation. What this does when you select it is that it allows you to create rules to automatically connect or disconnect the VPN when a particular network is detected.
After you select the option, you need to click on Add Automation Rule, select a network, and an action (connect or disconnect). After that, anytime you join the network you set up the rule for, your VPN will connect or disconnect automatically.
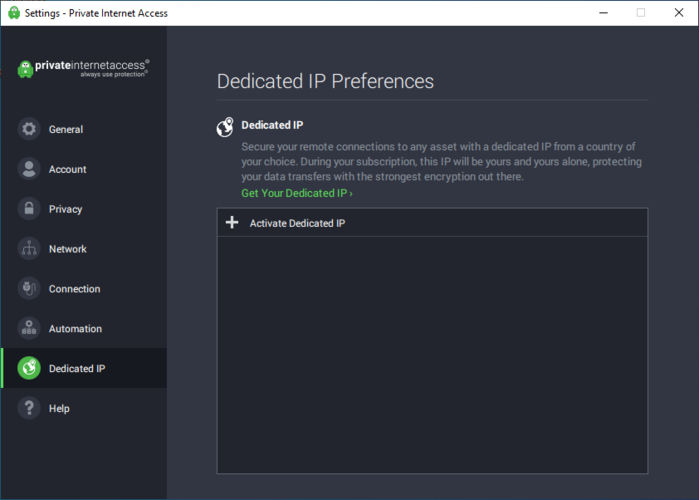
Scrolling down to the Dedicated IP tab will present another great PIA feature – the option to get a dedicated IP. When you connect to a VPN server, you share the same IP address with other users.
However, when you request a dedicated IP, PIA will assign you a static IP address that only you can use and all the data traffic will be sent through it.
Although a dedicated IP can sometimes affect your data privacy, it also comes with great advantages. One of them being the fact that you’ll be less likely to be blacklisted.
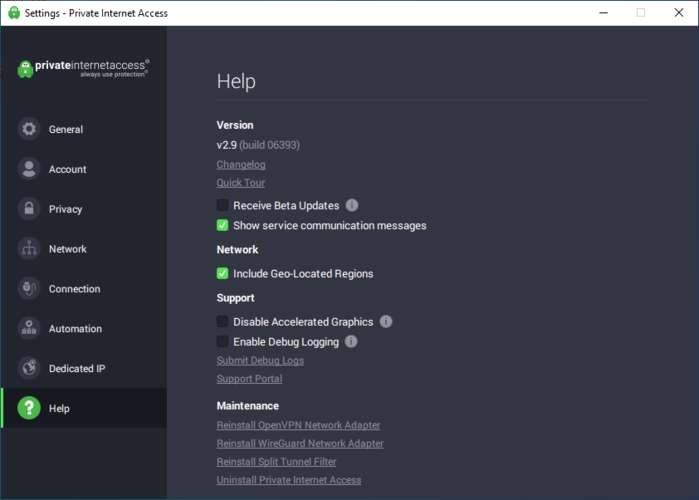
The last settings tab is the Help tab. There, you can find info regarding your current PIA version, see the changelog, take a quick tour, receive beta updates and select to show service communication messages.
Also, you can select to include the geo-located regions, disable the accelerated graphics, enable debug logging. Then you may reinstall the OpenVPN and WireGuard network adapters, the split tunnel filter, or uninstall the PIA client.
Features
When it comes to the features offered, Private Internet Access is certainly a great option for those who want to circumvent geoblocking while also maintaining their online privacy, anonymity, and security.
As you’ve already seen above when we went through the PIA GUI (Graphical User Interface), there are plenty of great features provided that make the service deserve its spot as one of the best VPNs on the market.
With PIA, you can choose from over 32,000 servers in more than 70 countries around the world. And you get up to 10 simultaneous connections.
One of its most amazing features is the interface. As you can see in all the pictures below, this VPN offers an extremely well-organized interface. So, if you’re a beginner do not worry about not being able to handle it.
However, in case you encounter any related issue, do not forget that manufacturers offer 24/7 live chat customer support. So, the specialized team will always be glad to help you.
Plus, it allows you to create up to 10 simultaneous connections, so it is a great option to share it with your family, friends, or colleagues.
Take a look at some other great features of Private Internet Access:
- Kill switch and PIA MACE anti-tracker.
- Port forwarding and split tunneling.
- OpenVPN and WireGuard VPN protocols.
- Shadowsocks and SOCKS5 proxy included.
- Connection automation and dedicated IPs.
- P2P support and multiple VPN gateways.
- Email breach monitoring.
- Secure VPN account and encrypted WiFi.
- Premium VPN bandwidth and unmetered VPN transfer.
Speed
When testing and comparing VPN products, speed is a very important factor that should be taken into consideration. The quality of your entire online activity from simple surfing, streaming, gaming to torrenting depends on it.
Our experiments showed that PIA manages great super-fast connection speeds, with no traffic or request logs.
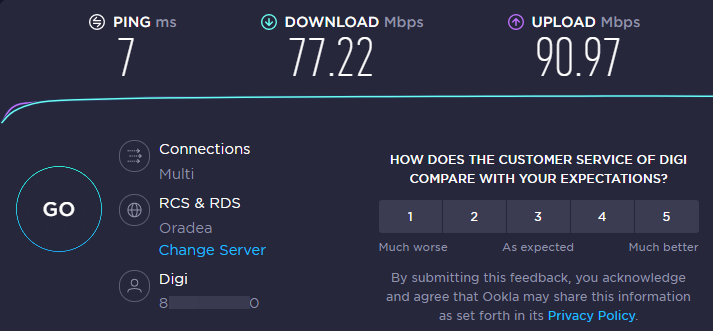
- Before PIA
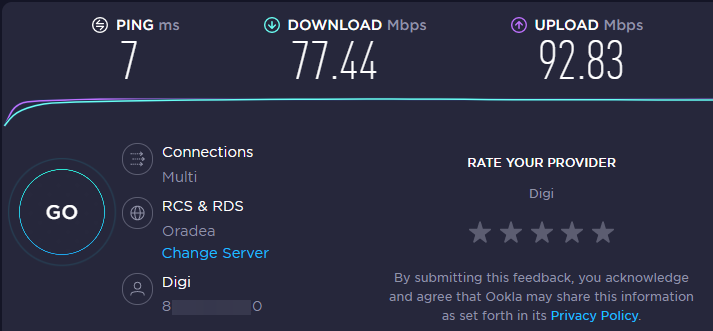
Before running the Speed Test by Ookla, we’ve already been connected to a server location in Oradea, Romania, which was provided by the ISP.
- With PIA
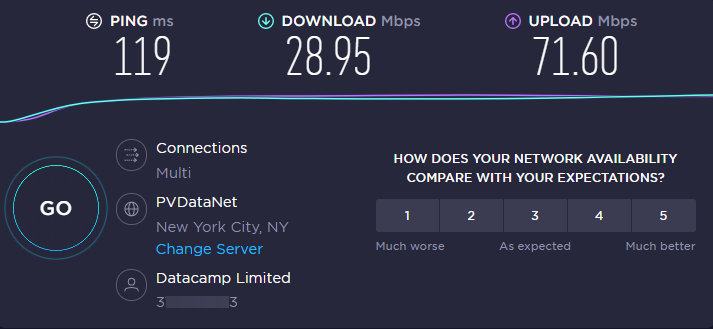
Here – as you can see – we connected to a PIA server from New York City, NY, USA.
AirVPN
Interface: not as user-friendly as PIA’s, but decent
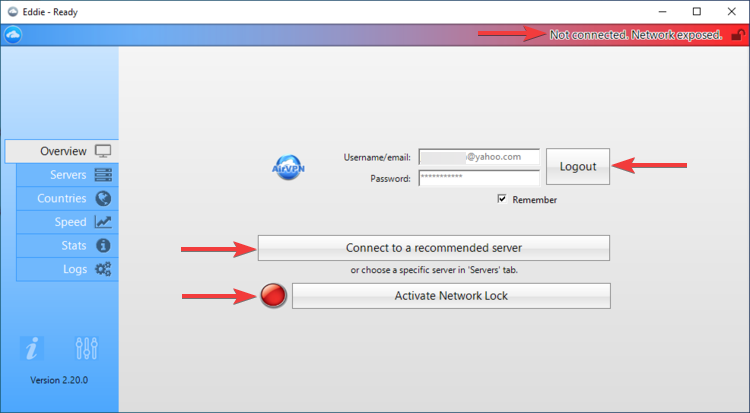
AirVPN uses the Eddie GUI (Graphical User Interface) client. Eddie was developed by AirVPN and is its official VPN client. It has an easy-to-use interface and can be used with any VPN service that supports the OpenVPN protocol.
Main menu
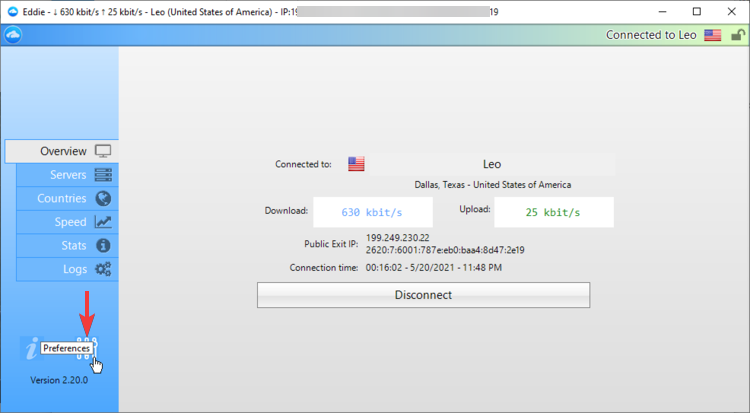
After you launch Eddie, you will be shown the Overview tab where you can see the status of your connection (connected or not connected), log in or log out, connect to a recommended server or activate network lock (we’ll explain what that is later).
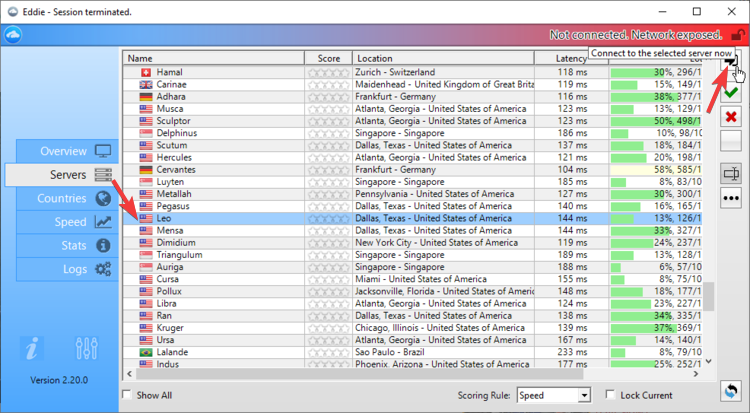
If you want to connect to an AirVPN server, just go to the Servers tab, scroll through the list of many available servers, select one and click on Connect to the selected server now.
In case your connection was successful, you can go back to the Overview tab to see the connection status as well as other related info.
You will see the country flag and the name of the server to which you’re connected, your download and upload speed, the VPN IP, connection time, and the option to disconnect.

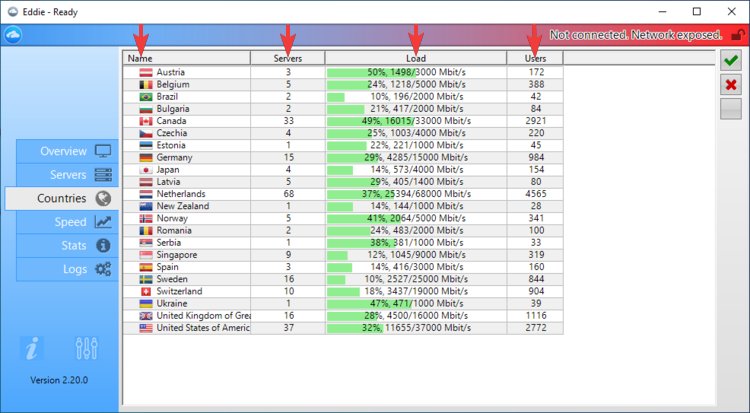
The Countries tab shows you the current list of available countries offered by AirVPN, the number of servers for each country, the percentage of the server load as well as the number of users connected at the moment.
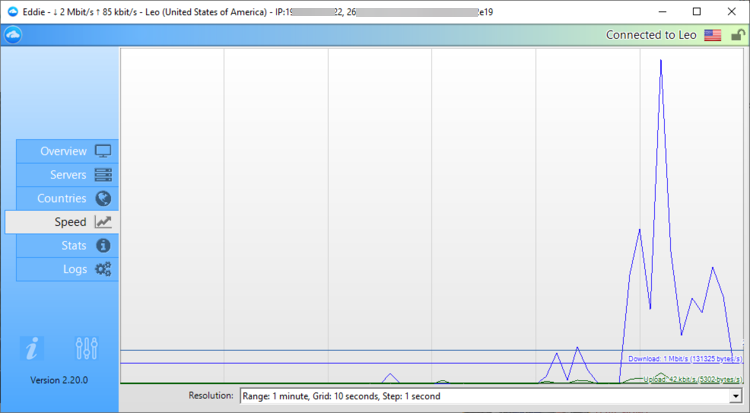
As you may have expected, the Speed tab will show you the download and upload speed values as well as a graph showing the variations.
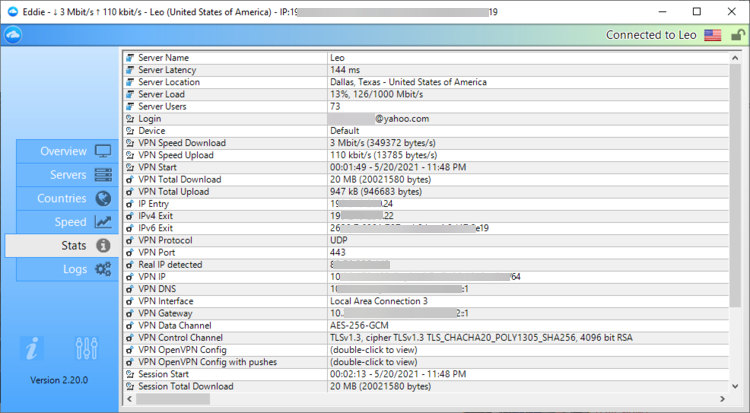
The Stats tab – as its name suggests – will provide you statistics regarding your current VPN connection (e.g. server name, latency, location, load, users, speeds, protocol, port, IP, DNS, etc.).
The Logs tab contains debug logs information organized by date and time. These logs are for troubleshooting purposes in case your VPN has issues or crashes. Developers can use the logs to determine what went wrong and when.

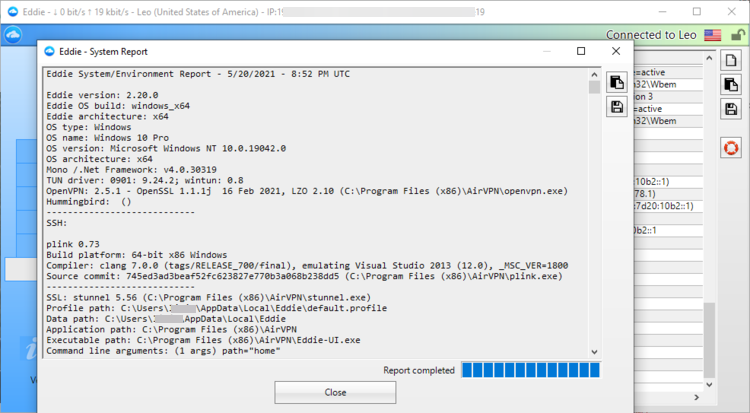
Below the tabs described above, you have the About icon which will open a window showing you general info regarding Eddie OpenVPN UI, such as version number, the AirVPN website, the links to the Eddie website, manual, sources as well as details about the license and libraries and tools.
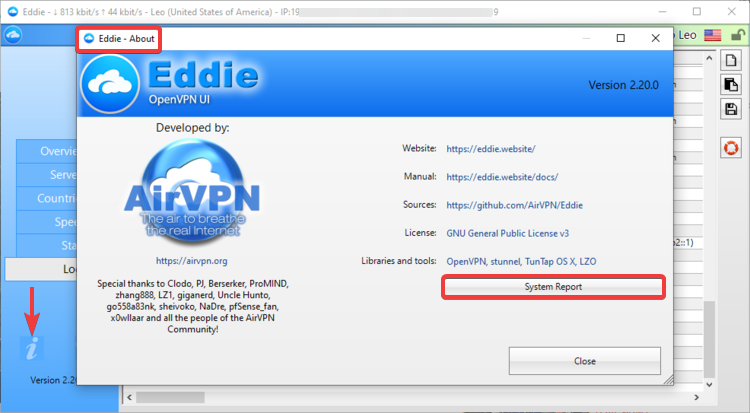
By clicking on System Report, you will see additional information related to the Eddie system/environment (e.g. version, operating system info, application paths, etc.).
Settings
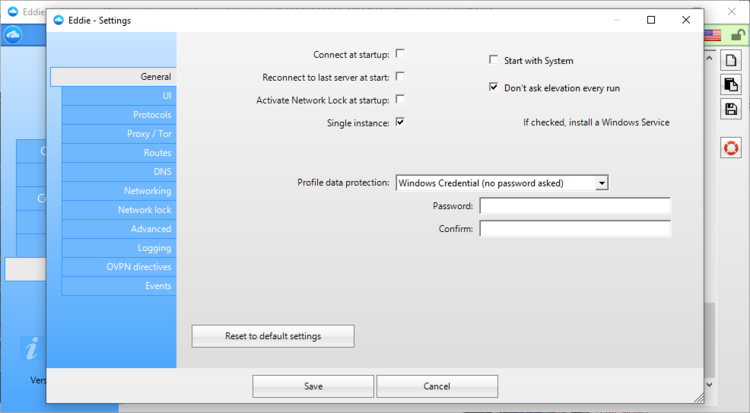
To go to the settings section, you need to click on the Preferences icon first from the Eddie main window.
In the General tab, you may check off some options such as connecting at startup, starting the client with the system, activating the network lock at startup, creating a password for data protection, or resetting the settings to default values.
The Protocols tab shows you information regarding multiple IP protocols (UDB, TCP, SSH, SSL). You can see the protocol name, port number, number of IPs, and a short description.
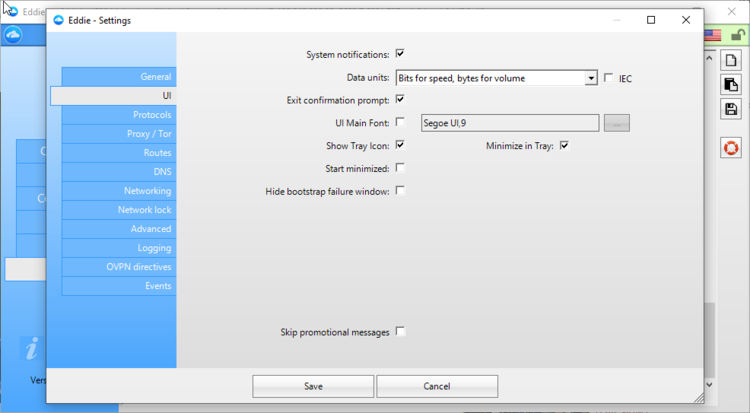
In the UI (User Interface) tab you can enable certain features such as system notifications, exit confirmation prompt, UI main prompt, show tray icon, and minimize in the tray; you can also select the data units, skip promotional messages, etc.
If you check the Automatic option, you won’t be able to change protocols. However, if you uncheck it, you can click on a certain protocol, then on Save and your protocol will switch to the chosen one.

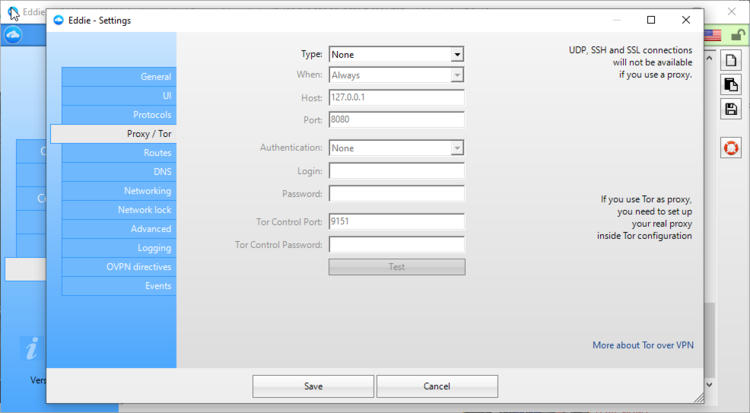
By going to the Proxy/Tor tab, you can choose to set up a proxy. You have three options to pick from. They invlude HTTP, socks, or Tor and can also select when to use them: always, only for web requests, only for OpenVPN, or never.
When you use the Tor connection mode, the VPN server will see the Tor IP address instead of yours. This connection mode only works with the AirVPN client. Also, if you use Tor as a proxy, you have to set up your real proxy inside the Tor configuration.
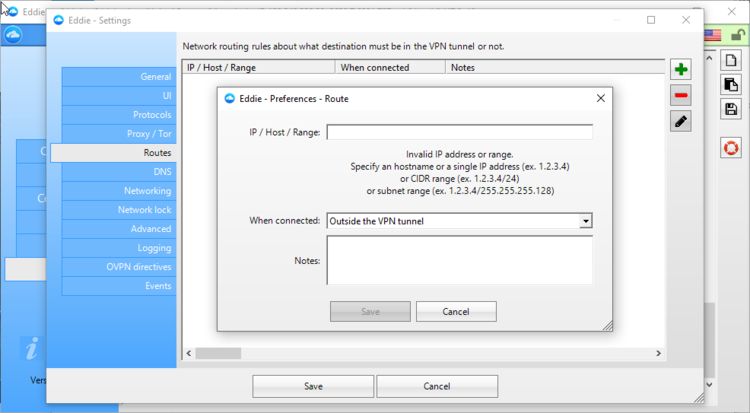
Have you asked yourself whether AirVPN provides split tunneling? Well, the Routes tab does just that. It allows you to set an individual IP, a hostname, or a range of IP addresses that can be routed inside or outside the VPN tunnel.
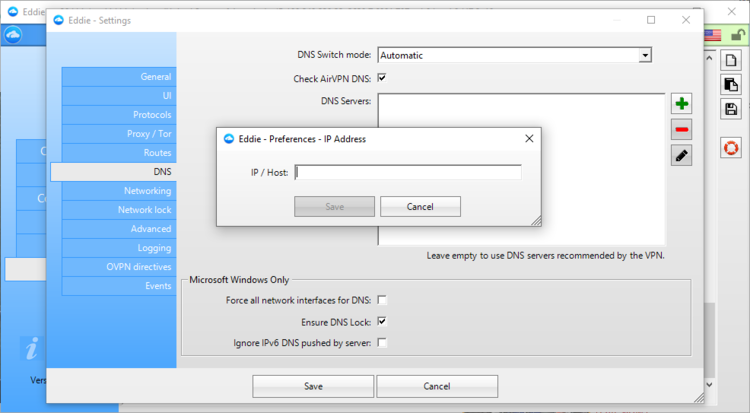
The DNS tab allows you to change your DNS settings although it’s not recommended. Each VPN server runs its DNS server – the same is true for AirVPN.
As such, we recommend that you use its DNS servers to avoid censorship through the VPN’s anti-geo-location features. However, you can change the DNS address if you want by clicking the + icon and adding it there.
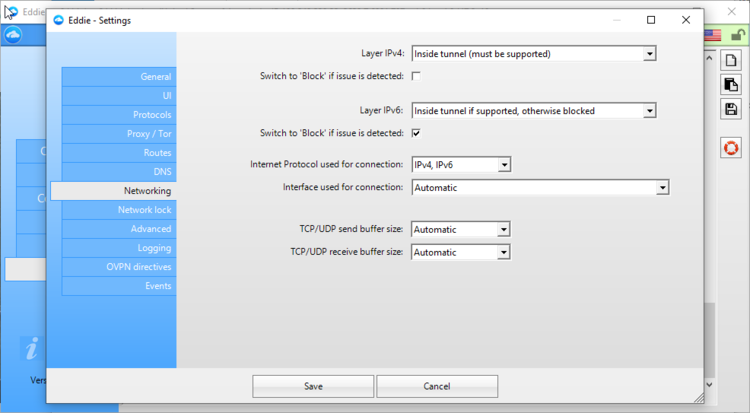
In the Networking tab, you can modify the settings for the following protocols: IPv4, IPv6, and TCP/UDP. Leave them to automatic values unless you know very well what you’re doing.

What about the kill switch, though? It doesn’t appear anywhere. Don’t worry, it’s here. The Network lock tab is all about the AirVPN kill switch feature. The only difference – unlike other VPNs – is that AirVPN calls it network lock.
When the network lock feature is enabled, your real IP or DNS won’t be revealed if your VPN connection drops unexpectedly since the network lock will immediately disable all traffic that is not routed via the VPN tunnel.
Therefore, you can select to block or allow all incoming or outgoing traffic while your VPN is off. Or you can also add only certain IPs exceptions for which you will allow it.
Features
AirVPN is a VPN service worth looking into as well, as it provides a great host of useful features while also maintaining privacy, security, and anti-censorship focus.
The service runs exclusively on OpenVPN, uses strong encryption, and provides good speed which can be of great help if you’re into streaming and torrenting.
AirVPN hosts over 240 servers in 25 countries, so considering this aspect we can strongly agree that it is best to choose Private Internet Access instead because it is much more versatile.
Plus, AirVPN offers only 5 maximum simultaneous connections. In this matter, for those of you who are running a business or who just want to share the experience with all their closes ones, Private Internet Access remains the better alternative.
Even if the interface seems to be not as user-friendly as PIA’s, you can always contact the 24/7 live chat support from the AirVPN team.
Do not forget that manufacturers let you raise a ticket via your account. Whis will allow you to start a 3-day free trial and test AirVPN’s capabilities.
You should also be aware of some other AirVPN features like:
- No monitoring or logging.
- Network lock (kill switch).
- Routes (split tunneling).
- Port forwarding and DDNS (Dynamic DNS).
- OpenVPN is the only available VPN protocol.
- P2P support and Tor integration.
- No traffic and time limit.
- No maximum speed limit.
- Unlimited and free server switches.
- No personal information required.
- 30-day money-back guarantee.
Speed
When it comes to running a speed test, all three factors (ping, download speed, upload speed) are important since they influence your online experience to a great extent.
- Before AirVPN
As with PIA, the connection before the speed test was made from the same location in Romania.
- With AirVPN
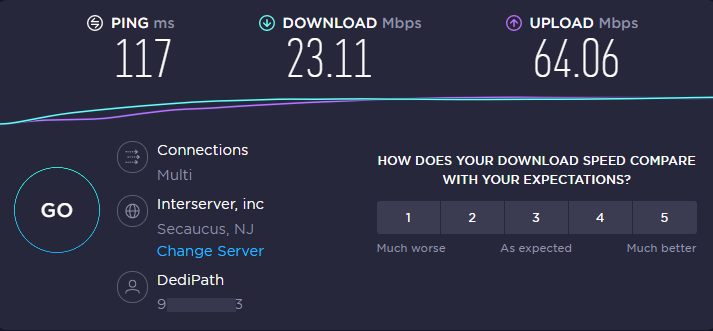
Although the server appears to be in Secaucus, NJ, USA, we connected to an AirVPN server from New York City – as we also did when we tested PIA’s speed – to provide a comparison as close to reality as possible.
How can I get and use PIA?
- Navigate to the Private Internet Access download page.
- There, click on the Try PIA VPN Now.

- Choose the plan that suits you the most.
- Select the method of payment (Credit Card, PayPal or Cryptocurrencies).
- Enter the required details.
- After downloading the app, open the related folder and start the installation process as shown on the on-screen instructions.
How can I get and use AirVPN?
- Go to the AirVPN download page.
- Click on the Get AirVPN button.
- If you’re not already, make sure you Sign In.
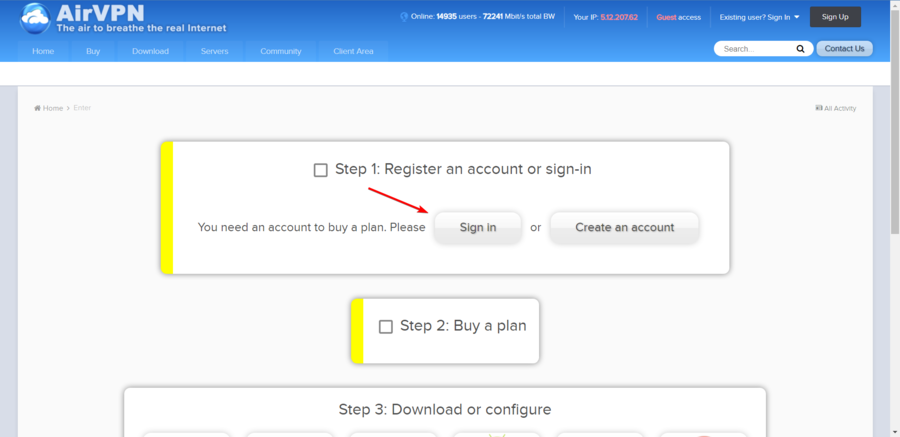
- In case you don’t have a profile, choose to Create an account.
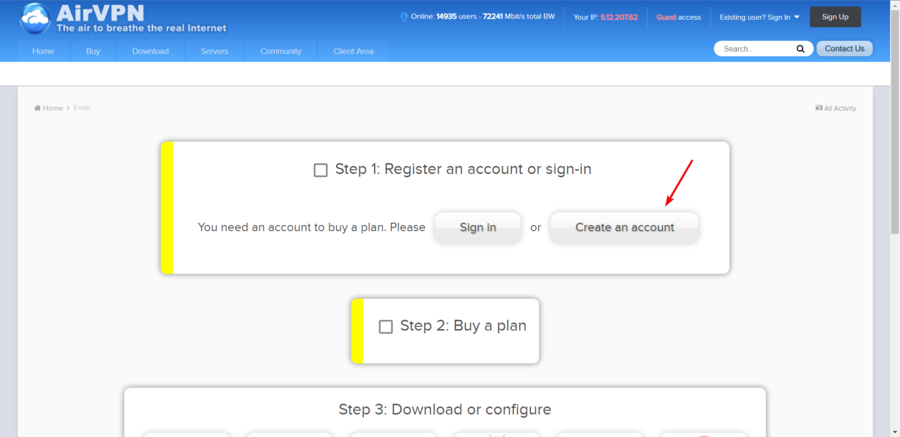
- Then, you should choose the most reliable plan you need.
- After that, download the version that’s compatible with your OS.
- Follow the on-screen instructions to complete the installation process.
What is good to know about PIA and AirVPN?
As you’ve already noticed, both VPN services are very good at doing their job. They circumvent geo-restrictions, protect your online privacy and ensure a secure surfing experience.
Now that you know more about the two, we want to help you decide which VPN to choose. Check out the table below where you can make a feature-to-feature comparison.
We hope that this will allow you to make a wise decision depending on your specific needs:
So, based on the specific feature comparison from above, we have a winner, and that’s Private Internet Access (PIA).
At the same time, you may take into account other factors based on your specific needs/options before deciding what VPN you want to go with.
Nonetheless, although AirVPN is a good VPN service that can indeed do its job well, it is clear and also based on objectivity – since we tested both products – that PIA outdoes it in a few very important aspects (e.g. servers, speed).
We hope that this performance comparison guide between PIA vs AirVPN helped you. In case you face any additional questions, make sure you leave a comment in the section below.
Read our disclosure page to find out how can you help VPNCentral sustain the editorial team Read more

Improve this guide


User forum
0 messages