How To Fix Error VPN 868: A Simple Step-by-Step Guide
Easily fix VPN error 868 by using one of these 7 solutions
If you see VPN error 868 and don’t know how to fix it, you’ve come to the right place. The same happened to me, so I decided to find out why this error appeared and how to fix it.
Below, you’ll find several ways to tackle the error, and all you have to do is follow step-by-step guides.
Before we jump to the “how” part, let me briefly explain what VPN error 868 is.
What Is VPN Error 868?
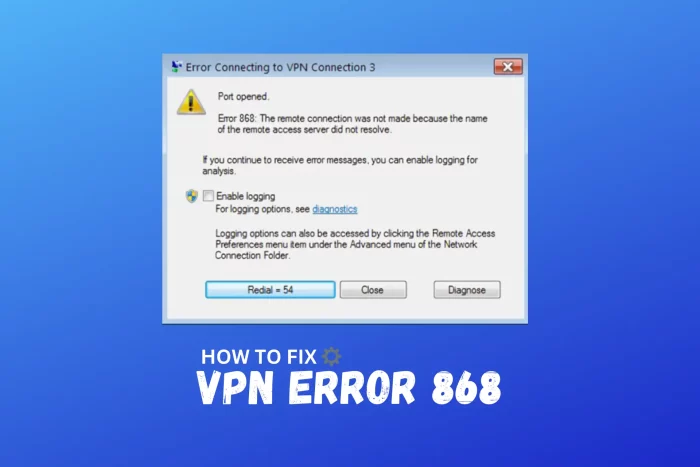
VPN error 868 happens in Windows 10 when you try to connect to a virtual private network. The reasons you can’t make a connection range from incorrect VPN network configuration and outdated drivers to antivirus and firewall restrictions.
You get the following message: The remote connection was not made because the name of the remote access server did not resolve.
And while all that might sound complicated, it’s not. Simply follow the steps in this guide, and you’ll get rid of VPN error 868 in no time.
How To Fix VPN Error 868?
✅ Preliminary checks
The first step is to try some simple, yet likely to be effective fixes that might solve the problem. If not, you can dive into more detailed troubleshooting.
Here are a few things you should try first:
- Restarting your computer
- Logging in and out of your VPN
- Restarting your router
- Updating your router’s firmware
If that doesn’t solve the problem, you can fix VPN error 868 by trying one of the following solutions:
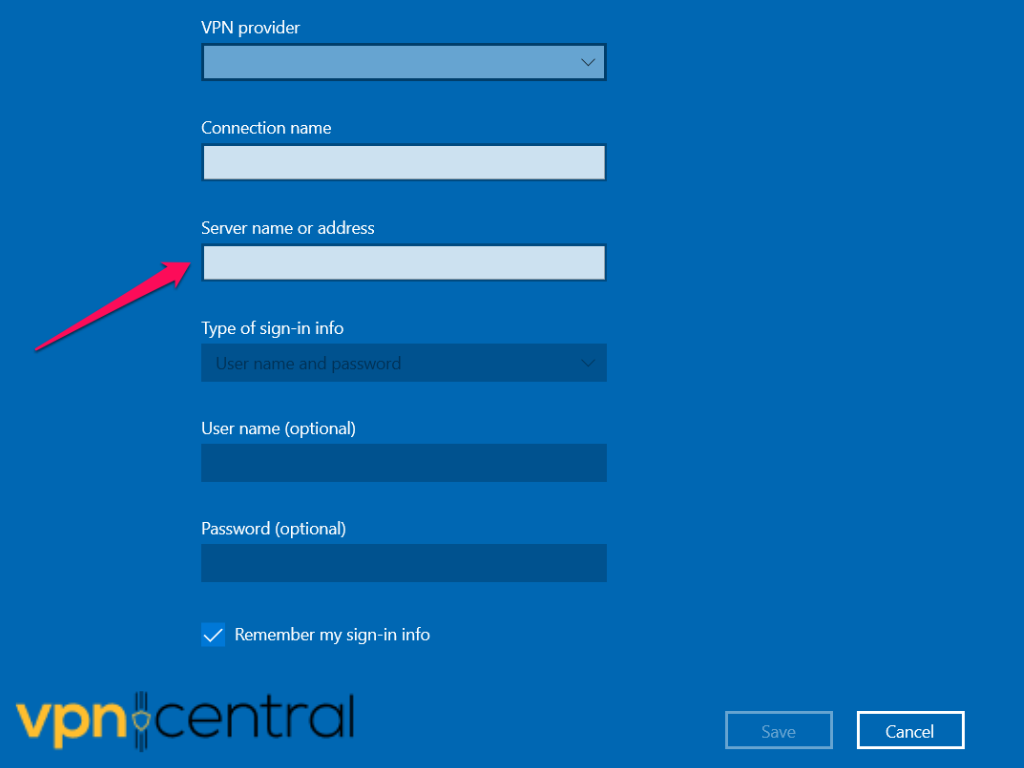
1. Check Your VPN Connection Settings
The reason you see error 868 can be caused by an incorrect remote server name or address. While setting up your VPN connection, you might have typed this value incorrectly or it has changed in the meantime.
To access VPN connection settings:
- Right-click the Windows start button and select Network Connections
- In the window that opens, select VPN from the left-side menu
- Locate your VPN, click on it, and then select Advanced Options→ Edit
Here, you’ll see the Server name or address field.
➡️Make sure that the name or address is correct.
If everything looks good, and you still get VPN error 868, move on to the next solution.
2. Add Your VPN to the Windows Firewall
VPNs are often blocked on Windows-operated machines by default.
To check if that’s the case with your system, follow these steps to add your VPN as an exception to the firewall:
- In the Taskbar search bar, type in Control Panel and open the app
- Select System and Security, then Windows Defender Firewall
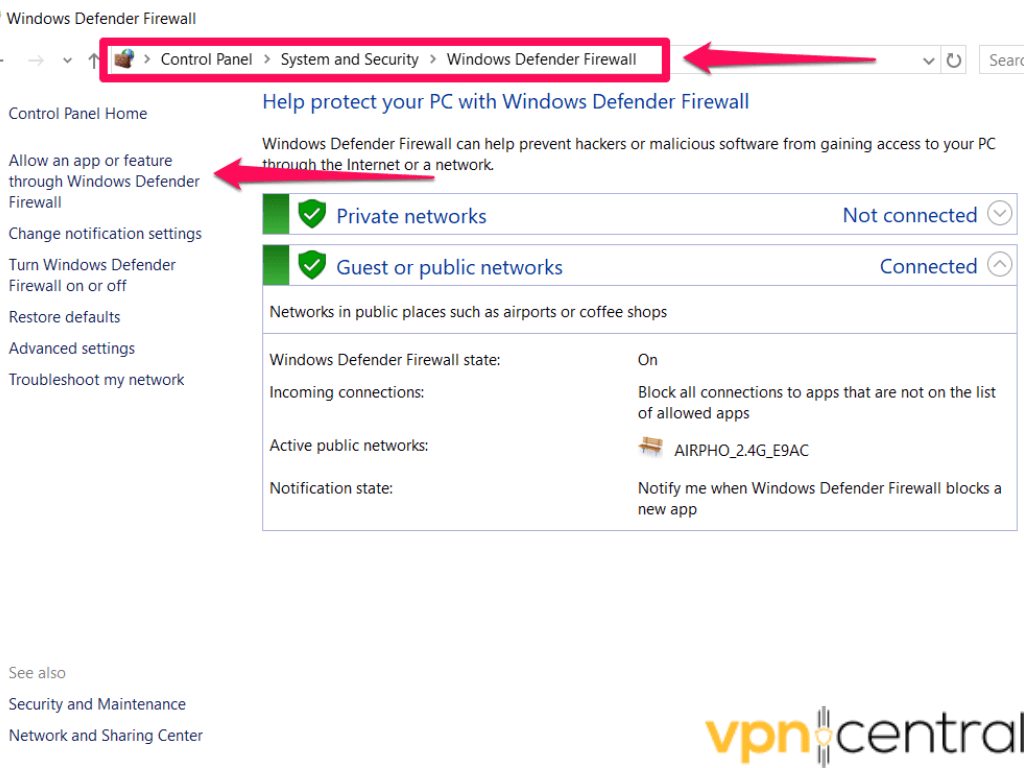
- From the left side, select Allow an App or feature through Windows Defender Firewall
This will open a new window where you’ll see all apps that aren’t blocked by the firewall.
If your VPN app isn’t on that list, do the following:
- Click Allow another app
- In the window that opens, click Browse and find your VPN app
- Confirm your choice by clicking Add
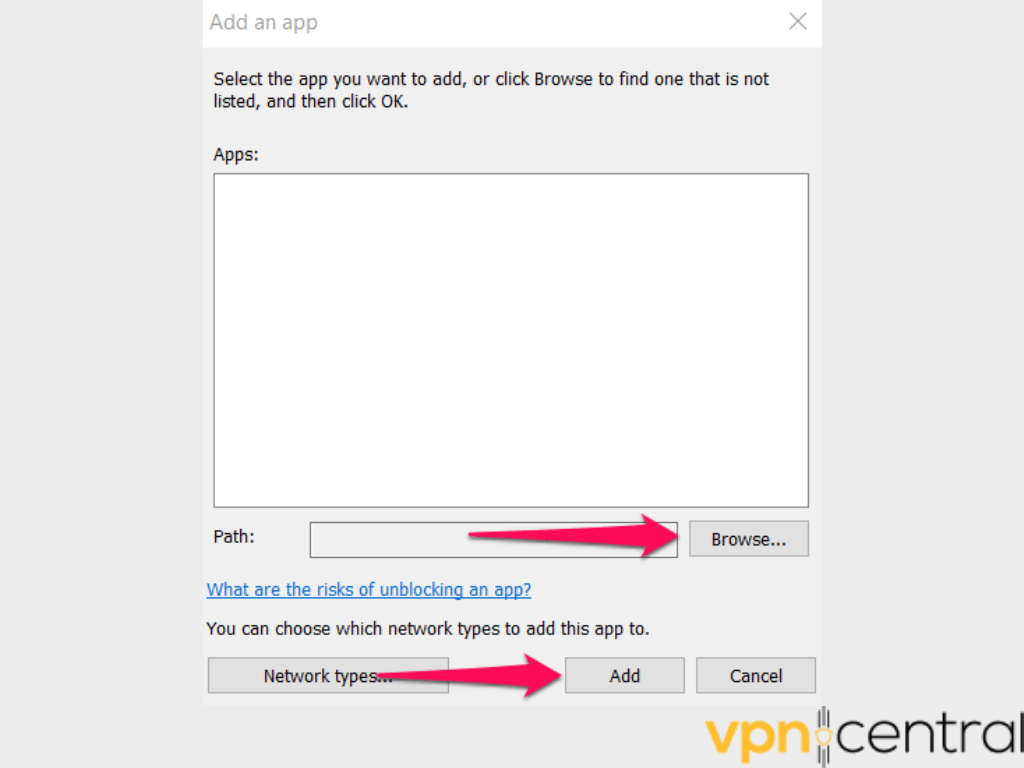
Finally, click OK and save your changes.
Alternatively, if you use third-party security software, you should whitelist your VPN in its settings.
3. Whitelist a VPN in Your Antivirus Settings
If you use another antivirus solution, you should find a section where you can block, and in this case, allow apps.
Add your VPN app, and try the next fix if the connection problem persists.
Try connecting again and if you get the same error message, it’s time to move on to the next possible solution.
4. Open a Port in the Windows Firewall
The first few steps for adding a port in the firewall are the same as the ones for adding a VPN app.
- Go to the Control Panel, then click Network and Security, and then Windows Defender Firewall.
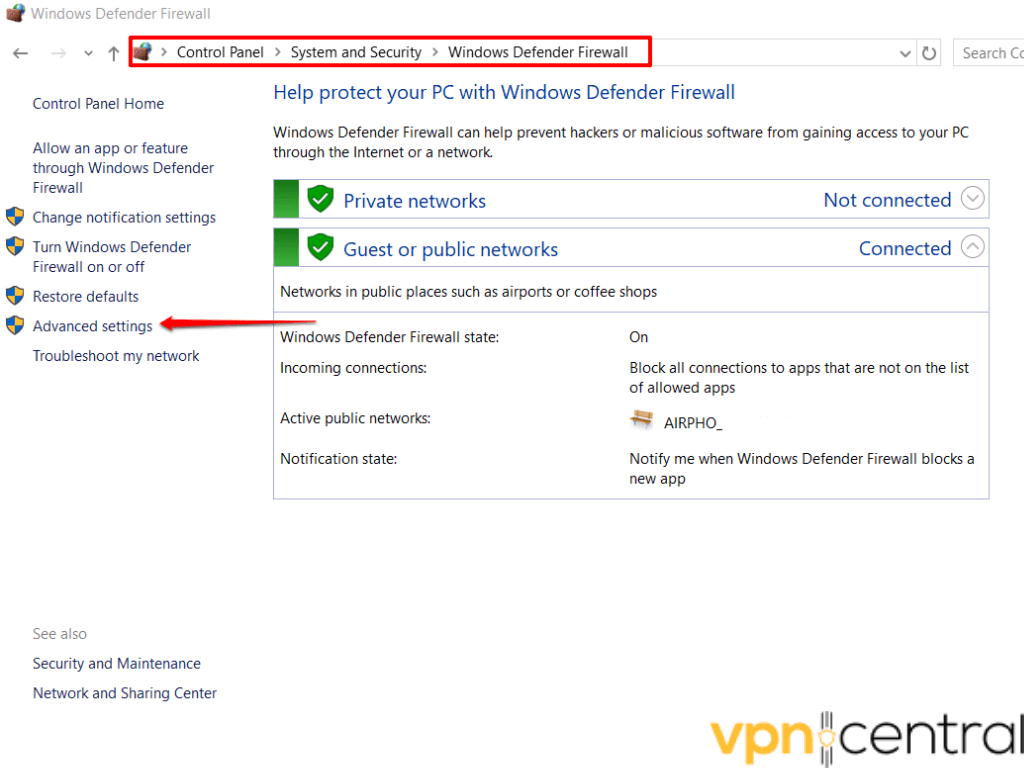
- After that, select Advanced Settings, which will open a new window.

- Click Inbound Rules on the left side of the screen, then New Rule on the right side
- In the window that opens, select Port, then Next
- Choose UDP or TCP and whether the rule applies to all local ports or specific ones, e.g., 51820 over UDP for the WireGuard protocol.
- On the next screen, select Allow the connection.
- In the Profile tab, select Domain, Private, and Public.
- Add a name for the new rule, and click Finish.
- Once done, click Outbound Rule, and create a new rule following the same steps.
This should solve VPN error 868.
Still having issues? Try the next solution.
5. Flush DNS and Reset Winsock
Another reason you’re seeing VPN error 868 is that your operating system is using data from its cache instead of retrieving it from your domain name server.
If that’s the case, you need to flush your DNS. Right after that, you should restart the communication between the network and your device, which you’ll do by resetting Winsock.
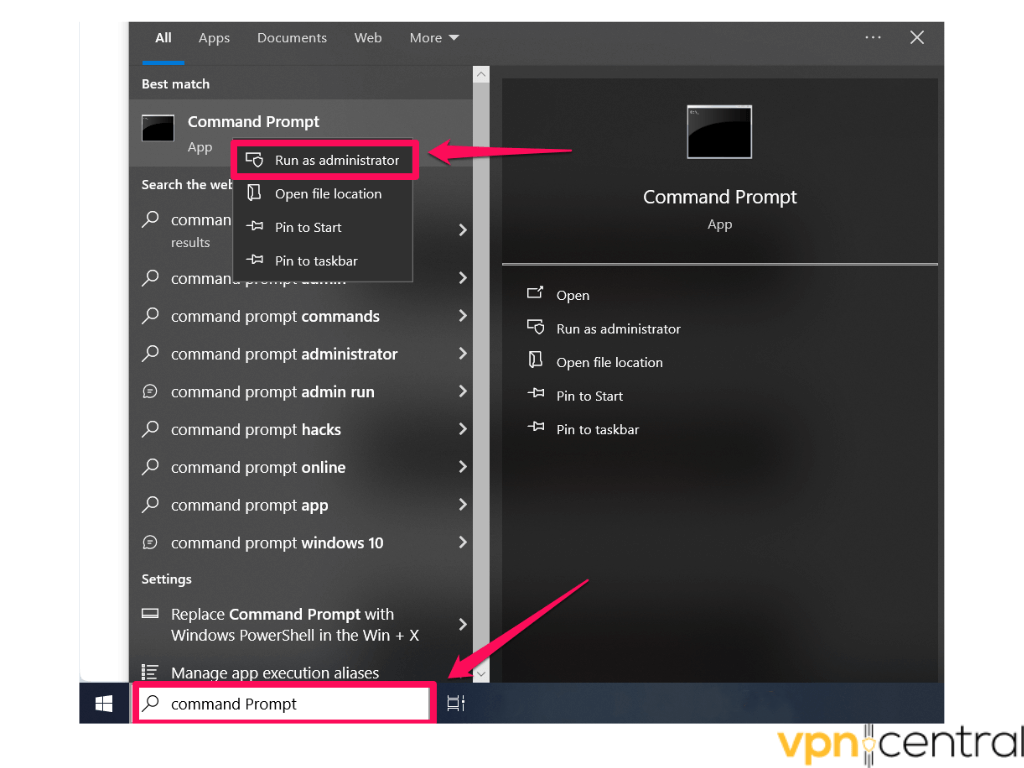
This fix is simple and happens inside the command prompt app.
So, open the app by typing in Command Prompt in the Taskbar search bar, and right-click on it to run it as an administrator.
Once in it, type the following commands one by one and press enter after each line.
- ipconfig /flushdns
- ipconfig /registerdns
- ipconfig /release
- ipconfig /renew
- netsh winsock reset
- exit
You need to restart your computer after exiting the command prompt for the changes to take effect.
At this point, try connecting again and check if you still get VPN error 868.
If the error is still there, proceed to the solution 6.
6. Change DNS Settings
A possible culprit behind VPN error 868 is incorrect DNS configuration. But the good news is that you can easily fix that by following the steps below:
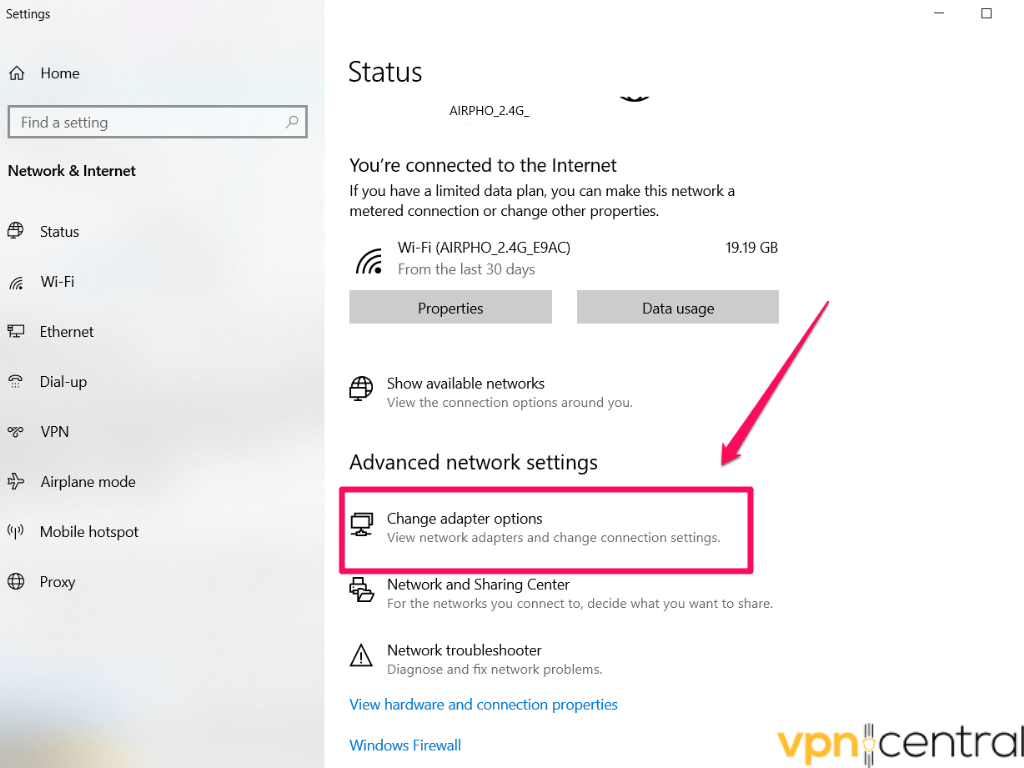
- Right-click the Start button, and select Network Connections from the list
- In the window that opens, choose Change adapter option
- Find your network, right-click on it, and select Properties
- From the list of items used by the network, select Internet Protocol Version 4, then Properties
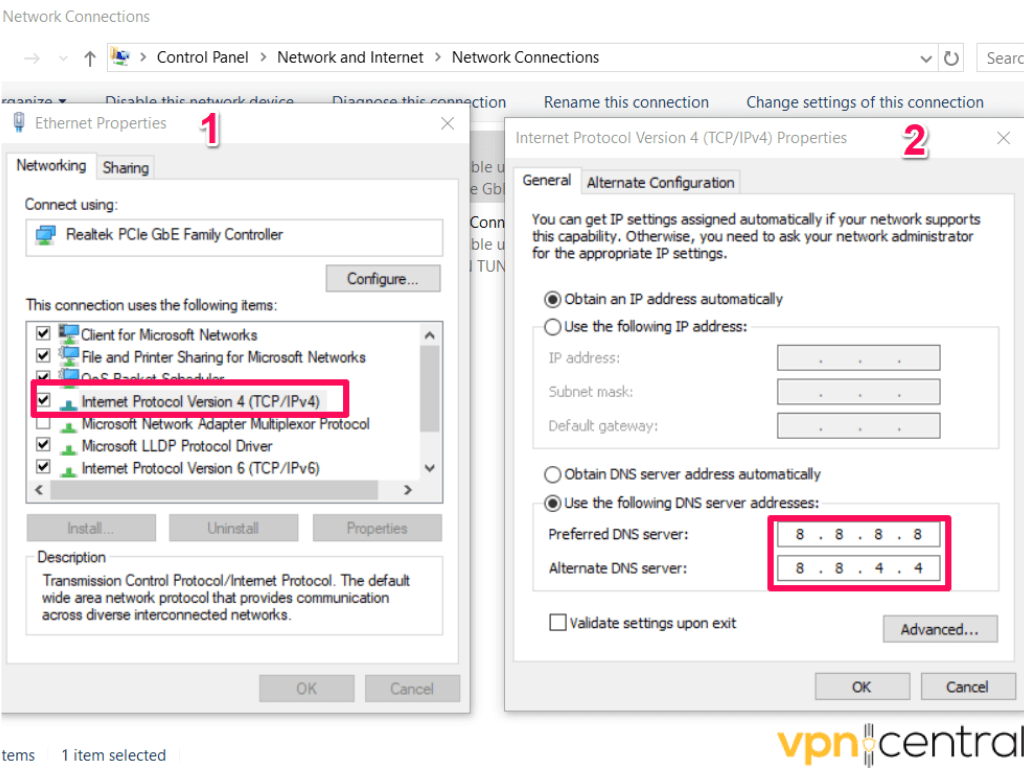
- On the following screen, select the option Use the following DNS server addresses
- In the Preferred DNS server field type in 8.8.8.8, and, in the Alternate DSN server field type in 8.8.4.4.
- Click OK to save the changes.
The DNS values provided above are Google’s free public DNS servers, but you can use others.
The list below contains preferred and alternate DNS servers for other reputable DNS server providers. Use any you like:
- Cloudflare: 1.1.1.1 and 1.0.0.1
- OpenDNS: 208.67.222.222 and 208.67.220.220
- Quad9: 9.9.9.9 and 149.112.112.112
- CleanBrowsing: 185.228.168.9 and 185.228.169.9.
Try connecting to the VPN now to see if you’ve solved the connectivity problem.
If not, proceed to the next solution.
7. Reset TAP Drivers
One of the final solutions is to reset TAP drivers.
To do that, follow these steps:
- Open Device Manager by right-clicking the Start button
- Collapse the Network Drivers menu by clicking the arrow next to it
- Find a TAP driver installed on your PC, right-click on it, and select Uninstall device.
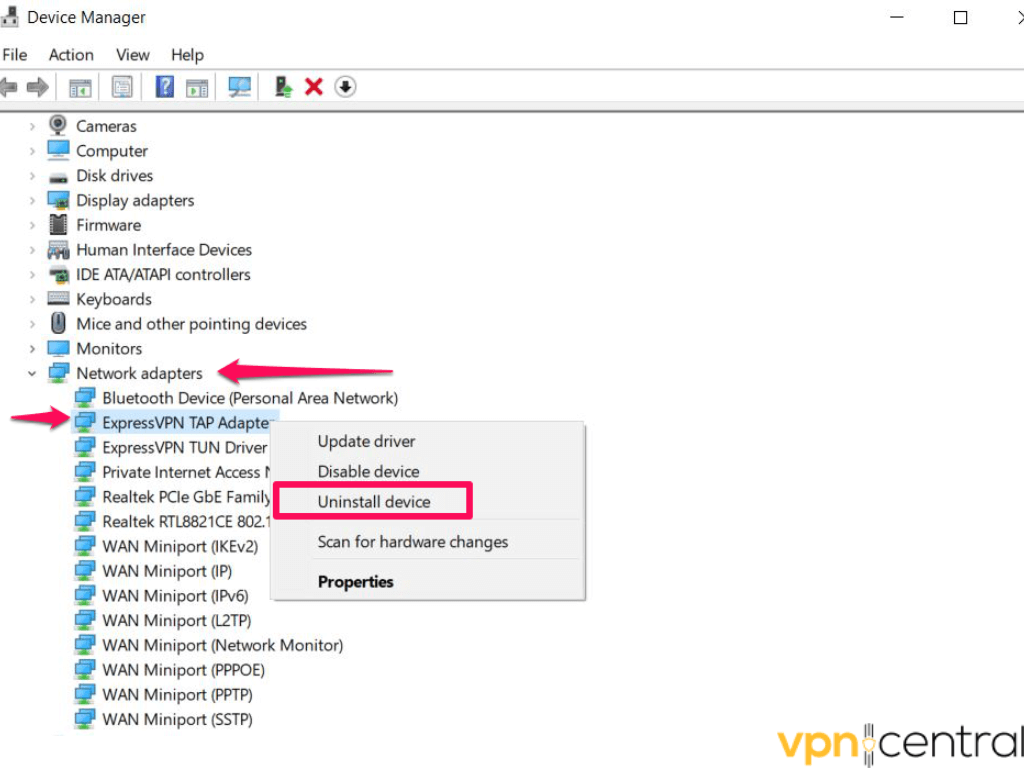
- After that, click the Action tab, and select the Scan for Hardware Changes option.
Related reads:
Summary
As you can see, there are quite a few ways to fix VPN error 868.
You can check if your VPN connection server details are correct, and see if your VPN is blocked by Windows firewall or antivirus software.
Additionally, you can change and flush your DNS settings, and reset TAP drivers and Winsock.
It doesn’t matter which of these fixes your problem as long as you fix VPN error 868.
Let me know in the comments below which of these helped fix the error.
Running into a different code? Here’s how to fix VPN error 720 on Windows.
Read our disclosure page to find out how can you help VPNCentral sustain the editorial team Read more

Improve this guide

User forum
0 messages