Solve Xbox High Packet Loss [5+ Solutions]
High packet loss interrupting gaming sessions on the Xbox? Let’s fix it.

Are you experiencing high packet loss on Xbox? I’m here to help.
The problem is well-known to cause an awful experience during gameplay. This includes frame drops, screen flickering, lagging, crashing, etc.

Access content across the globe at the highest speed rate.
70% of our readers choose Private Internet Access
70% of our readers choose ExpressVPN
Browse the web from multiple devices with industry-standard security protocols.

Faster dedicated servers for specific actions (currently at summer discounts)
I know how frustrating this can be for your gaming sessions. But why does it happen and how can you fix it?
Continue reading to find out.
What is high packet loss on Xbox?
High packet loss refers to the failure of packets to reach Xbox’s servers. These packets usually contain small chunks of data sent over the network by your Xbox.
The problem can arise due to poor connectivity, misconfigurations, network congestion, server-side problems, etc. As such, you stand to face earlier-mentioned issues like lagging, stuttering, and disconnections.
This problem is common among Xbox Series X/S and Xbox One. Some users of the earlier generation Xbox 360 also report encountering this issue.
You can double-check packet loss as follows:
- Locate and press the Xbox button on your controller.
- Locate Settings under Profile & System.
- Choose Network Settings.
- Perform a test using the Test Network Speed & Statistics option.
- Wait for your Xbox to run the tests and give you the results.
A packet loss of up to 5% shouldn’t be a problem. However, anything above 10% should be a reason to worry.
So, how can you fix this?
Xbox high packet loss fixes
There are several ways to fix the high packet loss on the Xbox. One of them is using a VPN to deliver stable and reliable connectivity.
It achieves this by employing multiple strategies, starting with routing optimization. In this case, it channels your traffic to servers closer to Xbox’s network.
The VPN will choose the most efficient route for sending and receiving requests. This can help with avoiding packet loss arising from network congestion.
Another thing is encryption, which reduces the chances of data leaks. Moreover, it wades off potential intruders that can interfere with your Xbox connection.
That’s why I recommend you:
1. Use NordVPN
NordVPN is among the best VPNs that target hardcore Xbox gamers. The service boasts 6,000+ servers available in around 60 countries.
It offers 256-bit encryption to keep your data safe and minimize packet loss. You also get top-notch protocols for ultra-fast connectivity like NordLynx, OpenVPN, and IKEv2/IPSec.
NordVPN also offers unlimited bandwidth for work and play. Additionally, you can use it for streaming when taking a break from gaming.
But there’s a catch.
You need a compatible router to use your Xbox with any VPN. If you’re unsure, refer to your device manual for details.
Here’s how it works:
- Go to NordVPN and register for the service.
- Choose Set Up NordVPN Manually from the customer dashboard. This step generates VPN user credentials for configuring your router.
- Access your router’s control panel and locate the VPN Settings.
- Enter the credentials obtained under Step 2 then Save.
- Reboot the router for the changes to take effect.
- Enjoy fast and low-latency speeds with minimal packet loss.
Some routers might require you to upload configuration files. If that’s the case, follow NordVPN’s guide on how to do it.

NordVPN
Experience super security and an ultra-fast gaming experience using NordVPN.2. Change DNS settings
Changing your domain name system (DNS) address can potentially reduce Xbox’s packet loss. DNS servers usually assist with redirecting your internet requests to relevant destinations.
Sometimes, they can malfunction causing your Xbox to experience networking issues. This can lead to connection drops that ultimately affect gameplay.
Accordingly, switching DNSs can improve performance by directing traffic through less congested routes. The outcome is reduced packet loss for stable gaming sessions.
Despite the availability of free DNS services, I recommend using SmartDNS Proxy. While the service targets streaming, its low latency speeds also make it ideal for gaming.
Here’s what to do:
- Go to SmartDNS Proxy and register for the service.
- Check your customer account for the Preferred and Alternative DNS addresses.
- Open our router’s control panel and log in.
- Locate DNS Settings under Advanced/Network Settings. This might defer from router to router.
- Change the DNS addresses with the ones obtained under Step 2.
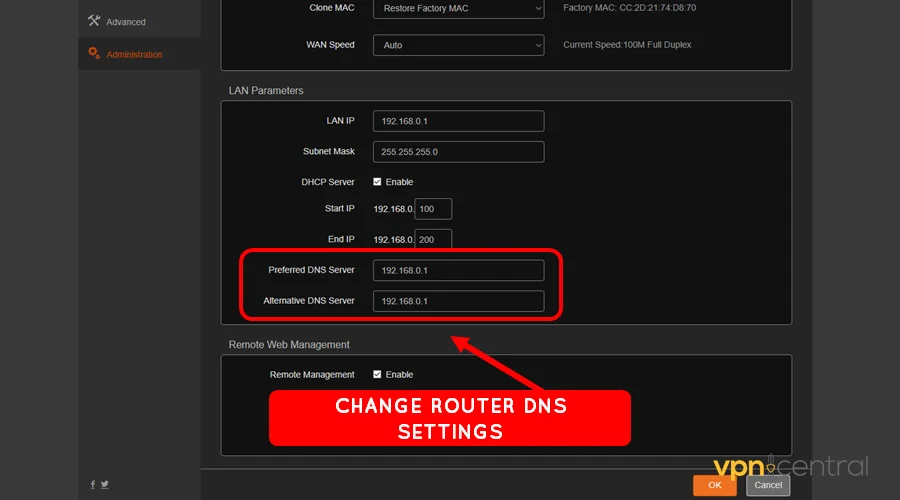
- Save and reboot your router for the changes to take effect.
- Enjoy a fast online gaming experience on the Xbox.
Still, you can also use reputable DNS addresses that are available for free. Some of them include Google DNS, Cloudflare, and Quad9.

SmartDNS Proxy
Enjoy a lag-free gaming experience on your Xbox at pocket-friendly prices.3. Switch to a wired connection
Sometimes, the problem might be with your home WiFi connection. This happens due to signal overload arising from multiple devices competing for bandwidth.
Another reason is channel overlap, which occurs when multiple WiFi transmitters are around. This can be from your neighbors, public hotspots, MiFi devices, etc.
As such, their presence within proximity can cause transmission channels to overlap. The outcome is an increase in interference, leading to a high packet loss.
Obstacles like walls and furniture can also be a problem. Connection quality declines when your Xbox isn’t in direct sight of your router.
The solution? Get a wired connection.
Wired connections can avoid interference associated with WiFis. They also offer superior consistency as opposed to their wireless counterpart.
Here’s how to do it:
- Get a certified ethernet cable for your Xbox. Ensure it’s rated Cat8 for you to experience the fastest possible speeds.
- Connect one end of the cable to the LAN port at the back of your router.
- Connect the other end to your Xbox’s ethernet port.
- Wait for the router and Xbox to pair connectivity automatically.
- Resume gaming with your peers on the Xbox.
A core advantage of wired connections is low latency. This can greatly reduce packet loss arising from slow connectivity.
4. Clear your MAC address
A media access control (MAC) address is a unique identifier for networking devices. It plays a crucial role in data communication by helping devices identify and interact effectively.
However, conflicts may arise when some of them share identical MAC addresses. Confusion may arise in connectivity, leading to the loss of packets.
This can happen whenever multiple devices use the same network. Therefore, clearing your Xbox’s MAC address can resolve such types of conflicts.
Follow these instructions:
- Press the Xbox button on the controller.
- Locate the Network option under Settings.
- Navigate down and select Advanced Settings.
- Select Alternate MAC Address and choose Clear.
- Restart your Xbox for the changes to take effect.
This process replaces your Xbox’s MAC address with a new one. Consequently, it eliminates close rivalry with other devices on your network.
5. Power cycle your Xbox/Router
A power cycle involves switching off a device temporarily before turning it back on. This requires unplugging your hardware briefly from a power source before reconnecting it.
Doing so comes with a few benefits including clearing underlying software glitches. The device will restart in a clean state, potentially resolving high packet loss.
A power cycle also completely refreshes your device’s memory and cache. Accordingly, a reboot may resolve network-related issues causing high packet loss.
Follow these steps:
- Locate the power button on your Xbox or router.
- Press it briefly until it shuts down.
- Unplug the device from the power source.
- Wait for a short period of between 30 – 120 seconds.
- Reconnect the device back to the power source.
- Press the power button for a few seconds to turn it on.
You should expect your Xbox/router to become snappier after a power cycle. The high packet loss incidence will reduce significantly as well.
6. Set your Xbox offline
Setting your Xbox offline closely relates to clearing your MAC address. This action stops your device from being active on the Xbox network.
It helps get rid of underlying server-side issues that may go unnoticed. As such, you stand to get top priority when you go back online.
The process is simple:
- Press the Xbox button to launch Guide.
- Navigate and locate Settings under Profile & System.
- Find Network Settings after selecting General.
- Choose Go Offline to disconnect from the Xbox network.
It’s okay to continue using your Xbox when it’s offline. Wait for at least half an hour before going back online.
7. Reset your Xbox
Resetting your Xbox can effectively tackle high packet loss issues. Doing this clears all accumulated data from the day of unboxing the device.
These include but it’s not limited to cache and background processes amassed over time. Such elements can cause stability issues, resulting in poor gaming outcomes.
This option also restores network settings to their default configurations. It can be instrumental in situations where software/app misconfigurations cause high packet loss.
Below is how to do it:
- Power on your Xbox. Wait until it boots up completely.
- Press the Home button on your Xbox controller.
- Navigate down and choose System from the list of options.
- Locate and select Console Info.
- Choose Reset Console.
- Select Reset and Remove Everything to perform a factory reset.
- Wait for a few minutes for the process to complete.
- Enjoy your snappy and responsive Xbox.
This option erases everything on your Xbox, returning it to a clean state. Consider it as a measure of last resort when everything else fails.
Extra tips for fixing high packet loss on the Xbox
Below are other alternatives to consider:
- Change ISPs: Consider switching ISPS if your current one consistently delivers high packet loss. Ensure you compare providers before making a switch.
- Avoid peak time: Heavy traffic on the Xbox network can cause connectivity issues to arise. As such, avoid high peak times to avoid running into problems.
- Router proximity: Place your router closer to your Xbox for a stronger wireless signal. This can improve the quality of the connection and reduce packet loss.
- Shorter ethernet cable: Using a shorter ethernet cable can be beneficial for wired connections. Longer ones exceeding 30 feet (9 meters) tend to introduce signal degradation, potentially causing packet loss.
- Optimize WiFi channels: Some routers allow you to change the WiFi broadcast channels. Use an app like WiFi Analyzer to find the least congested channel before switching.
That’s all you need to know.
Wrapping Up
The Xbox high packet loss error can interrupt your online gaming experience. As you’ve seen, there are multiple workarounds for resolving this issue.
Any of them should work. But you can consider resetting your device if the issue persists.
Ultimately, you may have to switch ISPs if packet losses continue wreaking havoc. This may go a long way in resolving the problem for good.
Read our disclosure page to find out how can you help VPNCentral sustain the editorial team Read more

Improve this guide


User forum
0 messages