FIXED: ChatGPT Not Working With VPN [Tested 2026]
ChatGPT has had connectivity issues ever since its launch. A VPN can be helpful, but what to do when your VPN isn't working with ChatGPT? Find out!
If your ChatGPT doesn’t work with a VPN, I’m here to help out. Since OpenAI’s chatbot is still unavailable in some countries, many resort to VPNs and proxies to access it.
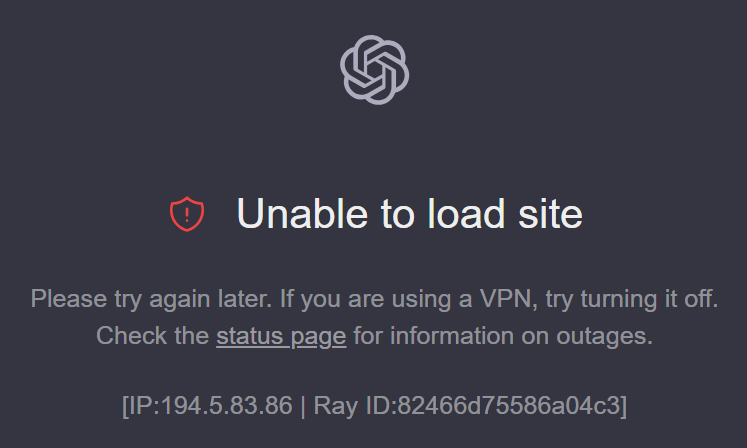
But as of late, more and more people deal with this dreaded message: “Please try again later. If you are using a VPN, try turning it off. Check the status page for information on outages”.

Access content across the globe at the highest speed rate.
70% of our readers choose Private Internet Access
70% of our readers choose ExpressVPN
Browse the web from multiple devices with industry-standard security protocols.

Faster dedicated servers for specific actions (currently at summer discounts)
This indicates the service detects you’re using a VPN and won’t allow it. Don’t worry, with a few tweaks, you should be able to regain access in just a few minutes.
Why is ChatGPT not working with your VPN?
ChatGPT isn’t working with your VPN because of one or several of the following reasons:
- Common VPN IP addresses blocked
- Connecting to a server in a country where ChatGPT doesn’t work
- Browser cookies revealing your real location
- DNS leak
- Not disabling IPv6
- WebRTC leak
- VPN restrictions interfering with the communication protocols ChatGPT uses
- Poor VPN performance
- Complications due to specific platforms or services ChatGPT is integrated with requiring user authentication or authorization
- ISP block. Another error you might encounter is “Something went wrong. You may be connected to a disallowed ISP.”
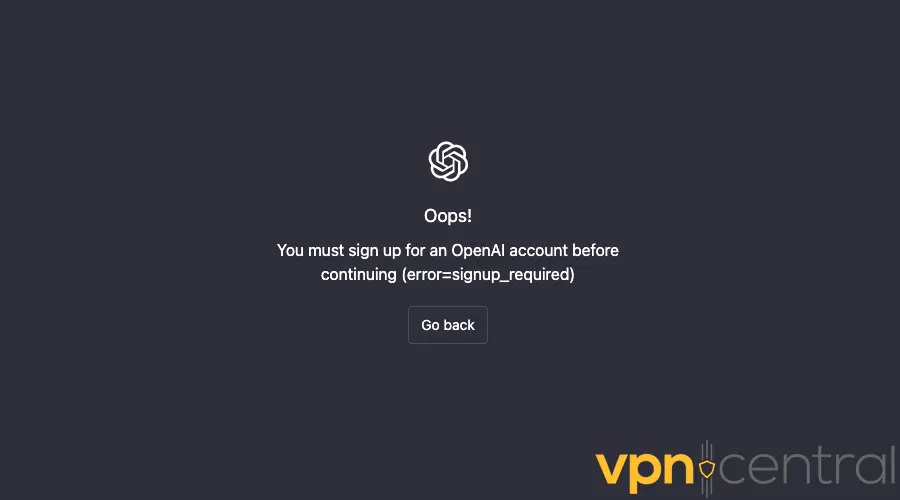
Your actual IP address leaking will cause the chatbot not to work if the service isn’t available in your country.
Currently, ChatGPT is available in 161 countries. That excludes Russia, Ukraine, China, Egypt, Iran, Yemen, Uzbekistan, and a few other places.
If you’re a user from an unsupported region, you might’ve encountered website accessibility issues while trying to log in with an active VPN:
This happens because your VPN is accidentally giving away your real IP address or you’re sharing a VPN IP address with too many people.
DNS, IPv6, and WebRTC leaks and vulnerabilities can completely defeat the purpose of a VPN.
ChatGPT will then know that you’re from an unsupported region and will stop working.
Alternatively, your phone number can cause issues by tipping ChatGPT off to the fact that you’re not from the country you’re pretending to be.
Virtual and Voice over Internet Protocol (VoIP) numbers won’t work. If your phone number is in order, you can be sure that your VPN is at fault.
Now that we understand the problem, check out the following VPN troubleshooting methods:
How to fix ChatGPT not working with VPN
If ChatGPT refuses to work while your VPN is enabled, consider the following solutions:
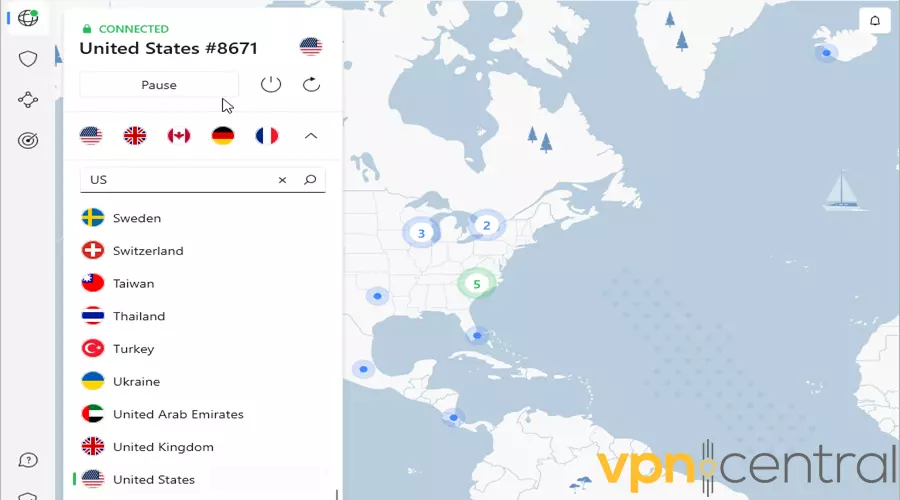
1. Use another server
If you’re unable to load the ChatGPT site with your VPN, switch to a different server. Overcrowded servers are often the cause of this issue, and changing to other countries can resolve it.
ChatGPT may have detected too many users sharing the same IP address. Ensure you’re not accidentally connected to a server in a location where ChatGPT isn’t available. Connect to another server in a country where ChatGPT is supported, then reload the page.
2. Change your VPN provider
If ChatGPT still doesn’t work with your VPN, your choice of service could be the issue. You might be using a lower-tier or free provider that’s not robust enough.
For ChatGPT, there are several excellent VPNs, but NordVPN comes highly recommended. It offers superb server coverage and features capable of bypassing geo-blocks and censorship, even in highly restrictive environments.
Here’s how to use it with ChatGPT:
1. Subscribe to NordVPN and download the software.
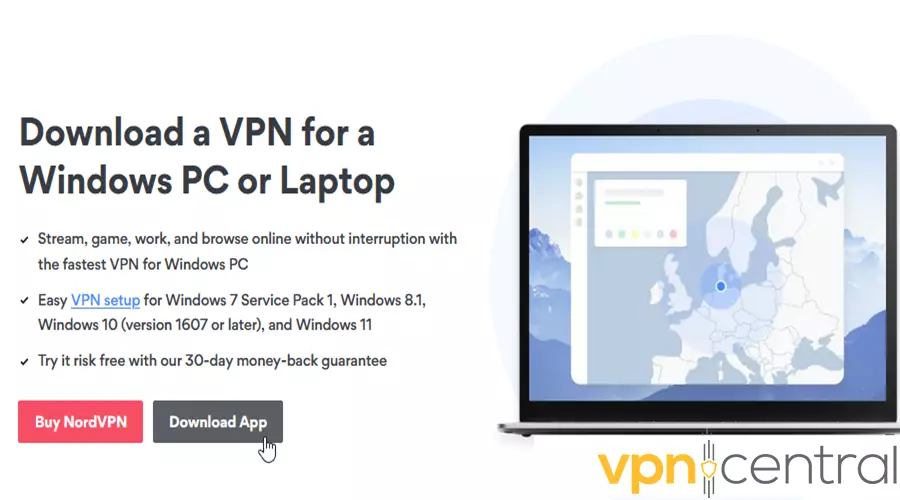
2. Follow the instructions to install the app.
3. Open it and scroll down the list to find a suitable server.
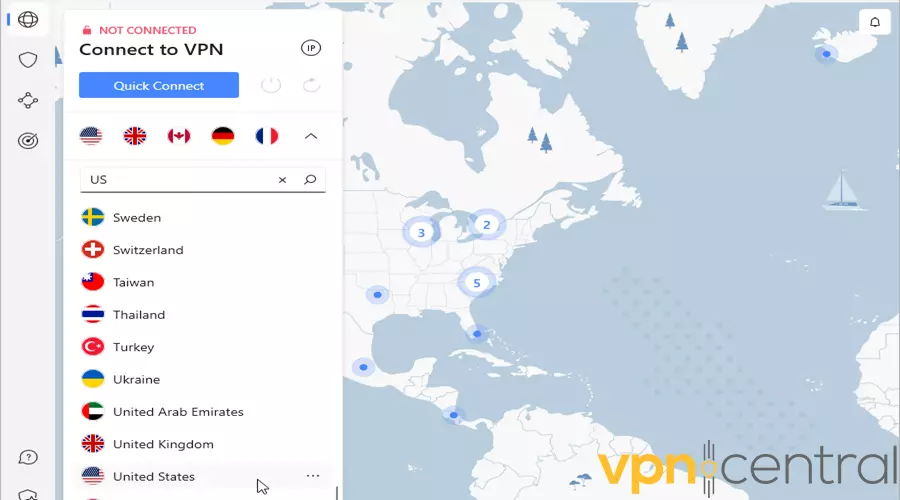
4. Click on the flag icon to connect. If you press the three dots next to it, you can look at all the available cities in this county or auto-connect.
5. Now you can log into OpenAI and chat away!
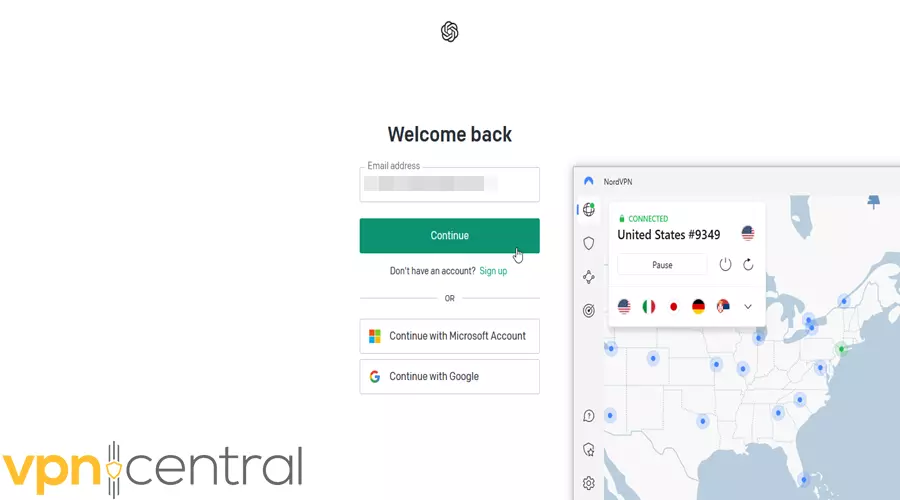

NordVPN
Unblock ChatGPT from anywhere and enjoy a secure and reliable connection with NordVPN.3. Clear browser cookies
Did you know that your browser’s cookies will store your location data?
They will also remember your page preferences, login credentials, shopping carts, and more.
That way, websites you visit often don’t have to load everything from scratch every time.
However, by remembering this data in can cause connection errors and sabotage your VPN.
So, your cookies could reveal that you’re from an unsupported ChatGPT region, and the chatbot won’t load.
Luckily, it’s pretty easy to clear your cookies and cache. The process will slightly differ depending on your browser.
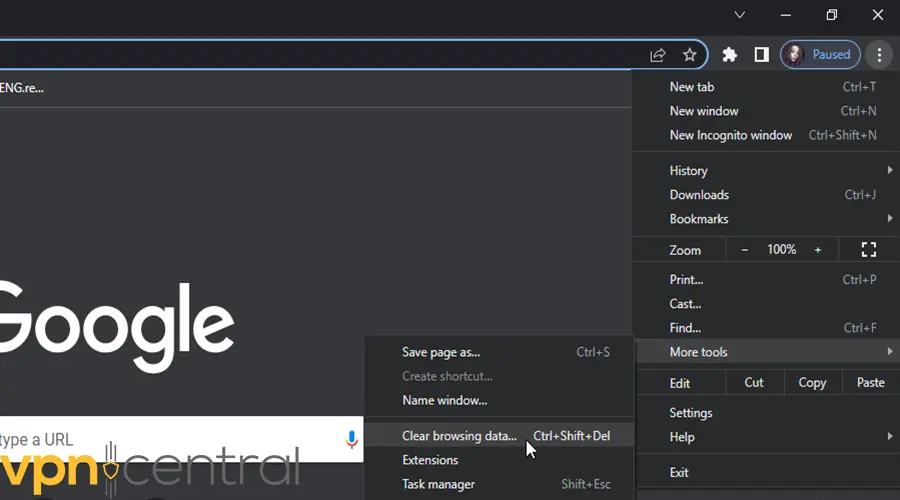
Here’s how to do it on Google Chrome:
1. Open the browser, click on the three-dot menu in the upper right corner, and hover over More tools.
2. Select Clear browsing data.
3. Go to the Basic tab.
4. Check the checkboxes for Cached images and files and Cookies and other site data.
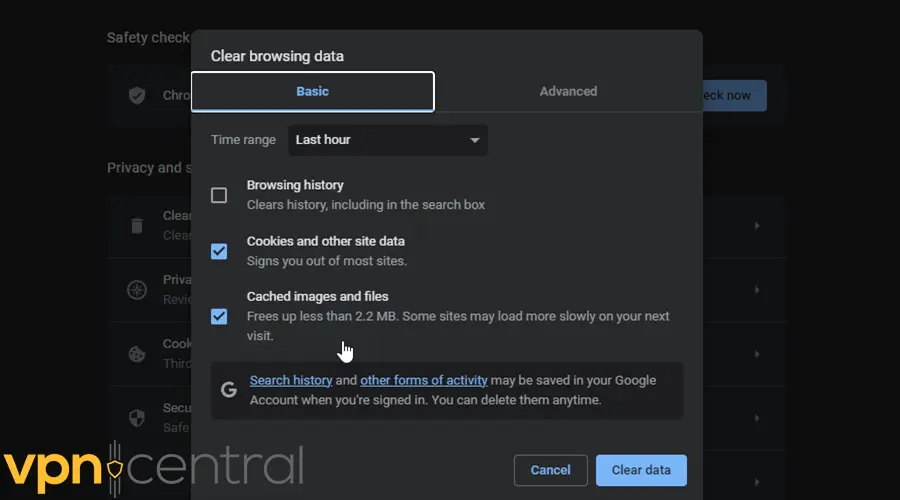
5. Choose All time for the time range.
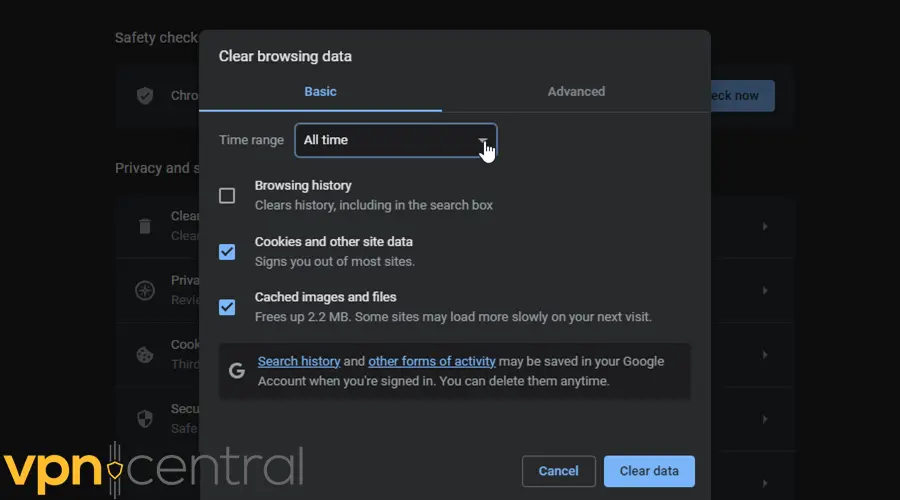
6. Finally, click Clear data.
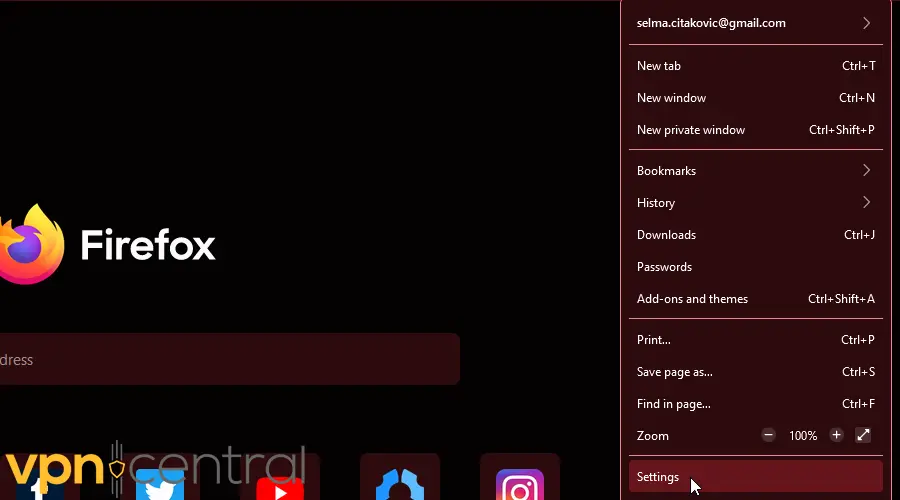
Alternatively, let me demonstrate you how to delete cookies on Firefox. Simply follow these instructions:
1. Open the browser, click the three bars in the upper right corner, and then Settings.
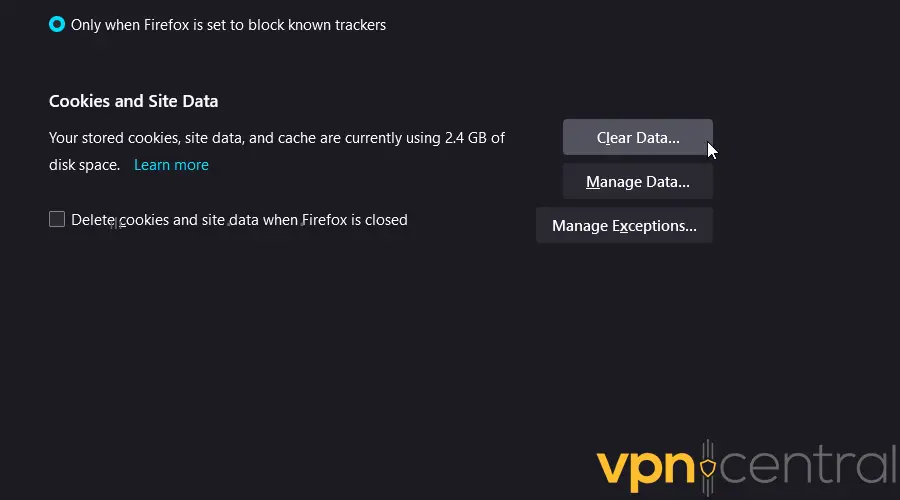
2. On the side menu, select Privacy & Security.

3. Scroll down to Cookies and Site Data and click Clear Data.
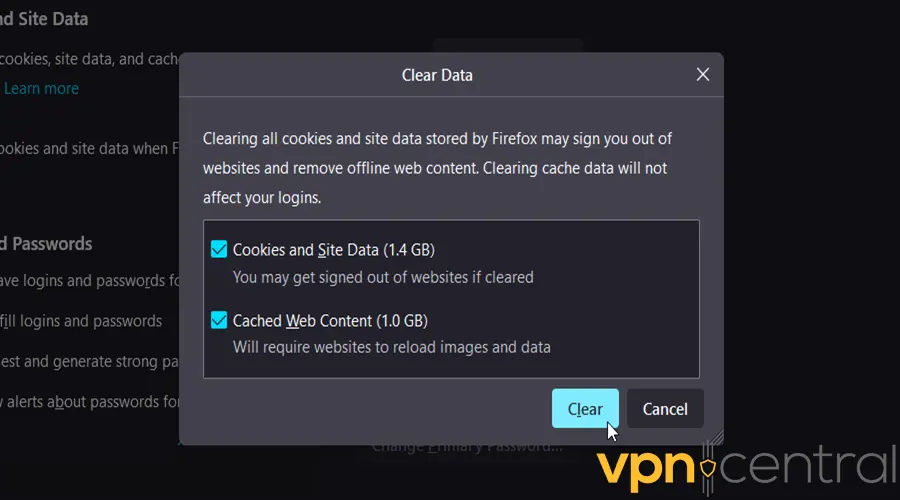
4. Confirm your decision and press Clear.
4. Fix a DNS leak
As you know, your VPN should envelop your entire traffic in an encrypted tunnel. But sometimes, your DNS queries can slip through and expose your real location.
That’s why you should periodically check for DNS leaks.
It’s a pretty simple operation:
1. Turn off your VPN and go to ipleak.net, dnsleaktest.com, or dnsleak.com.
2. Load the page and click to start the test. It’ll display your IP, Hostname, ISP, and country.
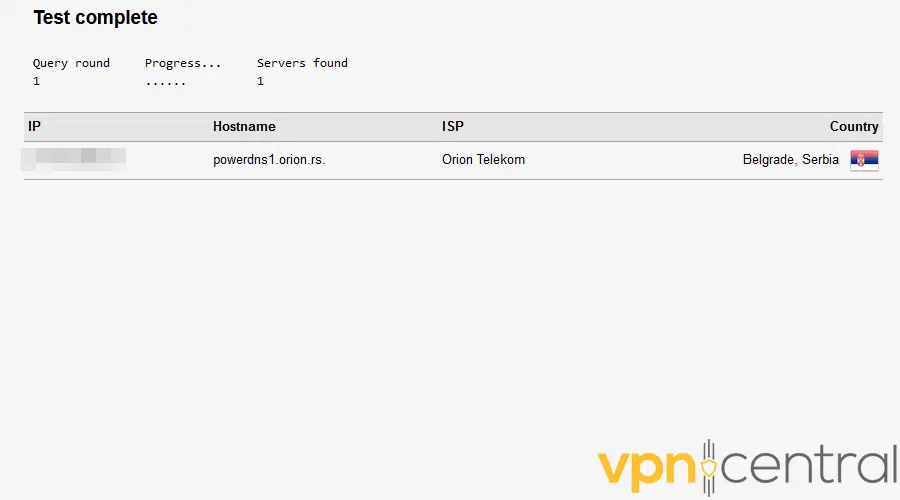
3. Now turn on your VPN, pick any location, and revisit the page. It should show you a different IP address, ISP, and location. That means you’re leak-free!
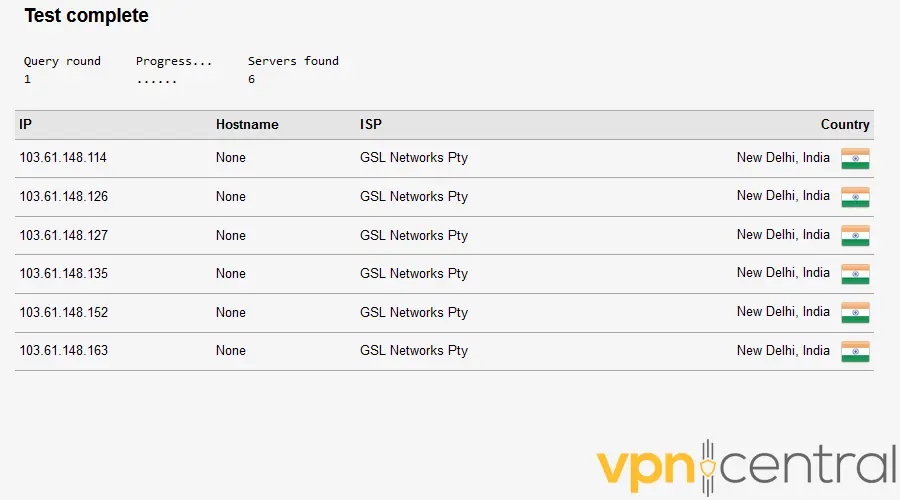
4. If it, again, shows your actual information, it indicates that you’re experiencing a DNS leak.
In that case, follow these steps to fix it:
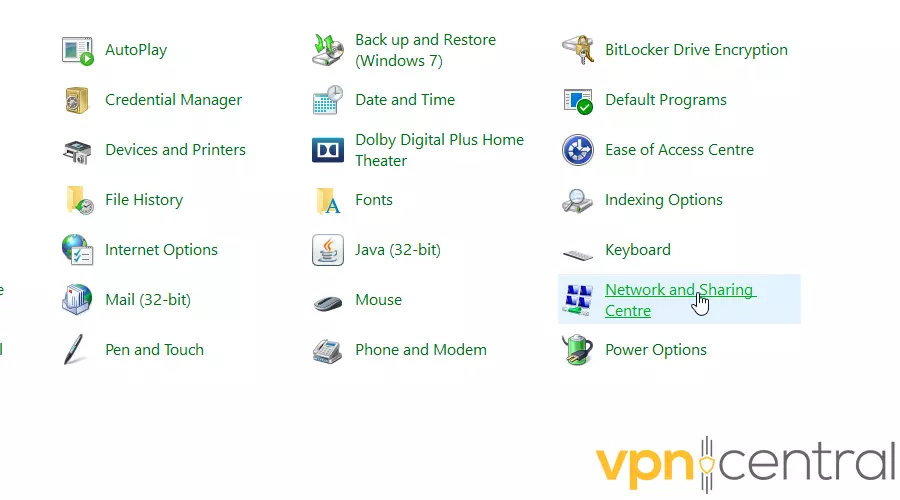
1. Type Control Panel in the Windows search bar and click on it.
2. Find Network and Sharing Center.
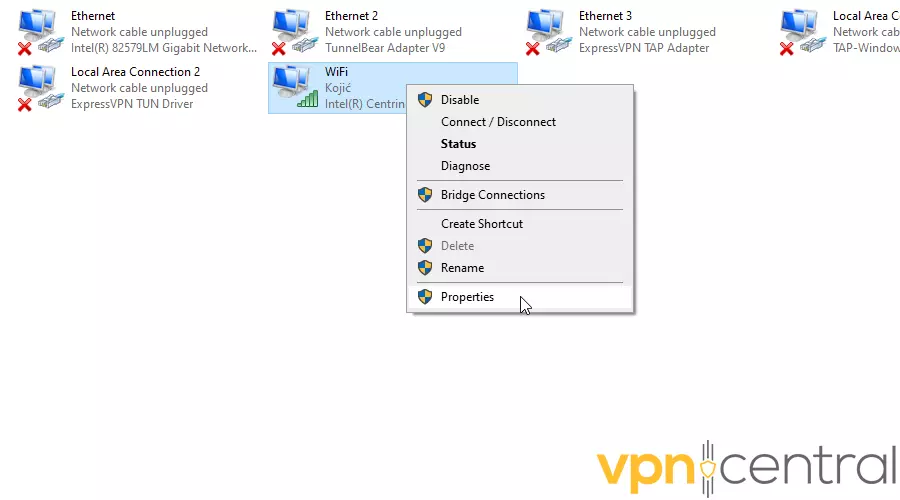
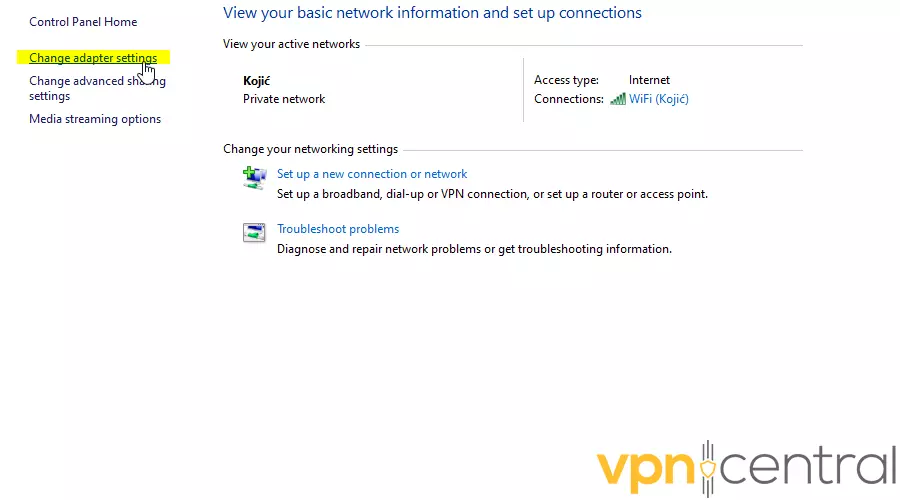
3. Select Change adapter settings from the left side of the screen.

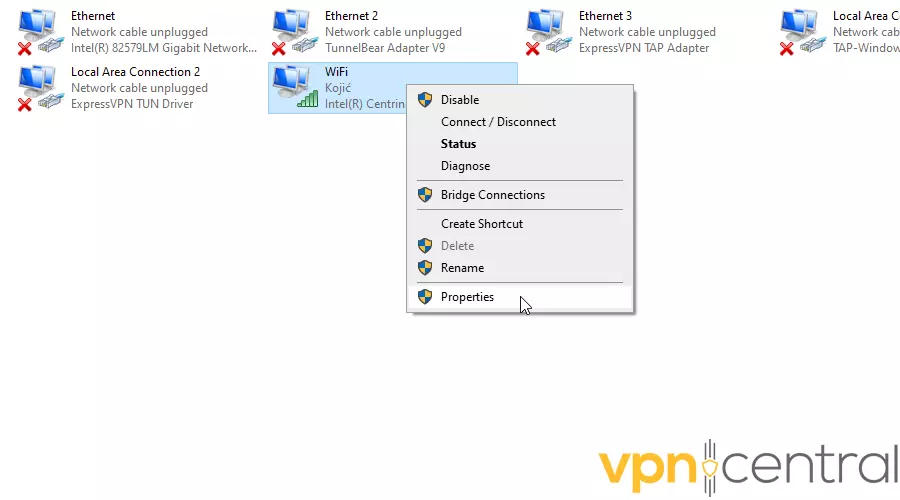
4. Right-click the connection you want to alter and choose Properties.
5. Click on Internet Protocol Version 4 (TCIP/IPv4), then Properties.
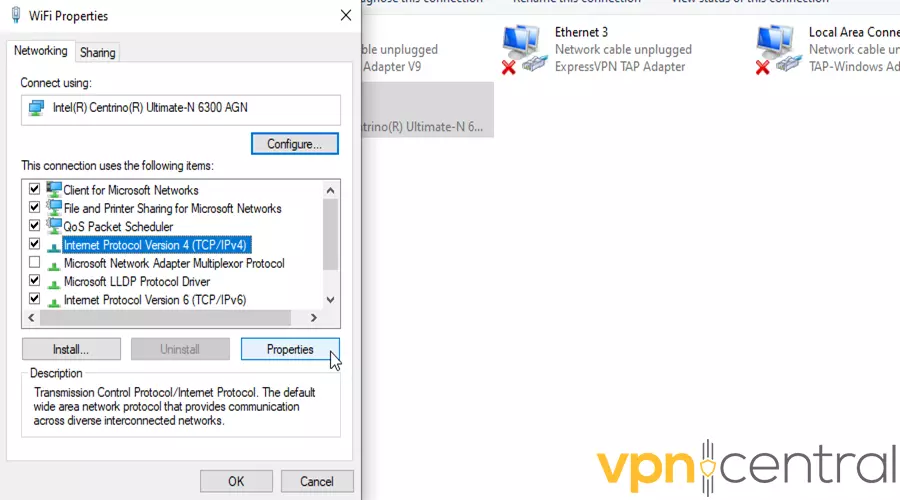
6. In the new pop-up, select Use the following DNS server addresses. Type in the new addresses and click OK.
7. Repeat the process for Internet Protocol Version 6 (TCIP/IPv6).
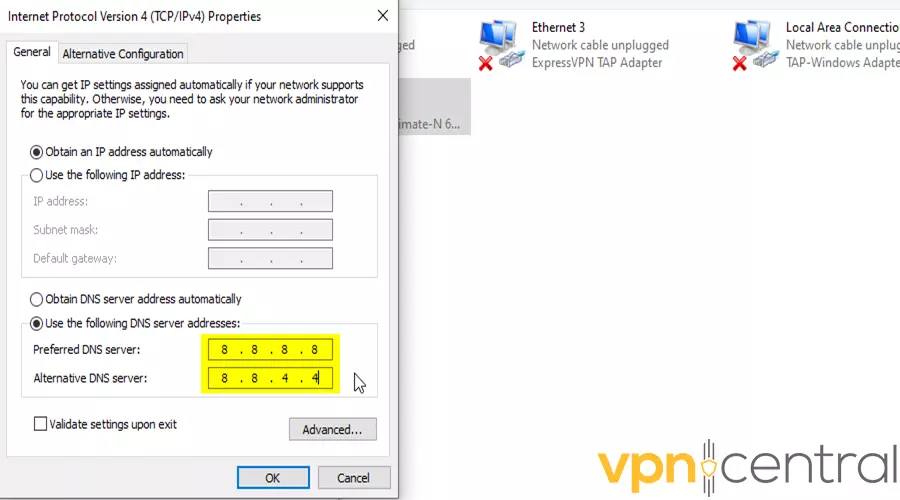
You’re most likely using your ISP’s DNS servers by default. Instead, you should switch to public free addresses such as:
- Google — 8.8.8.8 and 8.8.4.4
- Cloudflare — 1.1.1.1 and 1.0.0.1
- OpenDNS — 208.67.222.222 and 208.67.220.220
- Quad9 — 9.9.9.9 and 149.112.112.112.
They won’t record your IP address, which is definitely a plus for your privacy!
5. Prevent IPv6 leaks
IPv4 is still the most widely used Internet Protocol, but many ISPs offer IPv6 as well. As someone who reviews VPNs for a living, I can tell you most VPNs are only compatible with IPv4.
They can’t properly reroute and encrypt IPv6 traffic, and will accidentally leak your real IP address. This will prevent ChatGPT from working with your VPN. That’s why many providers let you disable IPv6 in their settings.
To disable IPv6 on a system level, follow these steps:
- Type Control Panel in the Windows search bar and click on it.
- Find Network and Sharing Center.
- Click on Change adapter settings in the upper left corner.
- Right-click on your network adapter and choose Properties.
- Uncheck Internet Protocol Version 6 (TCP/IPv6) on the list.
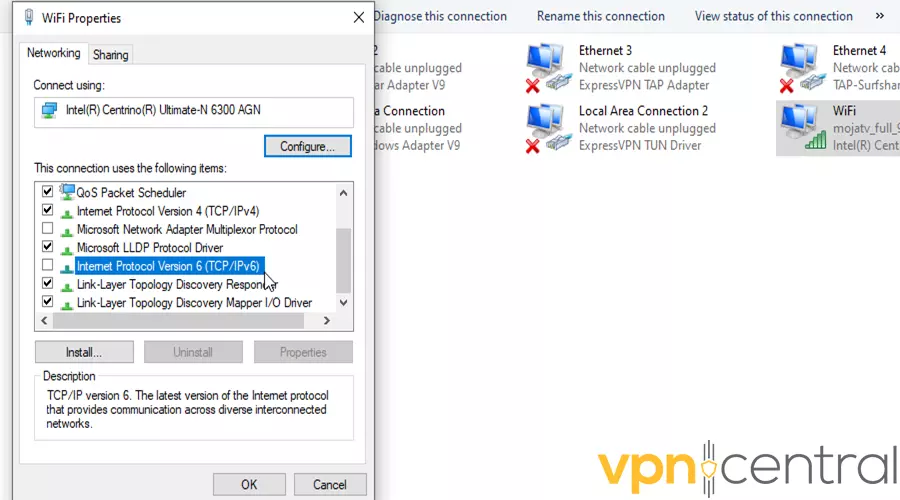
- After that, click OK and Close.
6. Stop WebRTC leaks
WebRTC (Web Real-Time Communication) is a type of communication technology supported by Google Chrome, Firefox, and Opera.
Unfortunately, it has a tendency to show your actual IP address, rendering your VPN useless. To combat this, many VPN services I’ve tested have features or add-ons that can prevent WebRTC leaks.
To disable WebRTC in Firefox, follow these steps:
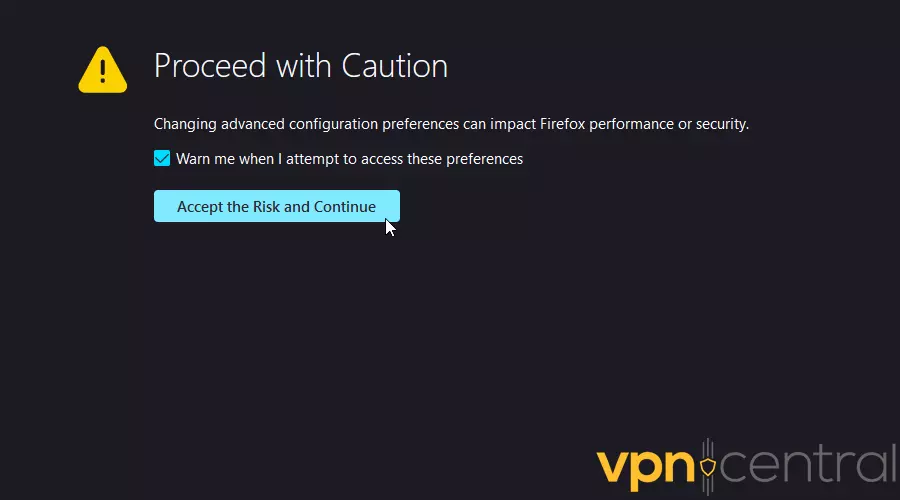
1. Open the browser, type about:config in the URL bar, and press Enter.
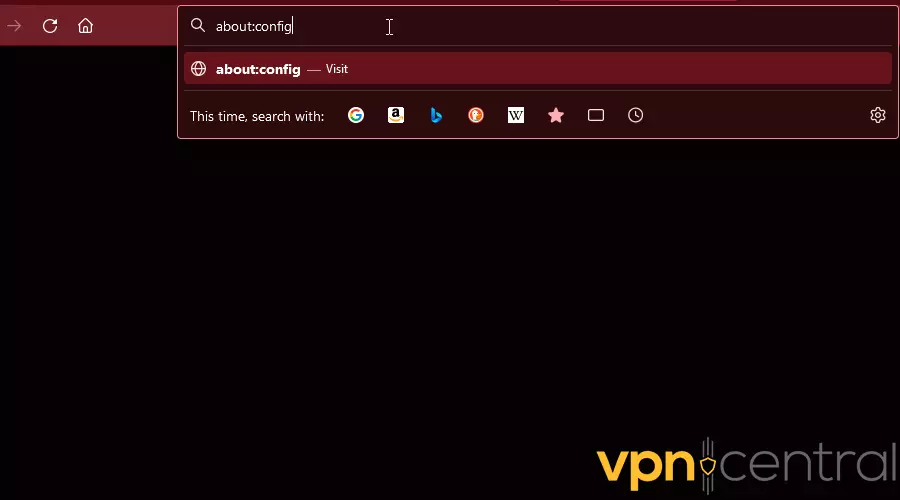
2. Agree that you want to continue.
3. Type in media.peerconnection.enabled. Double-click it to change its value to false.
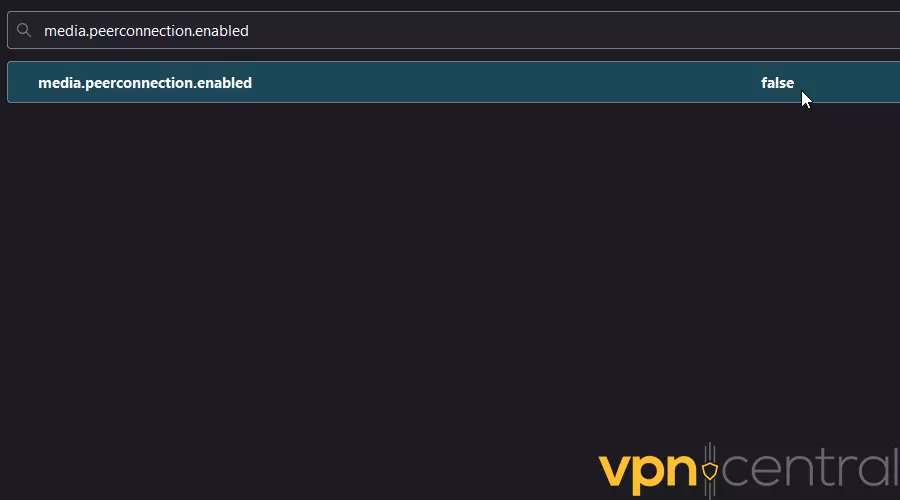
If you’re a Google Chrome user, you won’t be able to do this. Instead, you’ll have to rely on specialized extensions like WebRTC leak prevent and uBlock Origin.
8. Use a proxy
Using a proxy is another effective method to unblock access to ChatGPT, especially in regions with ISP and network restrictions.
Proxies act as intermediaries between your device and the internet, masking your IP address and allowing you to seamlessly bypass geo-blocks or network restrictions.
Smartproxy is highly recommended for the job due to its robust network of IP addresses, reliability, and user-friendly interface.
Does ChatGPT block VPN services?
ChatGPT doesn’t outright prohibit VPN usage, but if someone abuses the platform using a common VPN IP, it may block that address. If you’re unable to access the chatbot when your VPN is on, it may be because OpenAI has already blocked the IP you were assigned.
If that’s the case, some of the solutions I offered above should help you get around the problem. Depending on which VPN service you’re using, connecting to another server may resolve the issue.
Chances are ChatGPT has already blocked all or the majority of IP addresses belonging to less reputable VPNs. This can also lead to an ISP being disallowed error in ChatGPT. Changing your provider may be necessary if this is what’s causing the problem.
Wrap up
Now you know how to fix ChatGPT when it’s not working with your VPN, and as you can see, disabling it isn’t usually necessary!
It all comes down to identifying the root of the problem. Maybe you’re connected to an overloaded VPN server, or maybe your real IP address is visible.
Even your browser cookies could give away your IP.
Fortunately, all of these fixes only require a few minutes of your time. You’ll be back to talking to the chatbot in no time!
Read our disclosure page to find out how can you help VPNCentral sustain the editorial team Read more

Improve this guide


User forum
0 messages