VPN Not Working on Virgin Media? Fix it Now!
VPN Not Working on Virgin Media? Don’t fret, it’s fixable.
Due to an arguable monopoly in the British broadband market, Virgin Media is the one which, mainly, dictates the terms of use.

Access content across the globe at the highest speed rate.
70% of our readers choose Private Internet Access
70% of our readers choose ExpressVPN
Browse the web from multiple devices with industry-standard security protocols.

Faster dedicated servers for specific actions (currently at summer discounts)
More knowledgeable users turned to VPN solutions in order to protect their privacy, speed up the bandwidth (which is, as stated by some of them, 50% intentionally throttled), and avoid regional restrictions.
However, what to do when your VPN just won’t work with the Virgin Media router? Find the root cause and address it! Keep reading for an easy, step-by-step breakdown of all you need to do to fix Virgin broadband VPN issues.
Why does Virgin Media block VPN?
Virgin Media may block VPNs for reasons including network security, traffic management, content licensing agreements, regulatory compliance, preventing abuse, and network performance.
VPNs can bypass restrictions and even unlock Virgin Media while abroad, posing security and legal concerns, and prompting ISPs to restrict usage.
The ISP doesn’t have a clear policy that prohibits VPN usage. However, many VPN users that are subscribed to various clients aren’t able to access Virgin Media when connected to a VPN.
If you’re one of them, check out the solutions below.
How to unblock VPN on Virgin Media?
1. Pick a reliable VPN solution
If we exclude the probable actions against VPN solutions made by Virgin Media, it’s necessary to use a valid VPN. Some VPN solutions might get blocked by default, while others will underperform.
What you need is a VPN that will prevent ISP from throttling your bandwidth and one which allows you to avoid geo-restrictions and regional bans.
For example, peer-2-peer sites are a big NO for Virgin Media users. They, allegedly, is an offence that can result in the discontinuation of the service.
That being said, you will need a VPN service that has an abundance of UK-based servers that will let you connect to an alternative IP close to your location.
That way, you won’t suffer from data package latency issues while being secure. Make sure to check them out individually and choose for yourself.
Also, and what’s important in this matter, is the fact that you can communicate in real time with the support teams of the respective VPN providers we enlisted. That way, they can help you, the paying customer, address every issue you encounter.
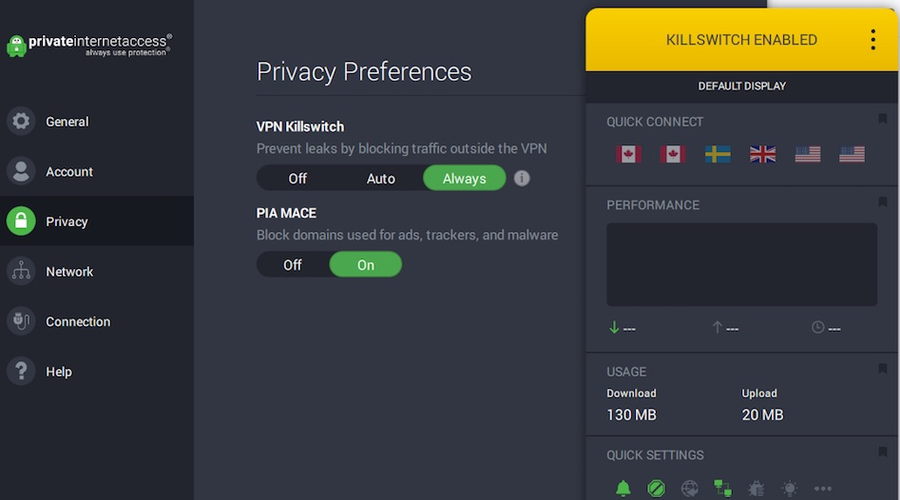
One great VPN service that meets all of the above-mentioned criteria and a bit more is Private Internet Access.
This VPN service owned by Kape Technologies features 35 000 servers in 80+ different countries, with plenty of them present in the UK as well.
It includes streaming-optimized servers that are capable to help you overcome connection errors such as Virgin Media not connecting to Netflix.
This, along with the fact that it guarantees total privacy and the ability to meld to any ISP makes it great for accessing any geo-locked content, including Virgin Media.
Enjoy Virgin Media from outside the UK with this foolproof VPN!
2. Configure the router
The issues between Virgin Media services and VPN tools emerged after the introduction of SuperHub 3, the latest, improved iteration of routers provided by the UK-based broadband provider.
Before that, end-users were able to use the VPN to reduce the blatant throttling of the bandwidth and to circumvent the geo-restrictions imposed by Virgin Media.
Was this something deliberate or the default router configuration is the mere issue, we can’t say with certainty.
Some users were able to resolve the halt by tampering with the settings, which include authentication and firewall measures which, seemingly, block VPN access to your native IP address.
It seems that SuperHub 3 blocks encryption protocols that differ from PPTP. If you’re not sure what to do, these steps should lead you through the procedure:
How to setup a VPN on Virgin Media Hub
- Connect to the router with a LAN cable.
- Open any browser and, in the address bar, type Virgin Media IP address — 192.168.0.1.
- Press OK to log into the router settings menu.
- If you haven’t changed your password, the default one is placed on the bottom of the router.
- Open Advanced settings.
- Select Firewall.
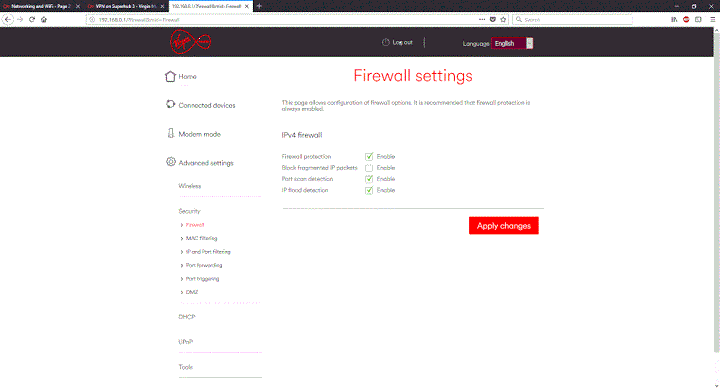
- Disable ‘Block fragmented IP packets‘ (SuperHub 3) or let IPSec, PPTP, and Multicast pass through the Firewall by checking the boxes (older Hubs).
- Confirm changes and restart your router and PC.
On a side note, if you’re using a business network with the VPN, contact your network administrator as chances are you won’t be able to access and change the configuration of the aforementioned router.
If you find your router’s settings difficult to navigate through, you can get router configuration software to ease things up.
3. Update/reinstall your VPN
This is a long shot since this issue is hardly caused by the VPN. Of course, we assume that you’re using a proper VPN solution.
Most of the free solutions are limited and you’ll need a subscription-based premium tool if you want to overcome the limitations imposed by Virgin Media.
However, even the best of the class can have issues if they’re not up to date or are blocked within the system itself.
Running an up-to-date VPN app will remove bugs and errors and allow you to connect without being blocked. Connecting to a fast server can also fix Virgin Media’s bad ping and latency.
So, the firsthand solution is to make sure that VPN is up to date and to confirm that either a Windows-native firewall or a third-party one isn’t blocking VPN. If this happens, here is a simple guide to fix the issue.
You can as well disable security for the time being, but we’re keener to suggest a whitelisting of the VPN at hand. That way, you’ll keep the protection while allowing VPN to communicate freely.
How to turn off the firewall on Virgin router
- Plug in your Virgin Media router
- Go to 192.168.1.1 or 192.168.0.1 on your browser
- Add a new username and password.
- Go to your browser settings and click Advanced settings
- Select the firewall and tick the following protocol
- IPSec Pass-Through
- PPTP Pass-Through
- Multicast Pass-Through.
- Afterwards, click Apply and save your settings
Finally, you can reinstall the VPN and move from there. The re-integration of the VPN solution is the most functional after a clean reinstallation.
How to setup a VPN on Virgin Media Hub 3?
Setting up a VPN directly on the Virgin Media Hub 3 router is not typically possible due to firmware limitations. However, you can set up a VPN on individual devices that connect to the Hub 3.
If you want all your home network traffic to go through a VPN, you might consider setting up the VPN on a secondary router or a dedicated VPN device that connects to the Hub 3, or using a VPN-enabled router as a primary connection point for your devices.
Remember, the Hub 3 will still handle the primary network connection, and the secondary device would manage the VPN connection.
Here’s how to do it:
Step 1: Access the Router’s Admin Interface
- Connect to Your Network: Ensure your device is connected to the Virgin Media Hub 3 network.
- Open a Web Browser: Launch your preferred web browser.
- Enter the Router’s IP Address: Type the default IP address for the Hub 3, typically
192.168.0.1, into the browser’s address bar. - Log In: Enter your admin username and password. If you haven’t changed these, they should be on the sticker on the router or in the provided documentation.
Step 2: Locate VPN Passthrough Settings
- Navigate to Advanced Settings: Look for an option labeled ‘Advanced Settings’ or similar.
- Find VPN Passthrough Options: Within the advanced settings, look for a section related to VPN, which might be under ‘Security’, ‘VPN’, or ‘Firewall’ settings.
Step 3: Enable VPN Passthrough
- Adjust VPN Passthrough Options: You will typically find options for different VPN protocols like PPTP, L2TP, and IPSec. Enable passthrough for the protocols you plan to use.
- Save Changes: After enabling the necessary protocols, make sure to save or apply the changes.
Step 4: Configure Your VPN Client
- Install VPN Software: On the device you want to use the VPN with, install the VPN client software.
- Enter VPN Details: Input the necessary details like server address, username, and password provided by your VPN service.
- Connect to the VPN: Initiate a VPN connection from your device. It should now pass through the Hub 3 without any issues.
Step 5: Test the Connection
- Check the Connection: Once connected, you can check if the VPN is working by visiting a site like
whatismyipaddress.comto see if your IP address reflects the VPN server’s location.
Conclusion
This should do it. Make sure to post your questions, alternative solutions, or the VPN which works best for you if you’re a Virgin Media user. We look forward to hearing from you in the comments section below.
Read our disclosure page to find out how can you help VPNCentral sustain the editorial team Read more

Improve this guide


User forum
0 messages