Easy Fix: VPN Connected But Not Working [No Internet Access]
11 min. read
Updated on
Read our disclosure page to find out how can you help VPNCentral sustain the editorial team Read more

Is your VPN connected but not working? You’re in the right place.
Check the solutions below to fix your VPN and get back to bypassing geo-blocks and ISP restrictions.

Access content across the globe at the highest speed rate.
70% of our readers choose Private Internet Access
70% of our readers choose ExpressVPN

Browse the web from multiple devices with industry-standard security protocols.

Faster dedicated servers for specific actions (currently at summer discounts)
Why is my VPN connected but not working
One common reason your VPN might be connected but not working is a problem with how your computer handles domain names (DNS). Another issue can occur when you set up the VPN to use the remote network’s default gateway, which might override your usual internet settings.
Additionally, sometimes the connection attempt is rejected when it should be accepted or accepted when it should be rejected.
Find below solutions for all possible causes, all put in easy-to-follow steps.
What can I do if the VPN connects but is not working?
Follow the guidelines below to fix this issue in just a few minutes.
But first:
✅ Preliminary checks
Before proceeding to the main instructions, make sure to carry out these preliminary checks:
- Switch to another server: Select a different VPN server location and connect to it. If you can access the internet when connected to a different server location, there may be a temporary issue with the server location you originally selected.
- Check your internet connection: Make sure that you have a stable internet connection. If your internet connection is weak or unstable, the VPN may not work properly.
- Restart the VPN client: Close the VPN client and reopen it. This can often resolve issues with the VPN connection.
- Restart your device: If you are still experiencing issues with the VPN, try restarting your device.
- Verify the VPN’s status: Contact the VPN provider to make sure that the service is not experiencing any outages or technical issues.
- Look out for VPN conflicts: If you are using multiple VPNs, make sure that they are not conflicting with each other.
- Check your firewall: Make sure that your firewall is not blocking the VPN connection.
Now let’s move on to more advanced workarounds.
1. Use Command Prompt as Administrator
- Click Start and type CMD.
- Right-click Command Prompt from the results and select Run as Administrator.
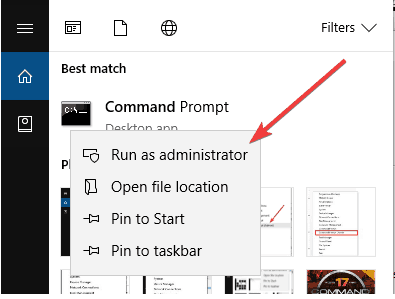
- In the black screen, type these two commands: ipconfig /release and then ipconfig /renew then press enter after each.
Check if the connection starts working again.
2. Check if the issue is DNS related
- Ping an external IP address like 8.8.8.8 to confirm your internet connection is working. You can check whether you can reach the server you’re going to connect to by pinging it using the next steps.
- Click Start and type CMD in the search bar.
- Click Command Prompt.
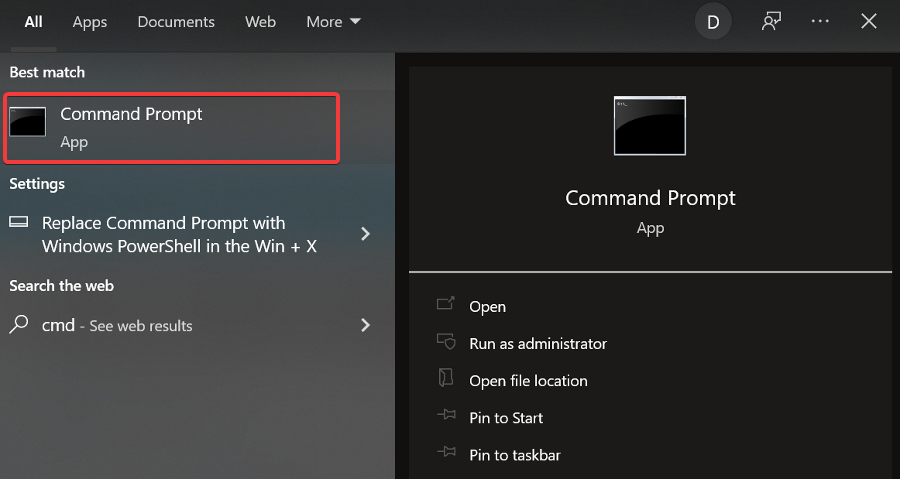
- Type ping 8.8.8.8 (you can replace it with the address you wish to ping) and press Enter.
If you get replies from the ping, it indicates your connection is working and the issue is likely with the DNS, so you need to resolve DNS issues.
If you don’t get a reply, for example, a Request Timeout message, it shows something is blocking the VPN connection.
Reset DNS settings
- On the Start menu, type View Network Connections.
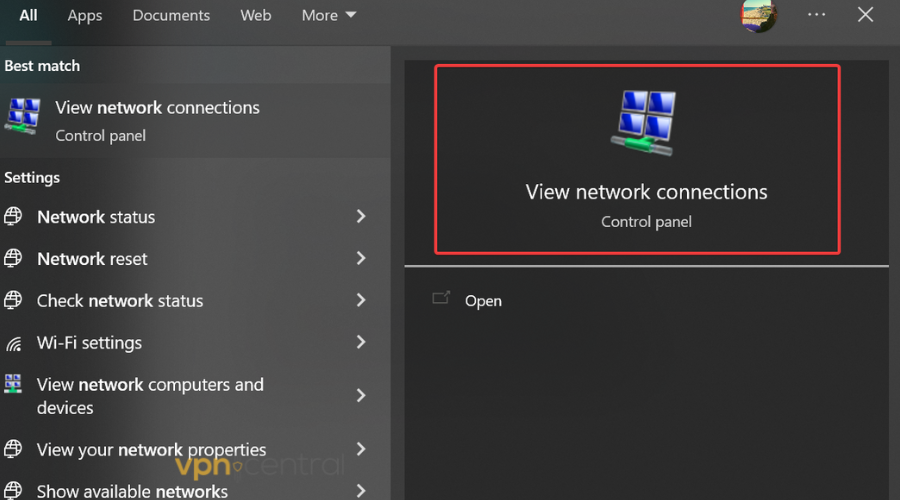
- Right-click on the network connection you’re using.
- Click on Internet Protocol Version 4 (TCP/IP v4)and then on the Properties.
- Ensure you have Obtain IP Address automatically and Obtain DNS Server Automatically This configures your device to acquire the settings directly from your modem/router.
- Click OK and exit.
This is necessary if your VPN client, or a DNS leak protection script crashes and left an unusable DNS configuration.
Do this if your Internet connection is present but you cannot browse any sites as your DNS is most likely not working.
If this doesn’t resolve the issue, then configure OpenDNS to resolve your DNS. By configuring OpenDNS servers, your DNS requests will be directed to OpenDNS.
The aim of this process is to direct DNS traffic from your network to the OpenDNS global network by accessing network settings, turning off Automatic DNS configured by your ISP, and configuring OpenDNS IPv4 addresses.
3. Change your VPN
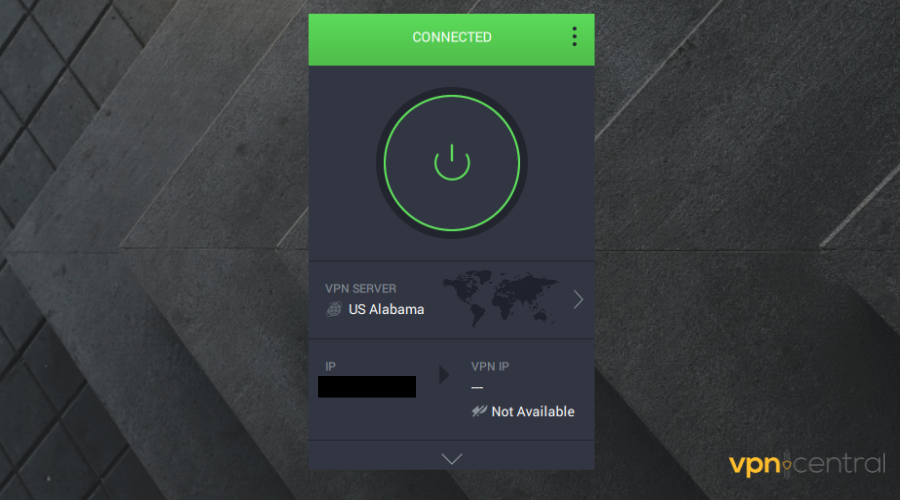
We strongly advise you to reconsider your choice of using a cracked version of a VPN. Not only that it won’t protect you but might actually be malware in disguise.
Things are no different for free VPNs that lack any reputation for guaranteeing your privacy. In the meantime, Kape Technologies, the parent company of PIA VPN, is a leader in privacy.
Therefore, this VPN records no data that could be used to track your activities online or associate you with specific activities.
Its servers are incredibly fast, making it a great VPN for streaming and gaming with limited drops or delays to worry about.
Another major advantage is customer support. Users who experienced problems with the operation of the VPN were able to solve them in a few hours with no major inconveniences.

Private Internet Access
Use premium VPN features to get an error-free and completely private connection.4. Check the Ethernet adapter option settings
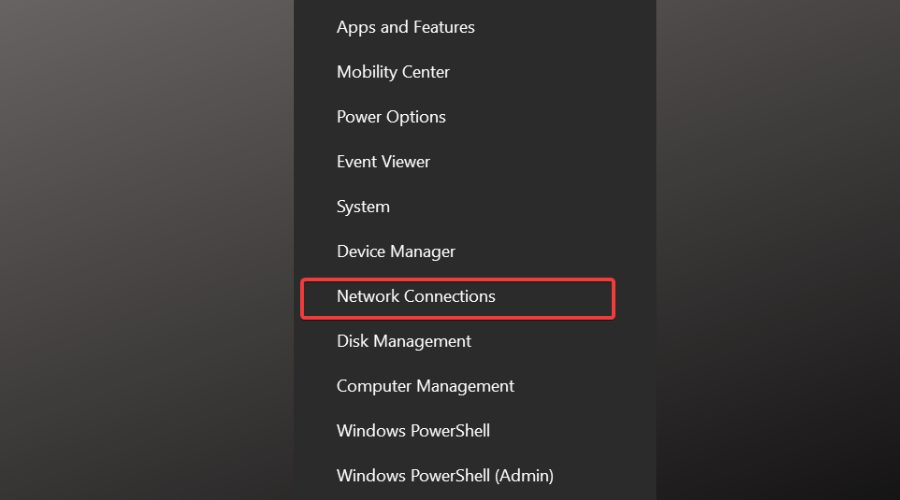
- Right-click the Start menu and select Network Connections.
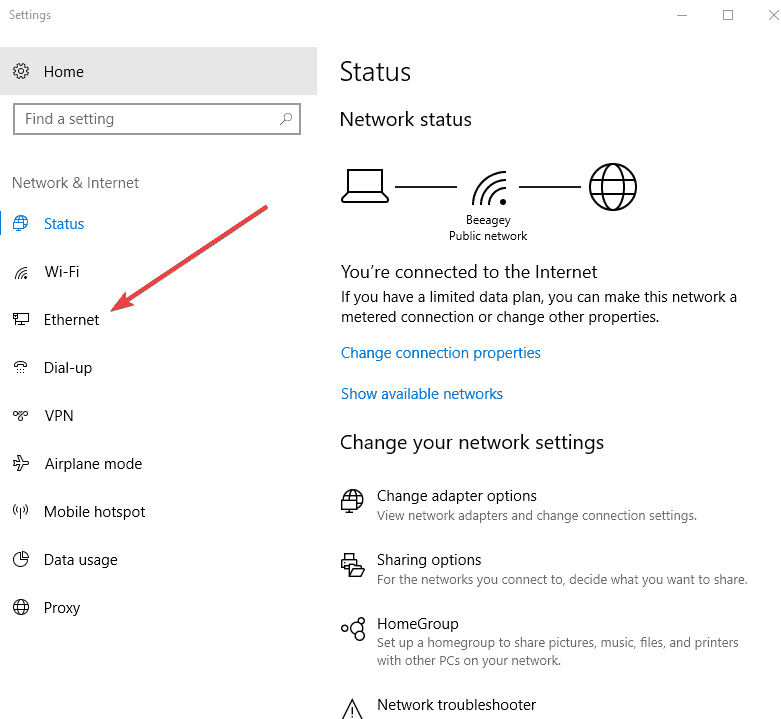
- On the left-hand side click Ethernet.
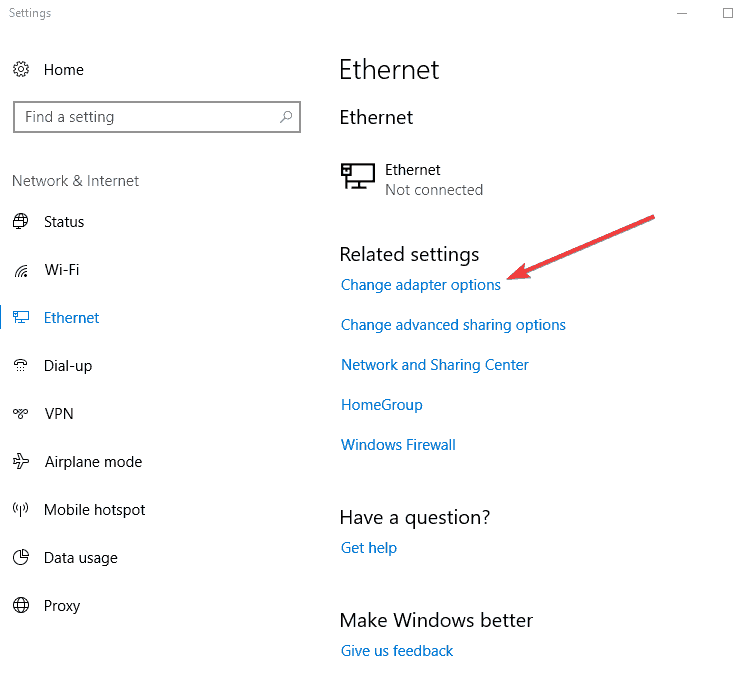
- Click Change adapter options.
- Right-click the network connection you’re using and select Properties.
- Highlight Internet Protocol Version 4 (TCP/IPv4) and click Properties.
- Select Use the following DNS server addresses and type OpenDNS addresses (208.67.222.222 and 208.67.220.220) in the Preferred DNS server and Alternate DNS server fields.
- Click OK, then Close, then Close Finally, close the Network Connections window.
- Flush your DNS. At this point, we recommend that you flush both your DNS resolver cache and your web browser’s cache. This ensures that your new DNS configuration settings take effect immediately.
5. Flush the DNS cache
- Click Start.
- Select All Apps.
- Click Accessories.
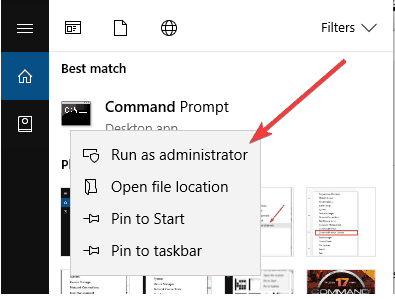
- Click Start and type CMD, then right-click Command Prompt, and select Run as administrator.
- Type ipconfig /flushdns and press Enter. You should get a confirmation that says: Windows IP Configuration Successfully flushed the DNS Resolver Cache.
In some countries, DNS entries saved from your ISP on your computer may be intentionally wrong, as an additional method of blocking sites.
In this case, flush your DNS cache so your computer can automatically access your VPN’s DNS for the proper/correct entries.
Other solutions to try:
- If you have configured a proxy in the past please ensure that it is disabled. This usually needs to be done via your browser settings.
- If you have another browser installed, use it and see if you have the same issue. You should also attempt to start your browser in ‘safe mode with all add-ons/plugins disabled. In Chrome open an ‘incognito’ window. If any of these methods allow you to browse the Internet then the issue lies with your Internet browser configuration.
6. Check your underlying connection
Disconnect from your VPN connection, and try to access the Internet. If you can access the Internet, connect to your VPN, and move to the next step of this guide.
If you cannot access the Internet, the problem has to do with your Internet connection. You may need to reboot your device and check your network settings to fix this.
7. Change your VPN protocol
VPN protocols are the methods by which your device connects to a VPN server. If your VPN uses the UDP protocol by default, this may be blocked in some countries.
For optimal performance, choose the protocols below in the following order:
- OpenVPN TCP
- L2TP
- PPTP
Open your VPN’s options or settings and select the Protocol from the list.
Note: PPTP offers only minimal security so only use it when absolutely necessary.
You may also want to read:
- Can’t Connect to VPN on Public Wi-Fi? Here’s What to Do
- VPN Not Working on 4G? Try These Fixes
- Can’t Connect to VPN When Using Mobile Hotspot? Here’s the Fix
8. Change your DNS server configuration
Open Network Connections settings
- Right-click Start and select Run.
- Type ncpa.cpl and click OK.
- In the Network connections window, find your usual connection, either LAN or Wireless network connection.
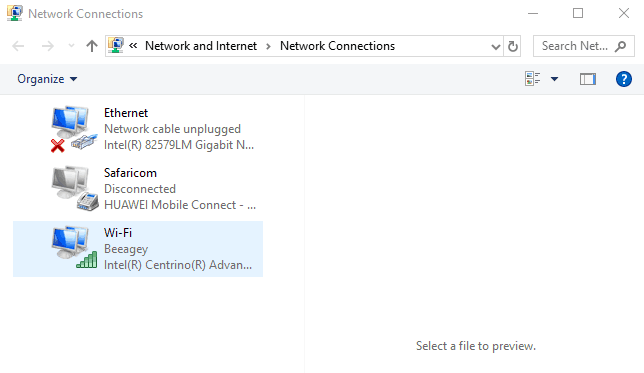
- Right-click the connection and select Properties.
Set the DNS server addresses
- Double click Internet Protocol Version 4 (IPv4) or just Internet Protocol.
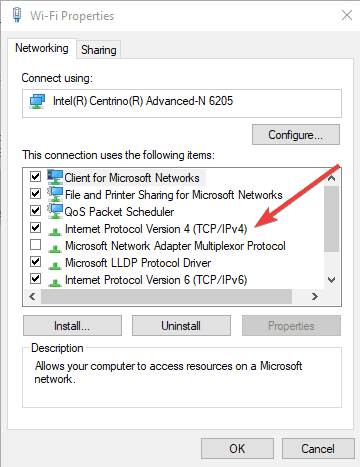
- Select Use the following DNS server addresses.
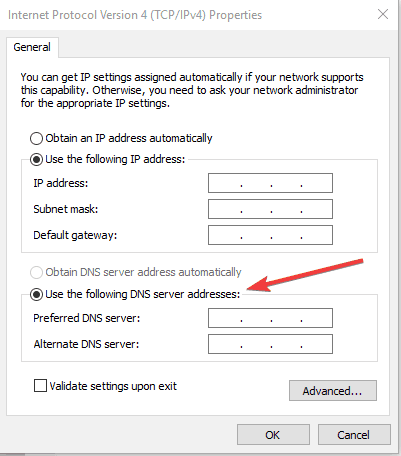
- Type these Google DNS server addresses: Preferred DNS server 8.8.8.8 and Alternate DNS server 8.8.4.4
- If Google DNS is blocked, try the following: Neustar DNS Advantage (156.154.70.1 and 156.154.71.1) enter and press OK; Level3 DNS (4.2.2.1 and 4.2.2.2) enter and press OK. Once you’re done, set your VPN’s DNS settings, and flush old DNS entries as described in the next solution.
Manually configuring your Windows computer with other DNS server addresses can help you access blocked sites and enjoy faster speeds.
To configure your Windows computer, please follow the instructions above.
9. Adjust your proxy settings
- From the Tools or gear menu.
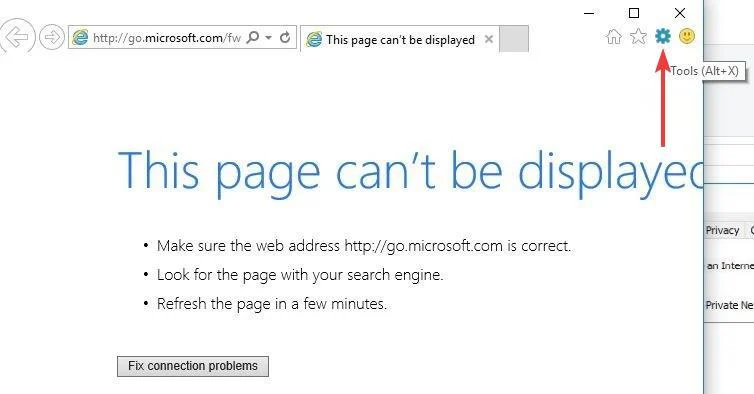
- Select Internet options.
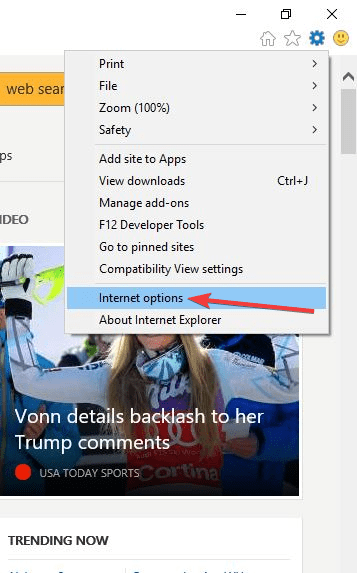
- In the Connections tab, click LAN settings.
- Uncheck all of the displayed options except automatically detect settings.
- Click OK, and OK.
- Close your browser and then open it again.
A proxy server is an intermediary between your computer and the Internet, often used to hide your real location and allow you to access websites that would otherwise be blocked.
If you’re having trouble connecting to the Internet, it’s possible that it has been set to use a proxy server.
Make sure that your browser is set to an auto-detect proxy or to no proxy.
No Internet when connected to VPN
The most common reasons why the Internet is not working when VPN is connected are rooted in your configuration:
- Incompatible DNS setup
- Unstable Internet connection
- Inadequate server or server location
- Your VPN is temporarily down
Such problems aren’t specific to a VPN service. Users of many different VPNs reported having this type of problem, noting familiar scenarios such as:
- NordVPN connected but no internet (NordLynx no internet access)
- GlobalProtect is connected but no internet
- Radmin VPN no internet access
- Windows VPN no internet access
- Surfshark connected but no internet
- You Can Only Connect to the Internet Through a VPN
- ExpressVPN not working
- Forticlient VPN connected but not working
- Pulse Secure is connected but no internet
- OpenVPN connected but not working
- VPN connected but can’t access the server
- When you connect to VPN, Internet is not working
On that same note, the error doesn’t discriminate when it comes to the operating systems either. The issue can happen on any device or operating system, but we’ve noticed it happens most for:
- Windows 10 VPN users
- Windows 11 VPN users
- macOS VPN users
Depending on the root cause, you can decide which of the above-mentioned solutions would work best for you.
Additionally, reputable VPN clients have their own troubleshooting tools that can answer the question of why your VPN is connected but not working, by running a scan to detect bugs and errors in your configuration.
Below you can find how to use one such tool on one of the most popular VPN clients.
How to Fix NordVPN connected but no Internet?
- Open NordVPN and click on the Settings icon in the lower corner on the left.
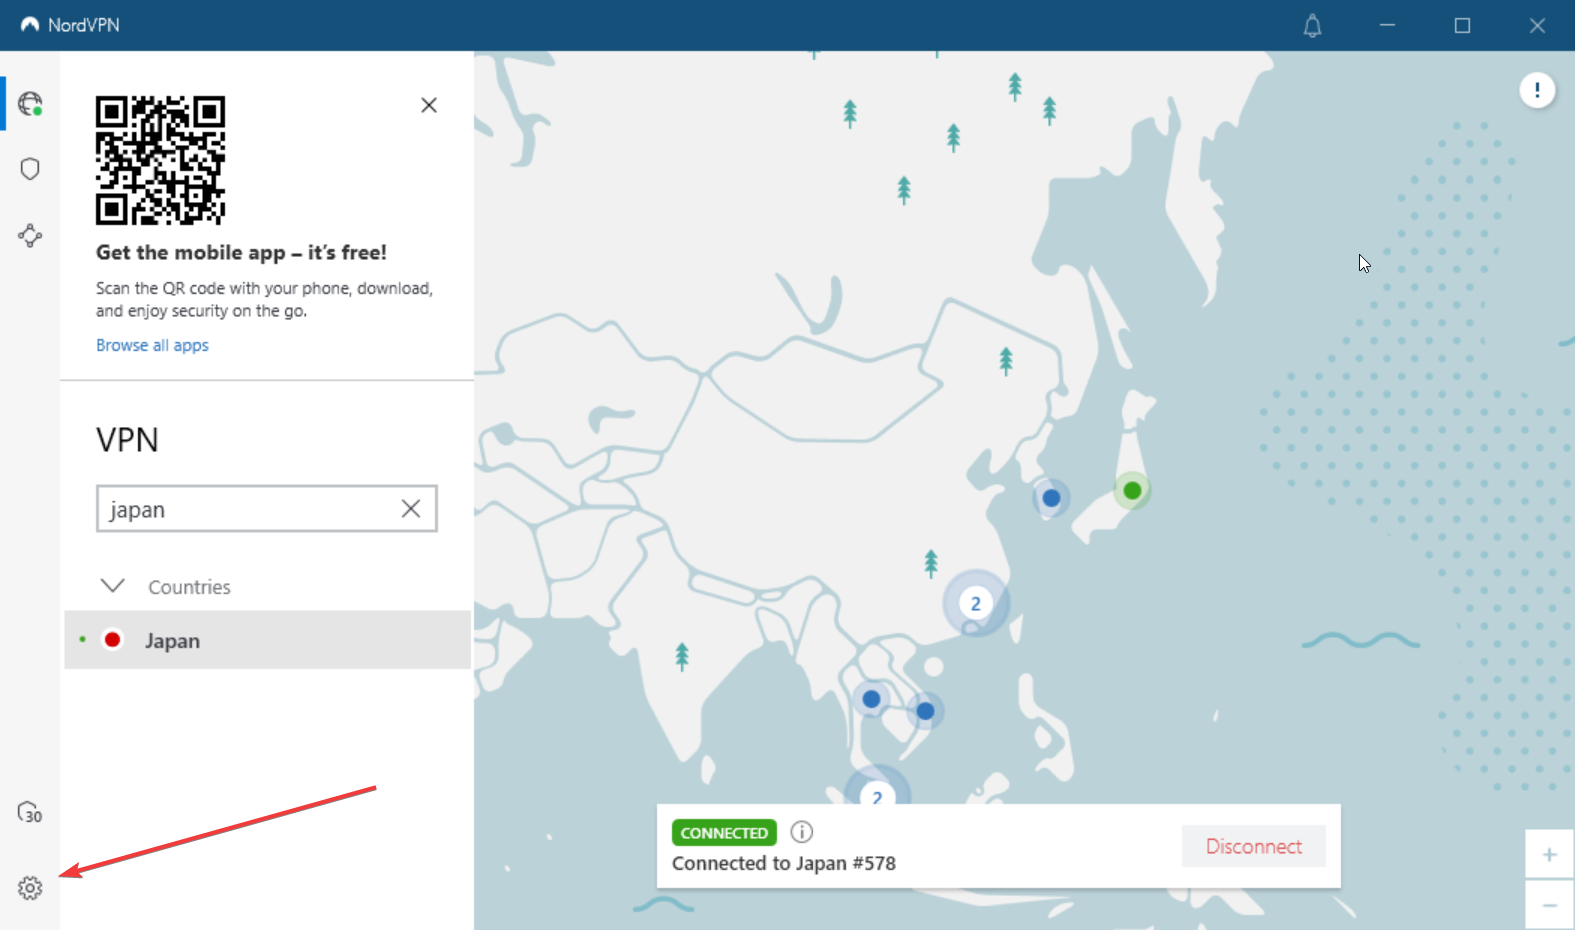
- Select Advanced.
- Click on the Run diagnostic tool link.
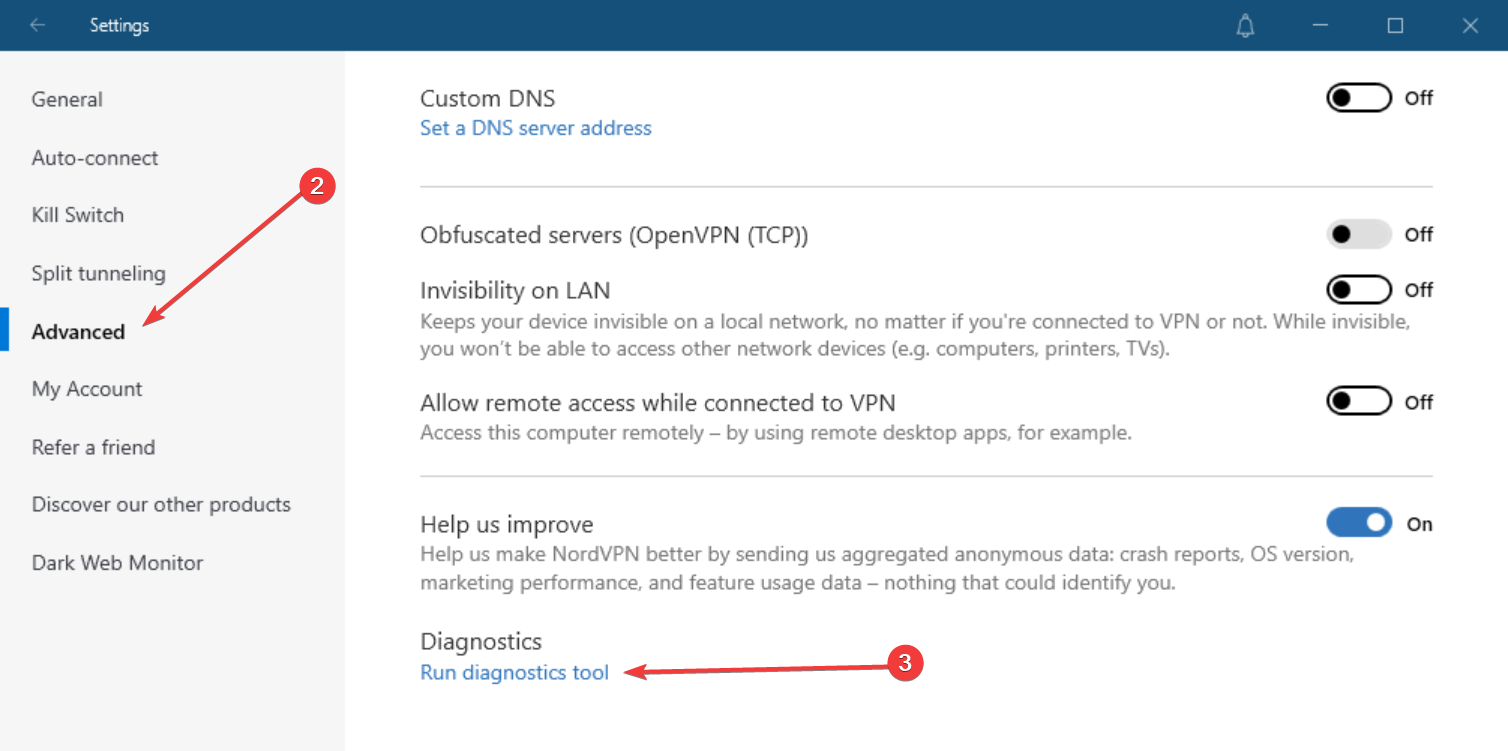
- Select Network Flush.
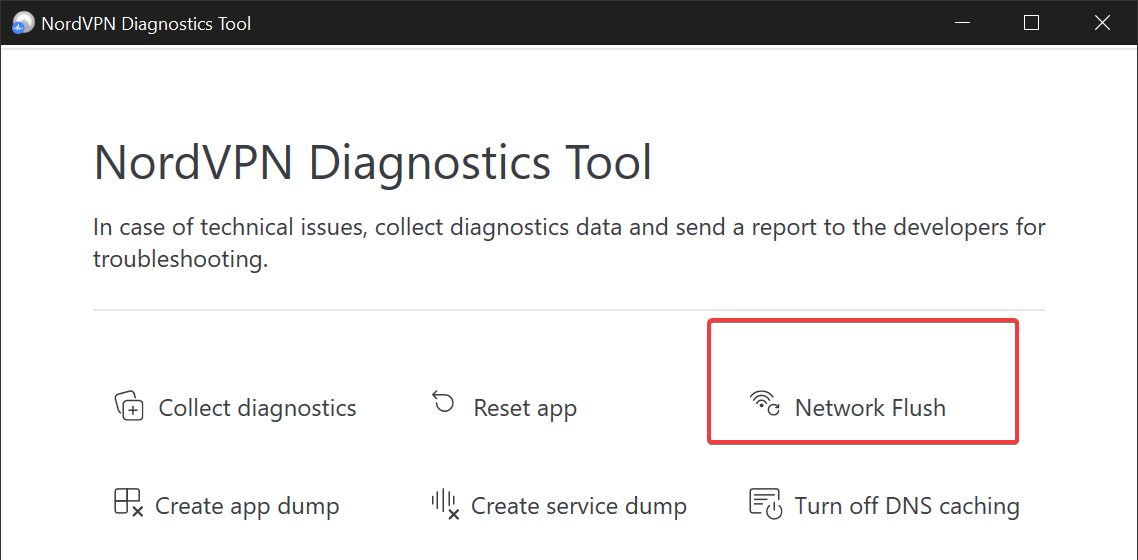
- Wait for the process to complete and check your Internet connection again.
This built-in utility resets your connection and removes any connection bugs that can appear over time.
Note: The steps above will not help you access online streaming services. If you’re unable to access a service because a VPN or proxy is detected, please contact your VPN support team for immediate assistance.
Did any of these solutions help? Let us know in the comments section below.
FAQ
There are several ways you can check whether your VPN is working or not:
1. Most VPNs tell you when you’re connected to a server. Check the status your software shows you.
2. Take note of your IP address, connect to a VPN server, and visit IPLeak. If the IP address the website discovers differs from yours and matches that of the server, then the VPN is working.
3. Check for DNS leaks on IPLeak. The website will show you if the VPN software is failing to encipher your DNS traffic.
Here are some of the quick and easy solutions for when your VPN is not connecting:
1. Check your internet connection.
2. Restart your device.
3. Connect to a server in another location.
4. Examine your VPN settings.
5. Disable your firewall and antivirus.
6. Check whether your VPN software needs updating.
7. Reinstall your VPN software.
If none of these solutions work, it’s a good idea to contact your VPN provider’s customer support.
If you’re unable to access the internet after you connect to a VPN server, apply one or more of the following fixes:
1. Connect to a different VPN server.
2. Check whether the software needs updating.
3. Disable your browser’s proxy settings.
4. Change your VPN protocol.
5. Disable your firewall and antivirus.



User forum
9 messages