VPN Establishment Capability for Remote User is Disabled [Fix]
Unlock remote access with Cisco VPN! Fix errors & connect hassle-free. Here's how!
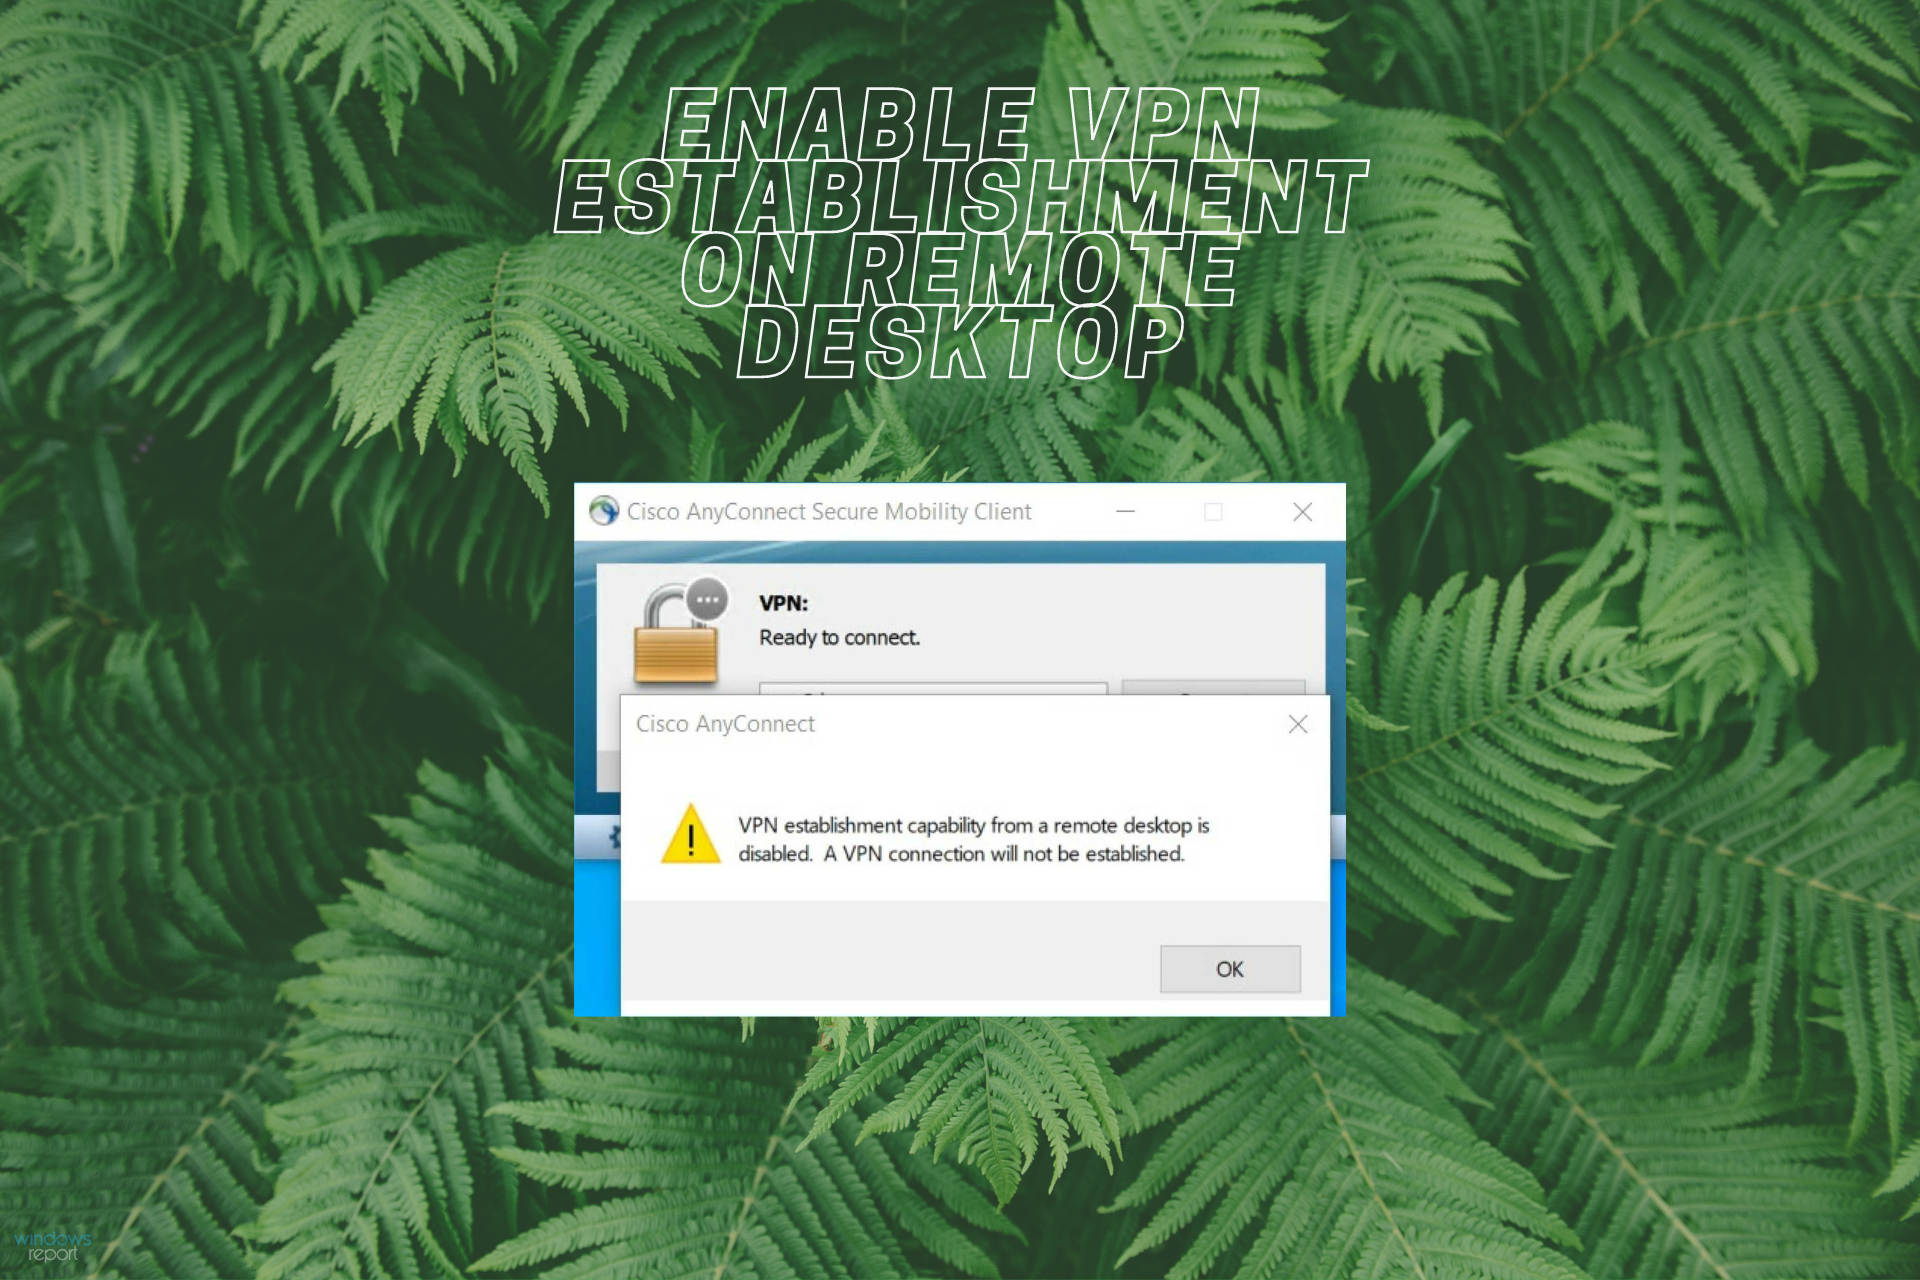
If you try to create a VPN connection using Cisco VPN, you might get the VPN establishment capability for a remote user is disabled error message. Don’t worry. I’ll explain all you need to fix it, step-by-step.
Depending on your version of Cisco AnyConnect, you might also get the error that states Cisco Anyconnect VPN establishment for a remote desktop is disabled. A VPN connection will not be established which has the same cause and can be solved by following the same steps.

Access content across the globe at the highest speed rate.
70% of our readers choose Private Internet Access
70% of our readers choose ExpressVPN
Browse the web from multiple devices with industry-standard security protocols.

Faster dedicated servers for specific actions (currently at summer discounts)
Those who use early versions of AnyConnect 4 might not see this error, the issue appears more often for Cisco AnyConnect 3.1 patch and Windows 7 or XP users.
For the latest versions (above 4), Cisco connects and then immediately disconnects, which should be a sign that something’s wrong. Plus, if you have debugging mode activated, you might receive the Profile settings do not allow VPN initiation from a remote desktop message.
That’s why it’s important to update the Cisco AnyConnect Secure Mobility Client to the latest version before proceeding with the following steps.
How to enable VPN establishment capability from a remote desktop?
Activate AllowRemoteUsers
You must activate AllowRemoteUsers to enable the remote desktop’s VPN establishment. That way, you get access to your system from virtually anywhere.
Here’s how to configure it step-by-step:
Time needed: 5 minutes
- Connect to the ASDM (Cisco Adaptive Security Device Manager)
- Go to Configuration > Remote Access VPN > Network Client remote Access > AnyConnect Client Profile
- Set a Profile Name and pick a Group Policy to apply it to
- Click OK
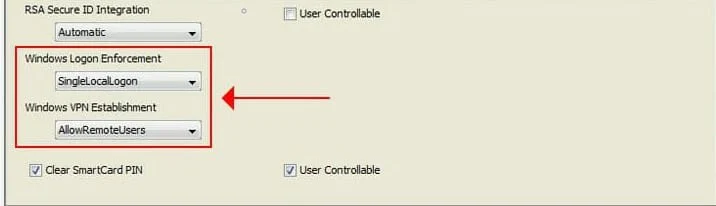
- Set Windows Logon Enforcement to SingleLocalLogon
- Set Windows VPN Establishment to AllowRemoteUsers*
- Save the profile as an XML
- Connect to the firewall’s ASDM
- Go to Tools > File Management > File Transfer > Between Local PC and Flash
- Select and upload the XML you previously created
- Once the file is uploaded, click Close
- Go to Configuration > Remote Access VPN > Network (Client) Access > Group Policies
- Select your Group Policy for your AnyConnect clients
- Head over to Edit > Advanced > SSL VPN Client
- Find the Client Profile to Download section and uncheck the Inherit button
- Click New > Browser Flash and locate the XML file
- Save all settings and try to reconnect using AnyConnect Mobility Client
Note that Cisco disables remote access to lock out intruders. By enabling it, you create room for potential attacks. Therefore, remember to deactivate it whenever it’s not in use.
Check if you can connect now, after applying the changes.
If you’re still getting the error, try to:
Check for multiple profiles
Checking for multiple VPN profiles is crucial to fix this error. Even if you activated “AllowRemoteUsers”. If some profiles allow remote users and others don’t, it can cause problems when connecting to a VPN.
Here’s what to do to fix that:
- Open File Explorer:
- Click on the folder icon on your taskbar, or press
Windows Key + Eto open File Explorer.
- Click on the folder icon on your taskbar, or press
- Navigate to the Cisco AnyConnect Profiles Folder:
- In the File Explorer address bar, type
%ProgramData%\Cisco\Cisco AnyConnect Secure Mobility Client\Profileand pressEnter. - This will take you directly to the folder where AnyConnect profiles are stored.
- In the File Explorer address bar, type
- Identify the Profiles:
- Look for files with the extension
.xml. These are the profile files. - Note the names of these files. Each file represents a different VPN profile.
- Look for files with the extension
- Check for Multiple Profiles:
- If you see more than one
.xmlfile, it means there are multiple profiles present. - Pay attention to similar or duplicate profile names, as they might be causing conflicts.
- If you see more than one
- Understand the Profiles:
- If you’re unsure about the purpose of each profile, you might need to consult with your IT department or the person who set up your VPN.
- It’s important not to delete or modify these files unless you’re certain about what you’re doing, as it could disrupt your VPN connectivity.
- Back Up Before Making Changes:
- If you need to delete or modify a profile, it’s a good practice to back it up first.
- To back up a profile, right-click on the
.xmlfile and selectCopy. Then, right-click on an empty space within the folder or on your desktop and selectPaste. This creates a copy of the profile.
- Consult Documentation or IT Support:
- If you find multiple profiles and are unsure which one to use or modify, it’s best to refer to any documentation provided by your IT department or reach out to them for support.
By identifying and managing these profiles, you ensure that the correct settings – particularly the “AllowRemoteUsers” option – are consistently applied across all profiles, thereby addressing the error effectively and ensuring a stable VPN connection for remote users.
Does VPN work with remote desktop?
Yes. If you configure your remote desktop via a VPN server, you should be able to use it with no problems. In case your Cisco Anyconnect VPN is not working, try repairing your installation files or fixing your registry.
With a VPN you can easily access files on Windows 10 with ease and increased security. The VPN network encrypts your data, so the risk of leaking or losing private information is very low.
The configuration is simple. You just have to use the same VPN IP address on your remote desktop network to access it using a dedicated or native app.
Check our overview for the best alternatives to Cisco VPN for better performance and improved privacy.
In conclusion, if you receive the VPN establishment capability for a remote desktop is disabled error message when trying to remotely connect to your office using Cisco VPN in RDP mode, just follow the steps above.
You can also read our in-depth article on how to correctly install Cisco VPN on your Windows 11 PC. It will help you avoid any errors along the way and maybe even save a little bit of time.
Read our disclosure page to find out how can you help VPNCentral sustain the editorial team Read more

Improve this guide


User forum
0 messages