How to Fix Dead by Daylight When you Can't Connect to Host
Fix DBD connection issues that prevent the game from connecting
Dead by Daylight errors like Connection with Host Could Not Be Established, No Network Connection,or Cannot Connect to Online Services errors, can halt your survival horror experience dead in its tracks.
Fortunately, with a bit of troubleshooting and some adjustments to your DNS settings, firewall, and more, you can overcome these obstacles. Find below all you have to do, explained step-by-step.

Access content across the globe at the highest speed rate.
70% of our readers choose Private Internet Access
70% of our readers choose ExpressVPN
Browse the web from multiple devices with industry-standard security protocols.

Faster dedicated servers for specific actions (currently at summer discounts)
Why does it keep saying unable to connect to Host?
Encountering the Unable to Connect to Host error in Dead by Daylight can stem from issues ranging from server downtime to problems with your own internet connection. Sometimes, the culprit might be your firewall or antivirus software mistakenly blocking the game, an outdated game version leading to compatibility troubles, corrupted game files disrupting connections, or DNS settings that need tweaking.
Identifying the root cause from these common issues is crucial for a quick fix, allowing you to dive back into the game. Let’s address all of these causes:
How do I fix can’t connect to the host in Dead by Daylight?
Try these solutions to fix Dead by Daylight unable to join host or not connecting:
1. Check your internet connection
A solid internet connection is essential, especially for fast-paced games like Dead by Daylight. Here’s how to make sure yours is up to snuff:
- Test Your Connection: Use Speedtest by Ookla to gauge your internet speed. It’s a reliable site that can quickly measure your download and upload speeds along with your ping. Just access the site and hit “Go” to start the test.
- Understanding the Results:
- Ping (Latency): Lower is better. For gaming, especially something as timing-sensitive as Dead by Daylight, you want this below 100 ms, ideally around 20-30 ms.
- Download Speed: Critical for downloading game updates and streaming content. A speed of 3 Mbps is usually sufficient for gaming, but for Dead by Daylight and a smooth experience, aim for at least 10 Mbps.
- Upload Speed: This is how quickly you can send data to others. You should aim for at least 1 Mbps, though 3-5 Mbps offers a more cushioned buffer.
- Restart Your Router: If your speeds seem off, or your ping is higher than the moon, give your router a rest. Unplug it, wait about a minute, then plug it back in. Wait a few minutes for it to fully reboot, then test your speed again.
A stable and speedy internet connection not only ensures Dead by Daylight runs smoothly but also minimizes frustrating disconnects and lag that can ruin your gaming experience.
2. Restart Game
Sometimes, something as simple as restarting the game can fix bugs that lead to can’t connect to host type errors in Dead by Daylight:
- Log out and exit the game.
- Open Task Manager and make sure no processes related to it are running in the background.
- Wait for a few minutes.
- Launch the game again and log in.
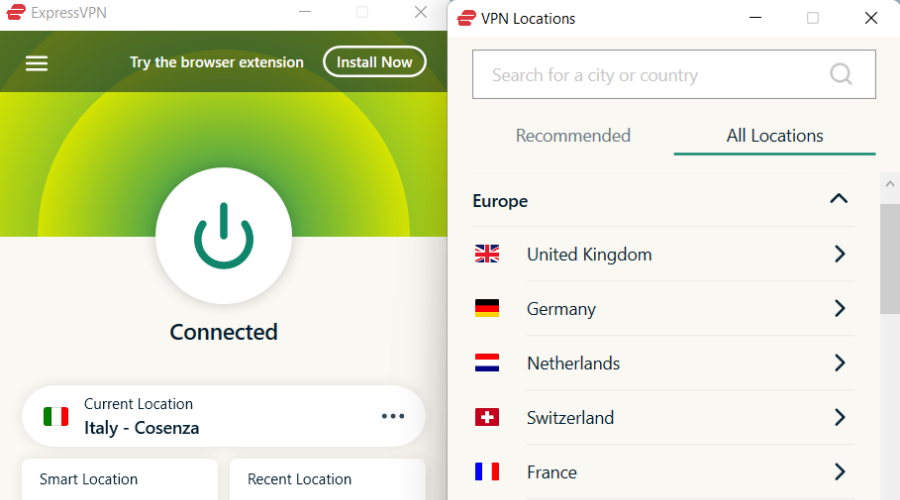
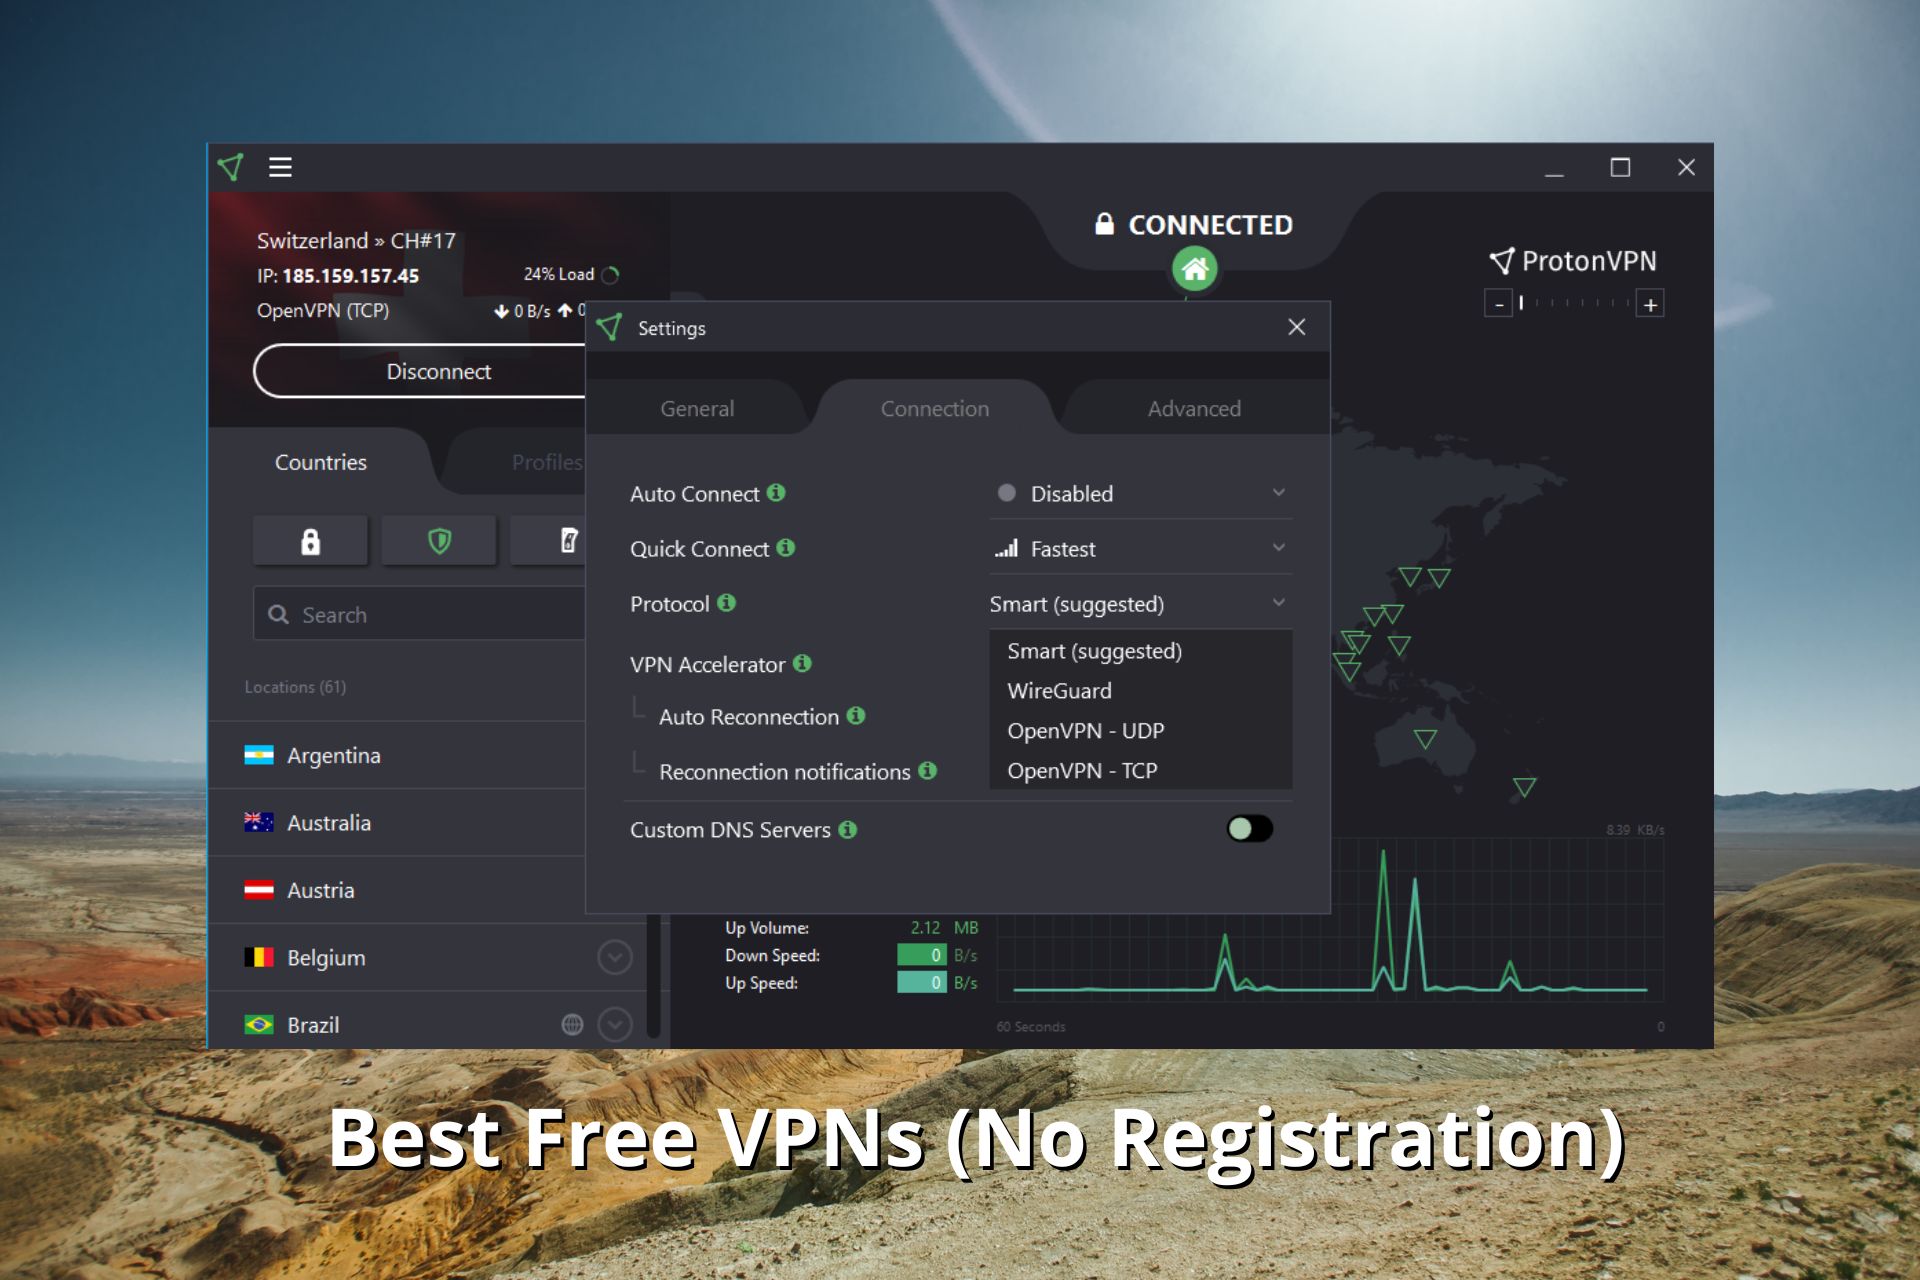
3. Use a VPN
A VPN will help you connect to a private server that’s more suitable for Dead by Daylight. It also helps with secondary network problems like ISP throttling.
For Dead by Daylight connection issues, we recommend using ExpressVPN because it has over 5 000 servers worldwide and exceptional Internet speed scores.
Here’s how to configure it:
- Get an ExpressVPN subscription plan and create an account.
- Download the app for your device, install it, and log in.
- In the main UI, click on the power button to automatically connect to a VPN server.
- Open Dead by Daylight and see if you can connect to host.
You can switch between different servers in ExpressVPN as often as you need, whenever there is a problem with the one you are currently on.
ExpressVPN is one of the most reputable VPNs on the market that can help you not only fix connection-to-host issues but also high ping and IP bans in DBD.

ExpressVPN
Stop network problems from ruining your gaming by connecting to fast and reliable ExpressVPN servers.4. Check DNS settings
If you’re encountering the Can’t Connect to Host error in Dead by Daylight, tweaking your DNS settings could be the game-changer you need.
Changing your DNS servers and flushing your DNS cache are powerful steps that could reduce game loading times and improve connection stability with Dead by Daylight servers.
Change DNS servers
Changing your DNS (Domain Name System) settings can help improve connection speed, reduce latency, and even bypass internet restrictions.
Here’s how to adjust your DNS settings for a potentially smoother gaming experience:
- Pick a DNS service: There are several free, fast DNS servers available. Google DNS (8.8.8.8 and 8.8.4.4) and Cloudflare DNS (1.1.1.1 and 1.0.0.1) are popular choices for gamers due to their speed and reliability.
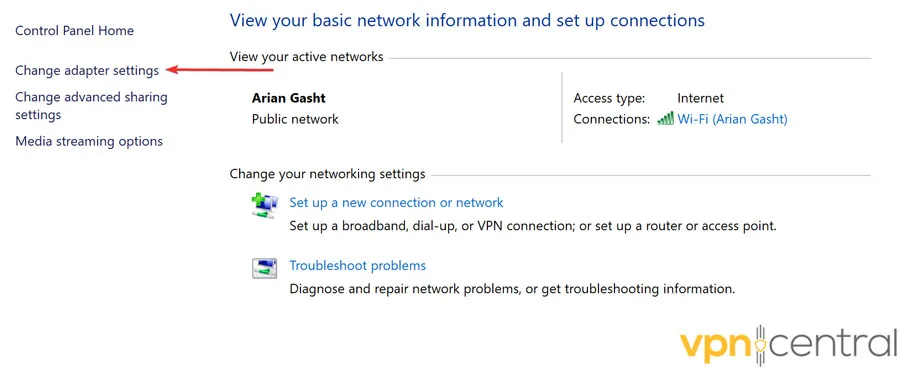
- Open Control Panel: Go to Network and Internet > Network and Sharing Center > Change adapter settings.
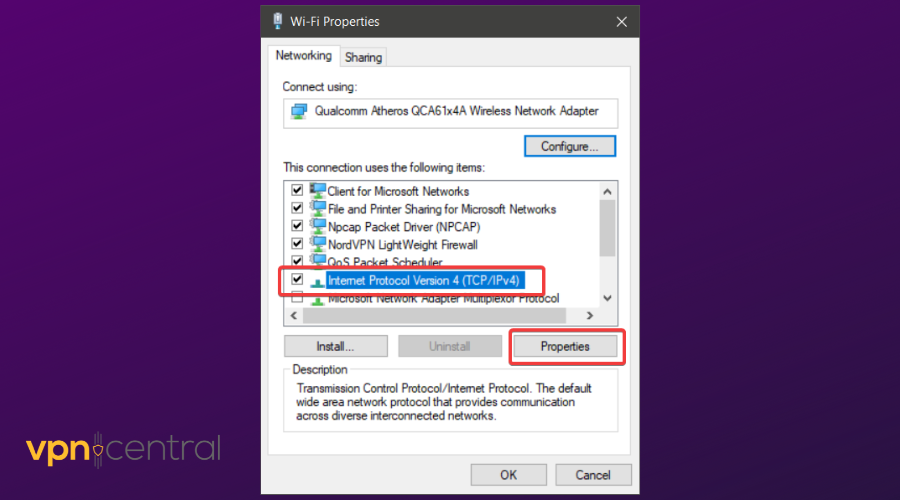
- Modify Properties: Right-click your active network connection and select Properties. Select Internet Protocol Version 4 (TCP/IPv4) or Internet Protocol Version 6 (TCP/IPv6) and click Properties.
- Use the Following DNS Server Addresses: Enter your chosen DNS server addresses here. For Google DNS, input 8.8.8.8 as the preferred DNS server and 8.8.4.4 as the alternate DNS server. For IPv6, use 2001:4860:4860::8888 and 2001:4860:4860::8844 respectively.
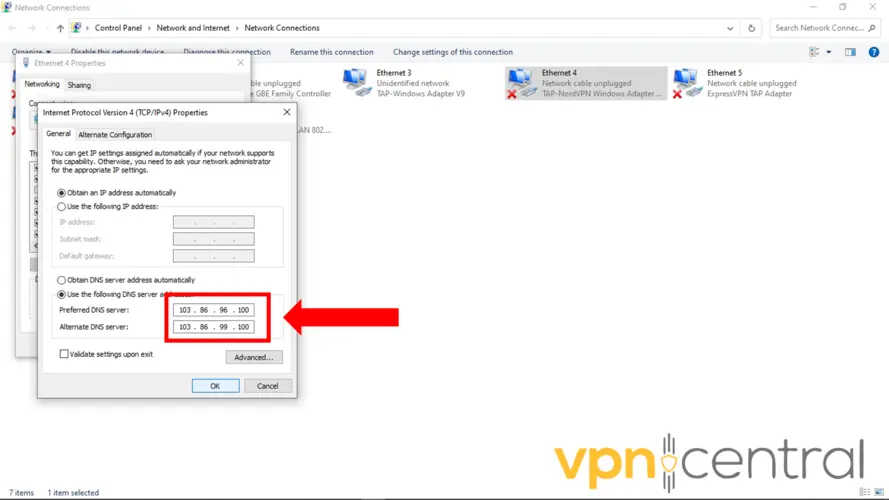
- Save: Click OK to save your changes.
Flush DNS Cache
Your device stores DNS responses locally to speed up future requests to the same domains. However, if this cache becomes outdated or corrupt, it can lead to connection issues.
Flushing (clearing) the DNS cache removes these stored responses, forcing your computer to retrieve fresh information:
- Open Command Prompt: Press the Windows key, type
cmd, then right-click on Command Prompt and select “Run as administrator.”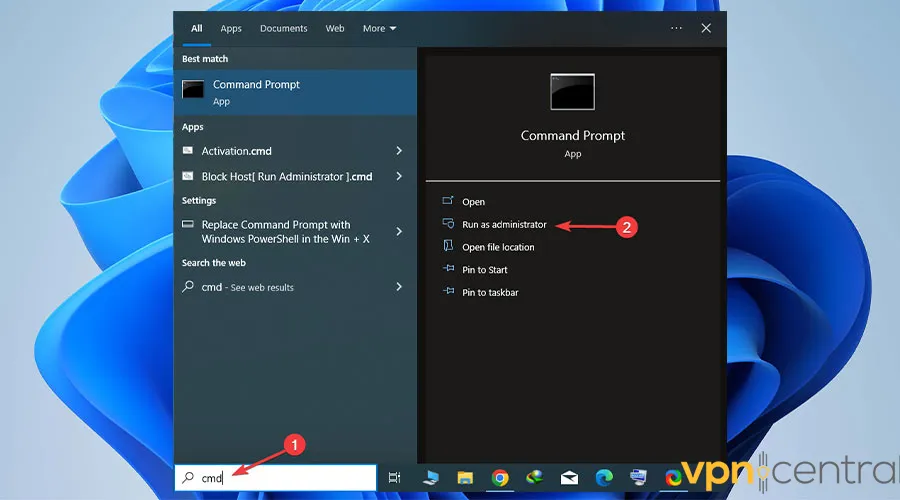
- Enter Flush Command: Type
ipconfig /flushdnsand press Enter. You should see a confirmation message stating that the DNS Resolver Cache was successfully flushed.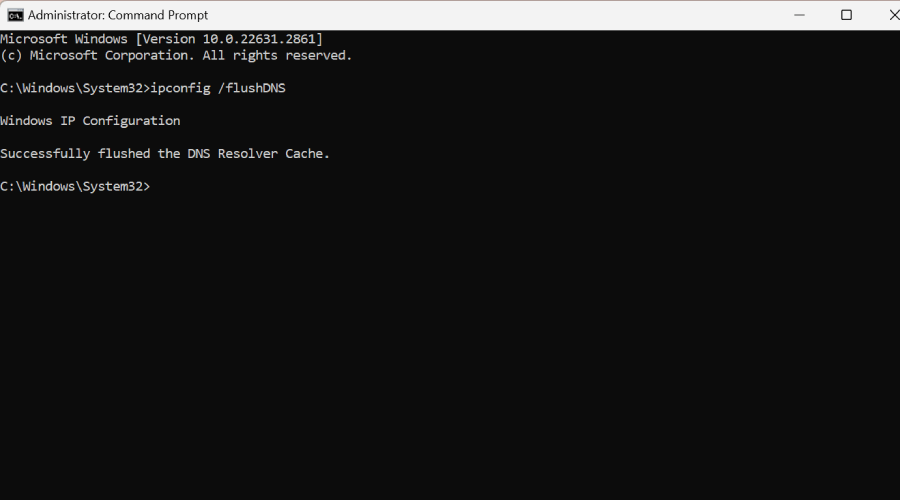
- Restart Your Computer: This ensures all changes take effect properly.
5. Adjust firewall settings
Dead by Daylight might be having server connection issues if you have your PC firewall or anti-virus active. Your firewall can mistakenly block game servers, thinking it’s defending your PC from a threat.
You should confirm that this feature doesn’t block the operation of the game:
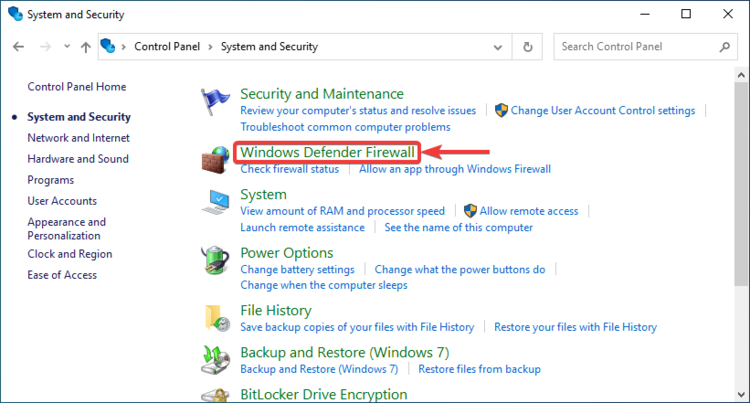
Windows Defender:
- Control Panel: Go to System and Security > Windows Defender Firewall.
- Allow an App: Choose “Allow an app or feature through Windows Defender Firewall.”
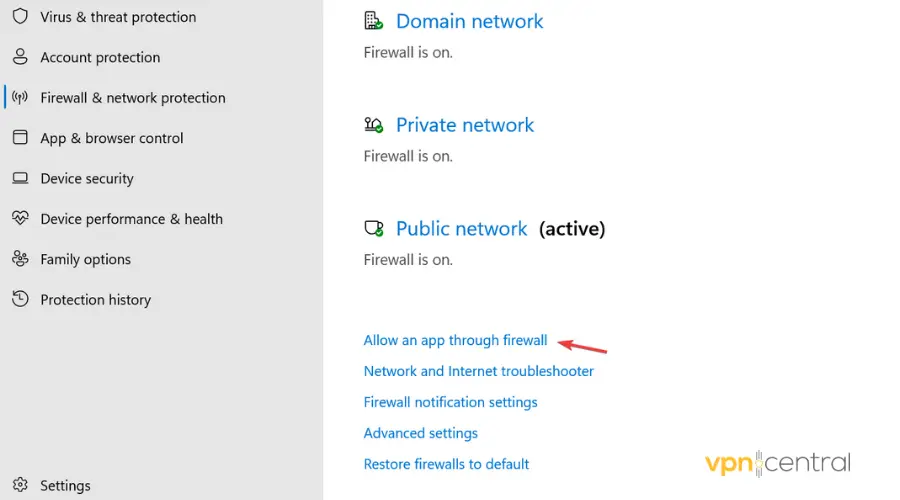
- Allow Dead by Daylight: Find it in the list and tick both “Private” and “Public” networks. If it’s not listed, click “Change settings” then “Allow another app…” to add it manually.
In Your Antivirus Software:
The steps can vary significantly depending on your antivirus software, but generally:
- Open Your Antivirus: Navigate to its main dashboard.
- Look for Exceptions/Exclusions: This could be under “Settings,” “Advanced Settings,” or similar.
- Add an Exception/Exclusion: You’ll often have the option to add specific files or folders. Add the Dead by Daylight installation folder to this list.
- Save Changes: Confirm your settings to ensure Dead by Daylight is not scanned or blocked.
For Specific Antivirus Programs:
- Norton: Go to Settings > Antivirus > Scans and Risks > Exclusions / Low Risks.
- McAfee: Go to PC Security > Real-Time Scanning > Excluded Files.
- Avast: Go to Menu > Settings > General > Exceptions.
6. Verify your game files
- Open Steam: Head to your Library.
- Right-Click Dead by Daylight: Choose “Properties,” then the “Local Files” tab.
- Click “Verify Integrity of Game Files”: Steam will check and fix any missing or corrupted files.
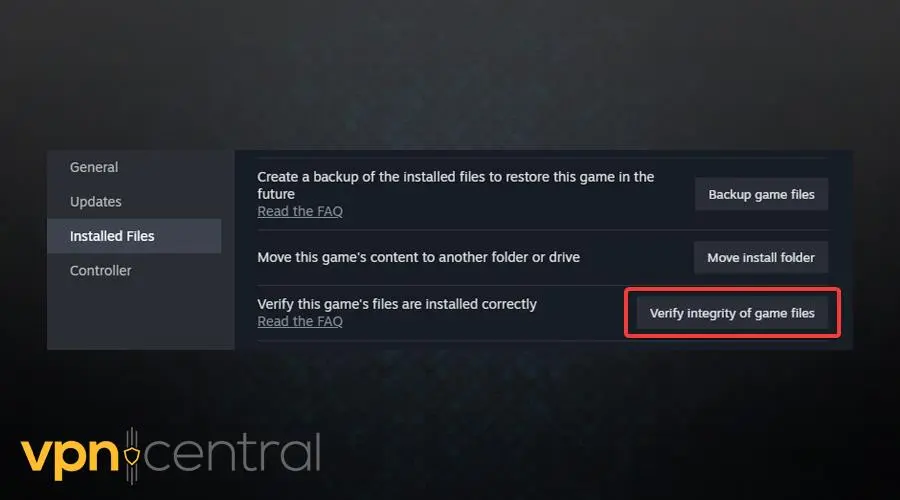
This ensures all Dead by Daylight game files are intact and in the correct version, preventing load and connection issues.
7. Server Availability Check
It happens that Dead by Daylight servers are temporarily down. In this case, you will most likely find the info on Downdetector, Steam Community forums, or the Dead By Daylight X Page.
It helps to confirm online whether the host server is live or temporarily down. If it is the latter, then you need to wait till it is up.
8. Contact your ISP
If you’ve tried everything and still face issues, your ISP might be blocking certain ports or have other restrictions.
They can check for broader connection issues or restrictions on their end that might be affecting your gameplay.
In Summary
Facing a Can’t Connect to Host error in Dead by Daylight is no doubt frustrating, but these steps have been my go-to solutions, and they’ve got me back in the game more times than I can count.
Whether it’s a simple restart, checking your connection, updating the game, adjusting firewall settings, or even reaching out to your ISP, there’s a good chance one of these solutions will work for you.
Bookmark this guide for the next time Dead by Daylight is acting up.
Read our disclosure page to find out how can you help VPNCentral sustain the editorial team Read more

Improve this guide
User forum
0 messages