Netflix Not Working with VPN: 9 Tested Tips for a Quick Fix
![]() 14 min. read
14 min. read
![]() Updated on
Updated on
Share this article

Improve this guide
Read our disclosure page to find out how can you help VPNCentral sustain the editorial team Read more
![Netflix VPN error [10 solutions to fix it for good]](https://vpncentral.com/wp-content/uploads/2022/02/Netflix-930x620-1.jpg)
Some users claimed that their VPN service is not working with services like Netflix.
It appears as if Netflix won’t load with VPNs from different companies, so the issue is not isolated. Users reported OpenVPN, ExpressVPN, VPN Unlimited, Surfshark, IPVanish, or even NordVPN not working with Netflix.

Access content across the globe at the highest speed rate.
70% of our readers choose Private Internet Access
70% of our readers choose ExpressVPN
Browse the web from multiple devices with industry-standard security protocols.

Faster dedicated servers for specific actions (currently at summer discounts)
While these services are generally very reliable for being used with streaming platforms, the Netflix monitoring system is able to detect them.
To bypass these kinds of issues, we’ll show you how to configure your VPN as well as other fixes below.
Why is my VPN not working on Netflix?
Sometimes the VPN may be hit by several factors you should definitely be aware of:
- Connection problems – Even if this seems like an obvious reason why your VPN won’t work, many users forget to think if the connection is stable or not.
- Interrupting antivirus programs – The VPN might not also work on Netflix due to your overprotective software. So temporarily disable any security software you have on your PC.
- Incorrect proxy settings – The proxy errors signify that you’re not allowed to visit a specific website or URL, such as Netflix. Fortunately, we’ll show you how to correctly configure these settings.
- VPN-related problems – You can run into several troubles while running a non-professional VPN. You should go for a premium option for enhanced results.
- Other issues – There are other causes, among which we have to consider outdated OS, your browser’s cache and cookies, or faulty DNS settings.
In this post, we’ll look at what you can do to solve each of the above causes and access your Netflix library completely secure.
Before that, we’ll check out some of the most common Netflix CPN issues users come across:
How do I bypass Netflix’s VPN block? Preliminary checks:
✅ Verify your Internet connection. Sometimes limited/inactive Internet connection can prevent your VPN from working with Netflix. Hence, you need to test your Internet connection.
✅ Restart your PC. Windows users reported that they were able to resolve their VPN problem simply by restarting their PC.
✅ Use a VPN with obfuscated servers or double VPN features.
There are several VPN clients that come with these features so make sure to check if your current provider has them and enable them if it does.
What can I do if Netflix VPN is not working?
1. Check your Date and Time settings
- On the bottom-right corner of your Windows Taskbar, right-click on the Time&Date section.
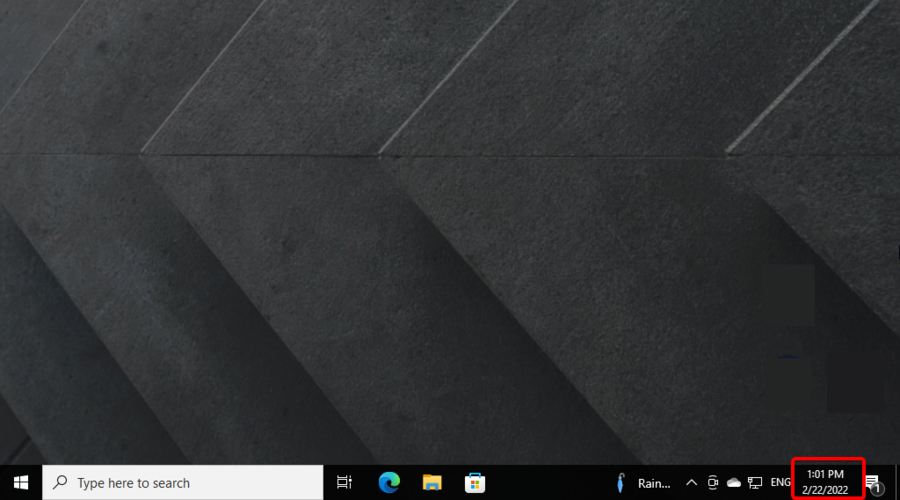
- Choose to Adjust date/time.

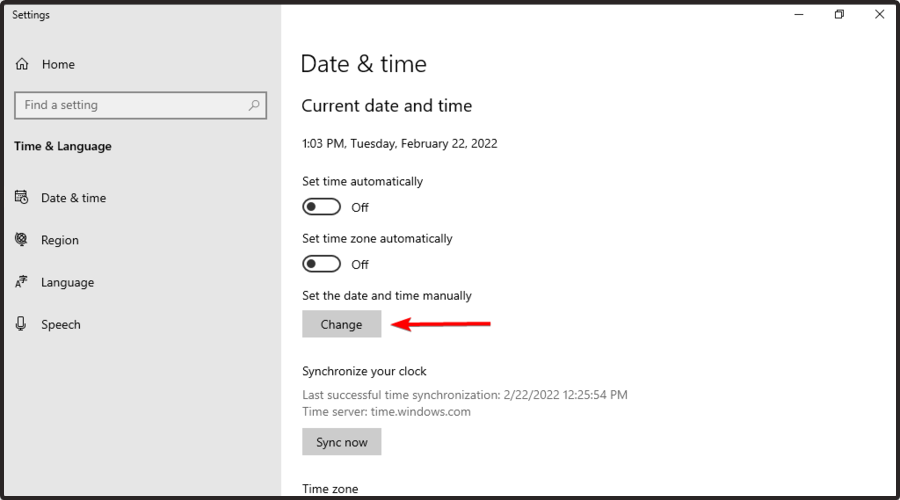
- On the right side of the window, Turn Off the Set time automatically option.

- Now, under the Set the date and time manually, select the Change button.
- Enter the correct date and time, then click on Change.
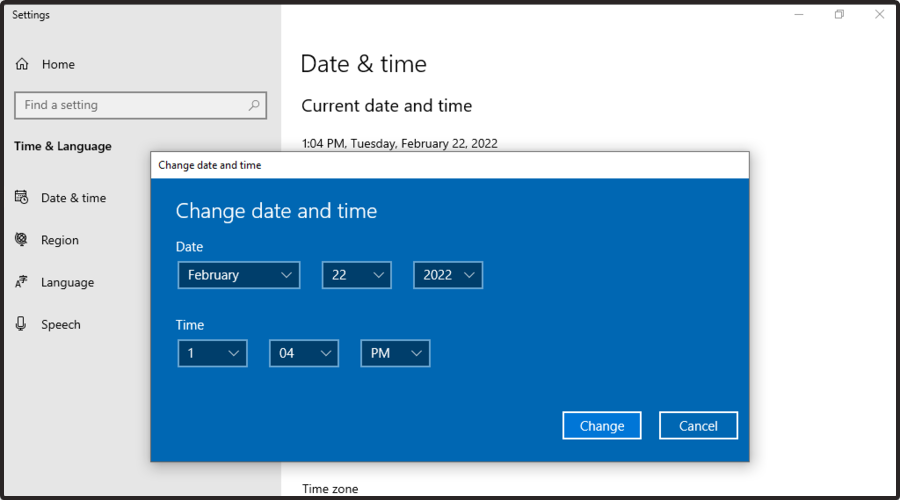
- Reboot your PC, then the system time should be updated.
Some Netflix VPN errors are caused by the incorrect date and time settings on your PC. Check the date and time settings to ensure they are correct.
Disable automatic update of date and time using the Internet, and manually set the date/time parameters. If the clock still displays the wrong time, then check our guide to fixing Windows 10 clock.
However, if you still get the error after restarting your PC, you may proceed to the next step.
2. Try another reliable VPN
If your current VPN doesn’t work with Netflix, you may try an alternative option. Our suggestions below are only VPNs that are streaming optimized and tested to bypass restrictions issues and connection errors.
Obfuscated servers are the feature you have to look for in a VPN. Any of these VPNs are advanced in bypassing streaming blocks, offering you full access to your preferred movies and shows.
Netflix platform may detect any privacy software sometimes, even VPNs that include obfuscation capability. In case you’re using software from below that has been detected, pick another one that suits your needs:
| VPNs | Obfuscation |
| ExpressVPN | Obfuscated servers |
| Private Internet Access | Obfuscated servers |
| Surfshark | NoBorder mode |
| NordVPN | Obfuscated servers |
| VyprVPN | Chameleon protocol |
It’s worth noting that you can try a free trial subscription with any software here to see if the issues are fixed. After the trial period, you may continue with a paid subscription to watch Netflix without any trouble.
3. Check your IP address
If VPN won’t work with Netflix, check your IP address for information such as your city or region (country) next to the location you selected in the VPN window.
You can use a web service such as IP location and WhatIsMyIPAddress to check your IP address location.
However, if you are not connected to the VPN server’s location, try connecting again. Alternatively, you may consider connecting to other VPN server locations and then accessing the Netflix service again.
4. Disable your security software
Some antivirus programs may block your VPN connection hindering you from accessing Netflix. Hence, you may need to temporarily disable your antivirus or firewall so as to be able to access Netflix.
Some antivirus programs have the Temporarily Disable Protection setting, while others do not.
If you have the option to reinstall the security software or program blocking the VPN connection, do it after the software has been installed so that it allows you to connect.
Hence, uninstall the virtual private network software followed by the security program blocking the connection, then install VPN software again, and then reinstall the security program on your PC.
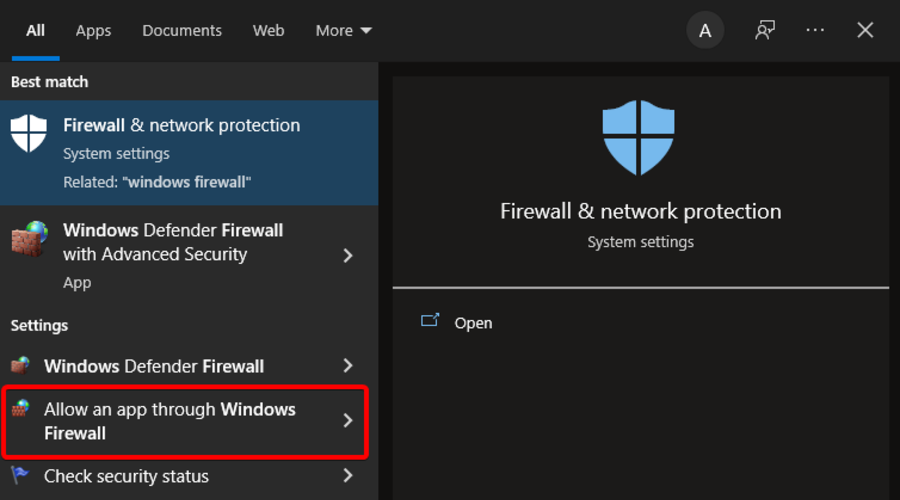
Alternatively, you can also enable the VPN software in the Windows firewall. Here’s how to do this:
- Hit the Windows key, type Windows Firewall, then navigate to Allow a program through Windows Firewall.
- Click on Change Settings options.

- Now, choose to Allow another app…
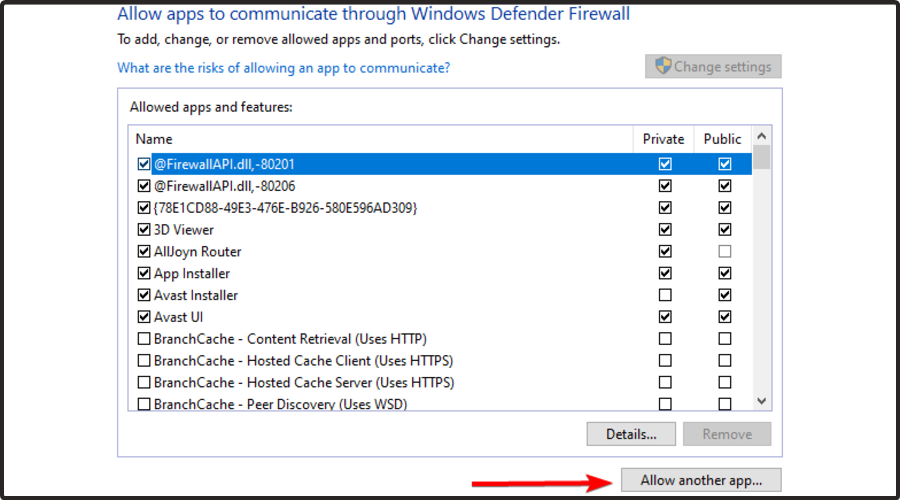
- Select the program you want to add or click Browse to find the VPN software.
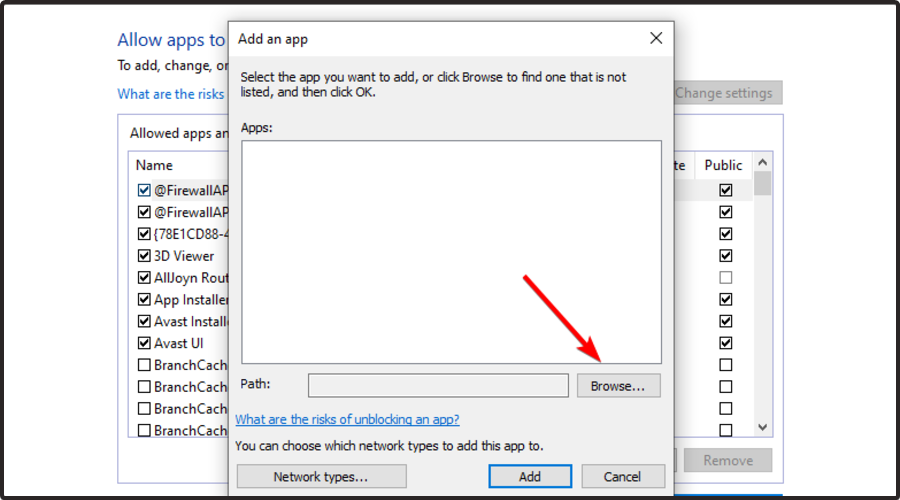
- Click on OK, then check if you can connect again and try to access Netflix.
However, if this does not work, proceed to the next step.
5. Run Windows Update
- Go to the Start, then type update in the search box.
- Navigate to the Check for updates option.
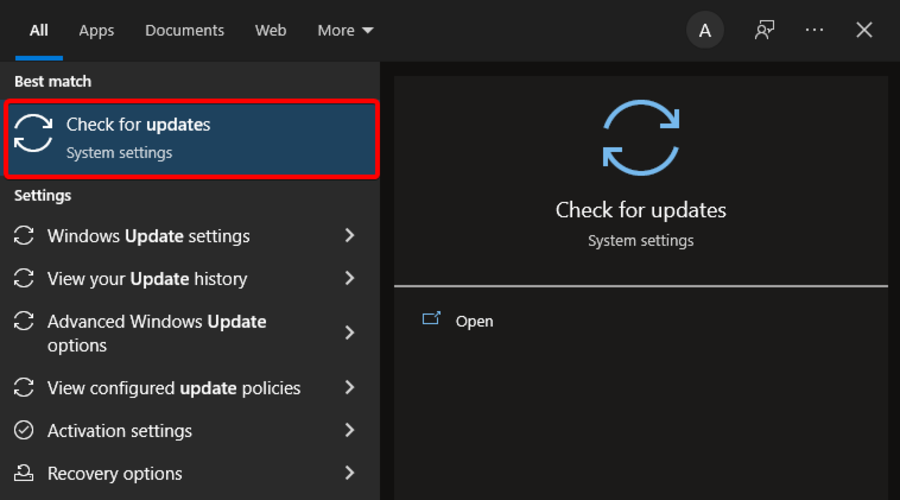
- In the Windows Update window, look in the right side.
- If any updates are available, choose to Install now.
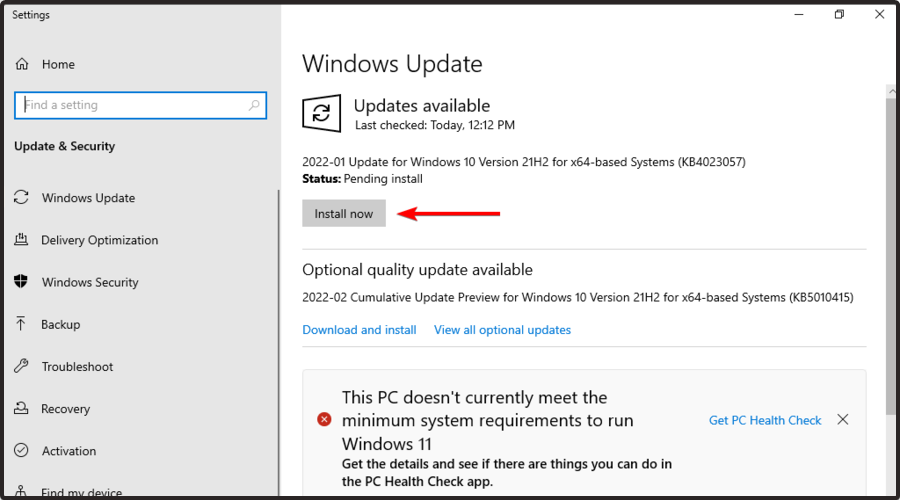
- After the update is complete, restart your Windows PC.
Another way of fixing the VPN not working with Netflix problem is by updating your Windows Operating System to the latest version.
The latest Windows updates improve the system’s stability and fix various issues you may encounter most especially VPN-related. You can follow these steps to update any Windows OS:
6. Manually configure DNS settings
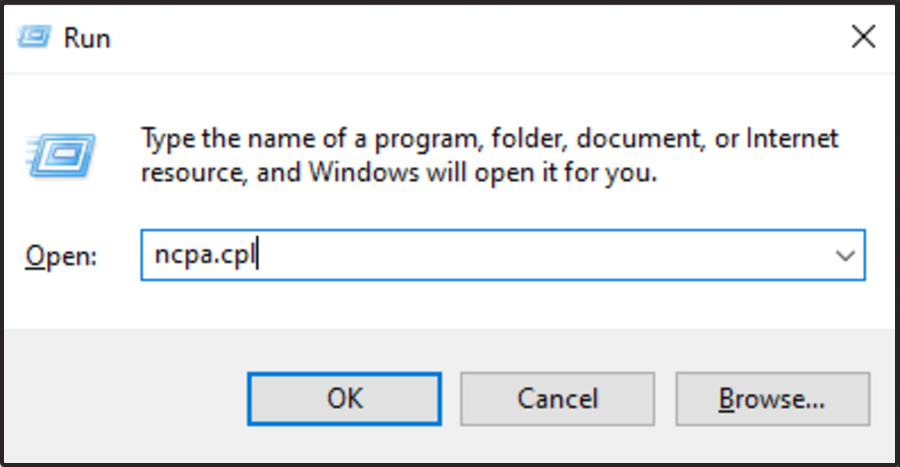
- Use the following keyboard shortcut: Windows + R.
- Type ncpa.cpl and click OK.
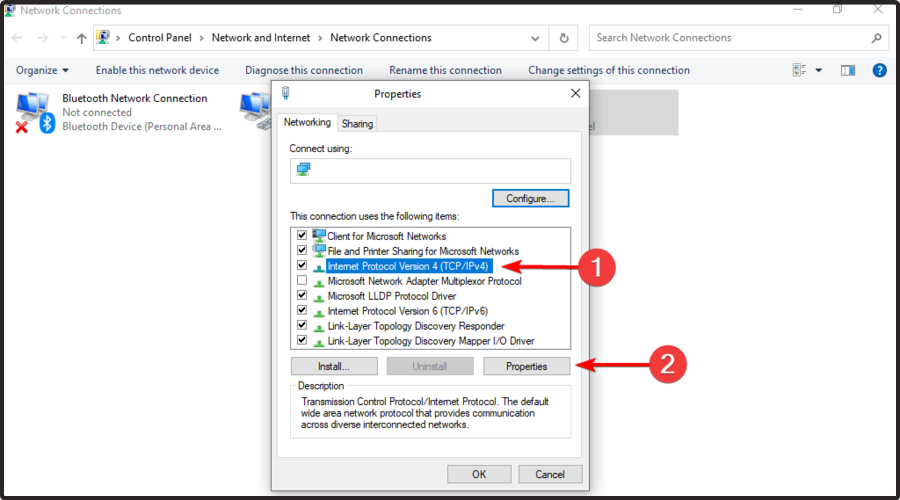
- In the Network connections window, find your usual connection, either LAN or Wireless network connection.
- Right-click the connection and select Properties.

- Double click Internet Protocol Version 4 (IPv4) or just Internet Protocol, then navigate to Properties.
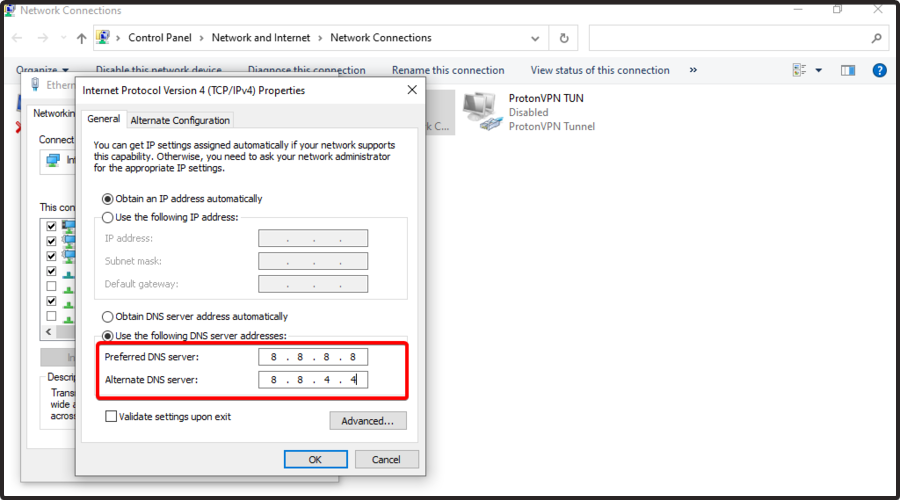
- Select Use the following DNS server addresses.
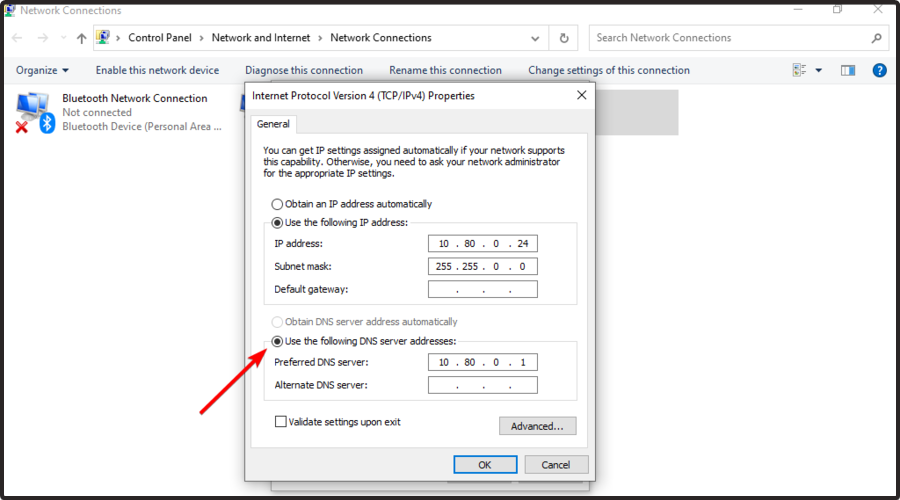
- Type these Google DNS server addresses: Preferred DNS server – 8.8.8.8 and Alternate DNS server – 8.8.4.4.
- If Google DNS is blocked, try the following: Neustar DNS Advantage (156.154.70.1 and 156.154.71.1) and Level3 DNS (4.2.2.1 and 4.2.2.2) enter and press OK.
Manually configuring your computer with other DNS server addresses helps you access Netflix, and enjoy faster connection speeds.
Some computers may not automatically connect to the VPN DNS servers, hence you need to configure it with your VPN DNS servers’ IP addresses, manually.
7. Flush the DNS
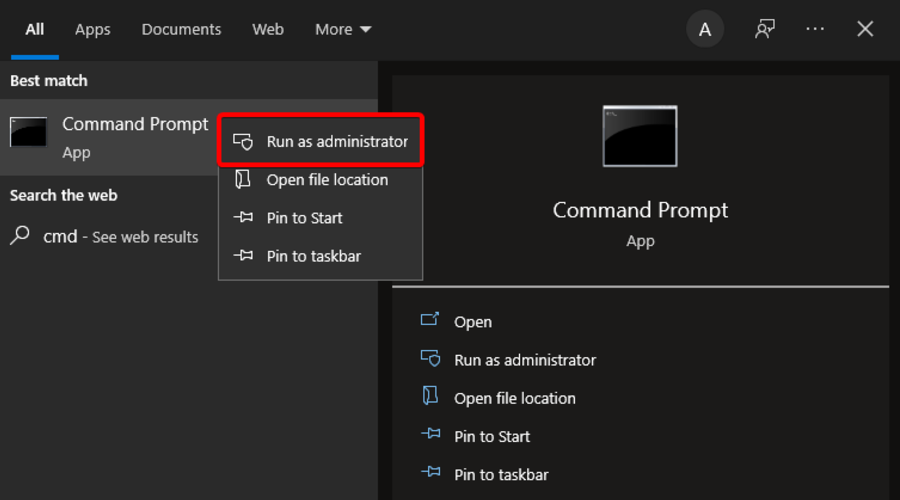
- Hit the Windows key, then type cmd.
- Right-click on Command Prompt, then choose to Run as administrator.
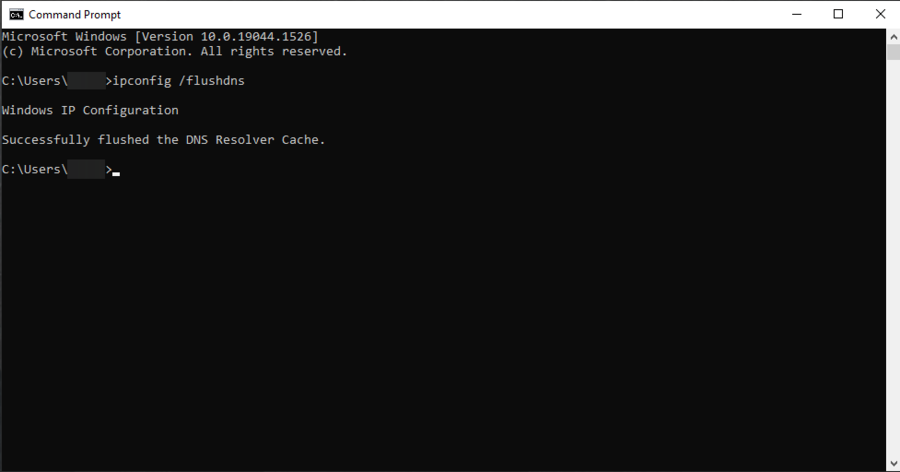
- In the opened window, type the following command, then press on Enter:
ipconfig /flushdns - You should get a confirmation that says: Windows IP Configuration Successfully flushed the DNS Resolver Cache.
8. Clear the browser’s cache and cookies
8.1 Google Chrome
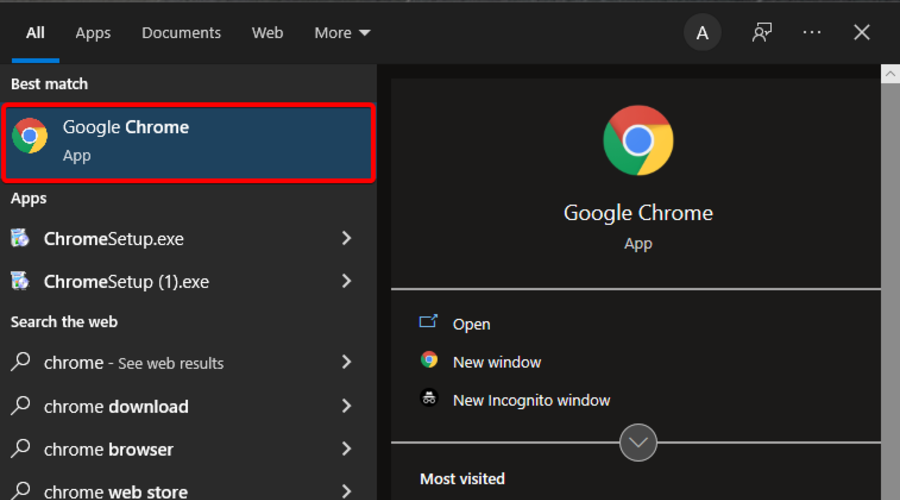
- Hit the Windows key, type Chrome, then click on the first result.
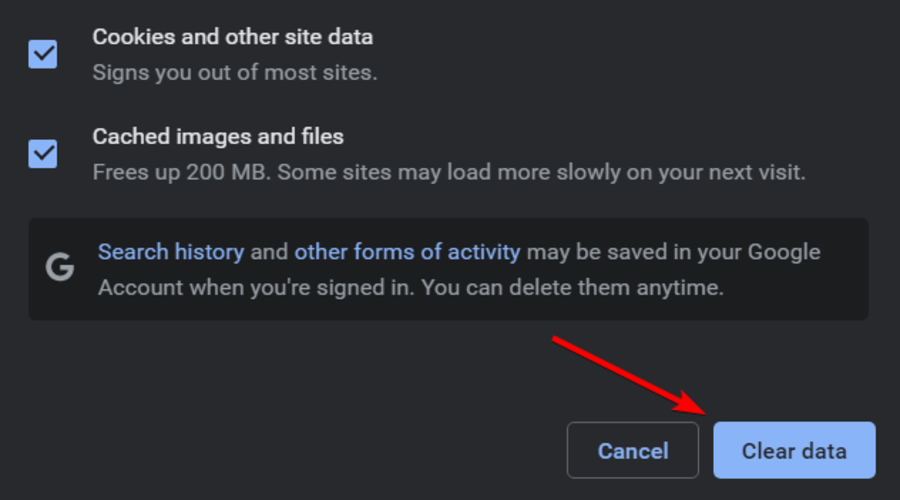
- Press simultaneously on the following keys to open the Clear browsing data window: Ctrl + Shift + Delete.
- In the Time range drop-down menu, select All time.
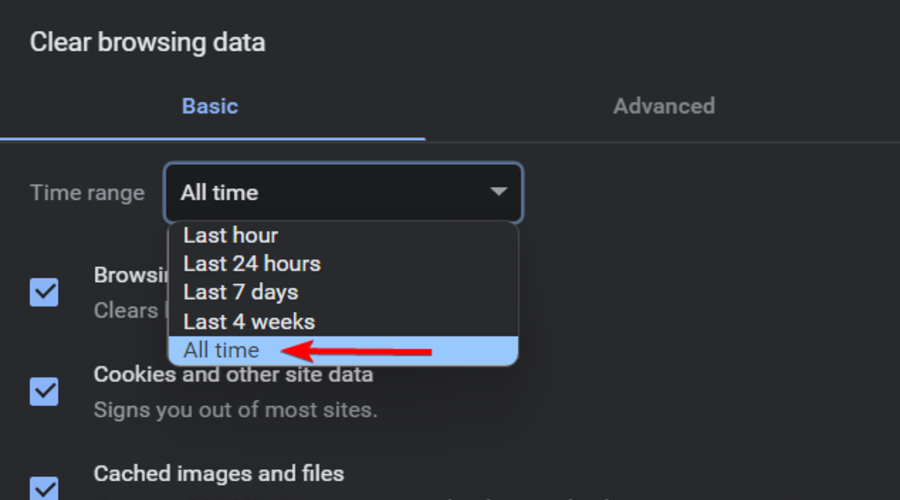
- Now, check the Cookies and other site data and Cached images and files options.

- Click on the Clear data button.
8.2 Mozilla Firefox
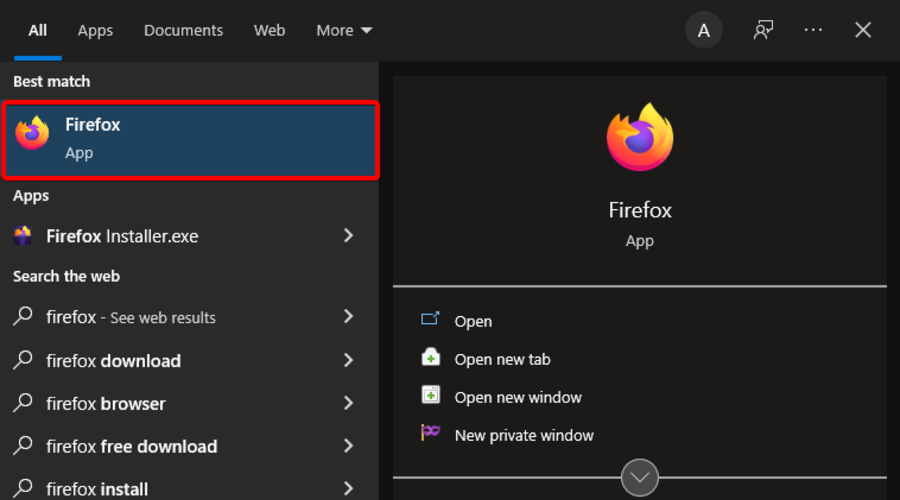
- Hit the Windows key, type Firefox, and navigate to the first result.
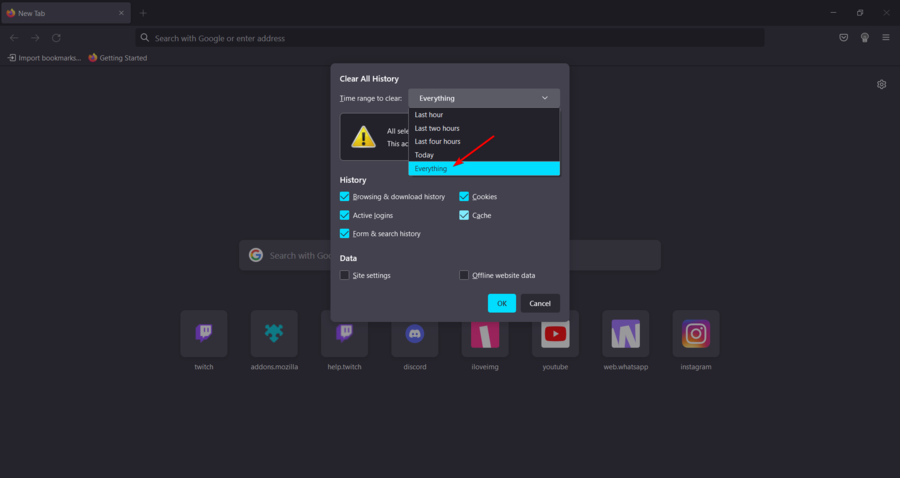
- Use the following keyboard shortcut to open the Clear recent history dialog box: Ctrl + Shift + Delete.
- Under the Time range to clear drop-down menu, select Everything.
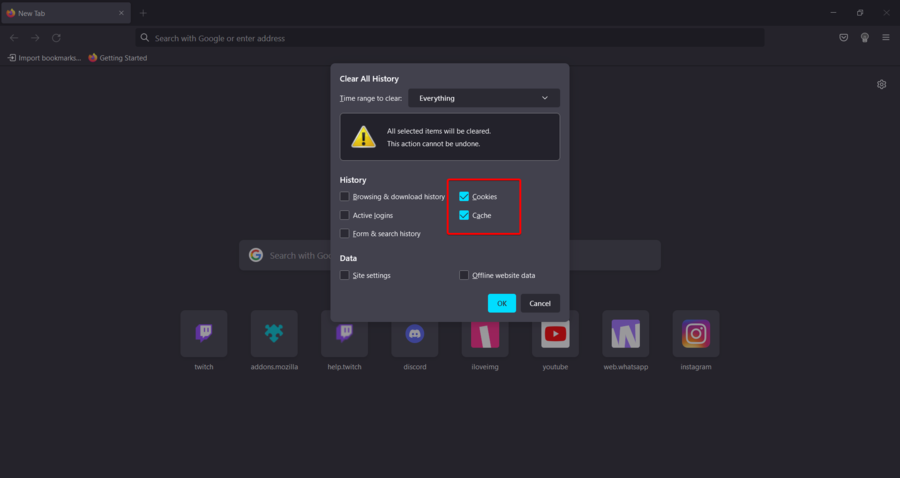
- Make sure to check the Cache and Cookies boxes, then click on OK.
Another way of fixing the VPN won’t work with the Netflix problem is by flushing your DNS and clearing your web browser’s cache.
DNS entries from your Internet Service Provider may be wrong and probably utilized by Netflix to block your virtual private network from accessing their service. Hence, you need to flush your DNS and clear your web browser’s cache afterward.
Keep in mind that Ctrl + Shift + Delete can also be used to clear the cache on other web browsers such as Internet Explorer, Opera, Microsoft Edge, etc.
9. Manually configure Proxy Settings
- Hit the Windows key, then type proxy settings, and open the Change proxy settings option.
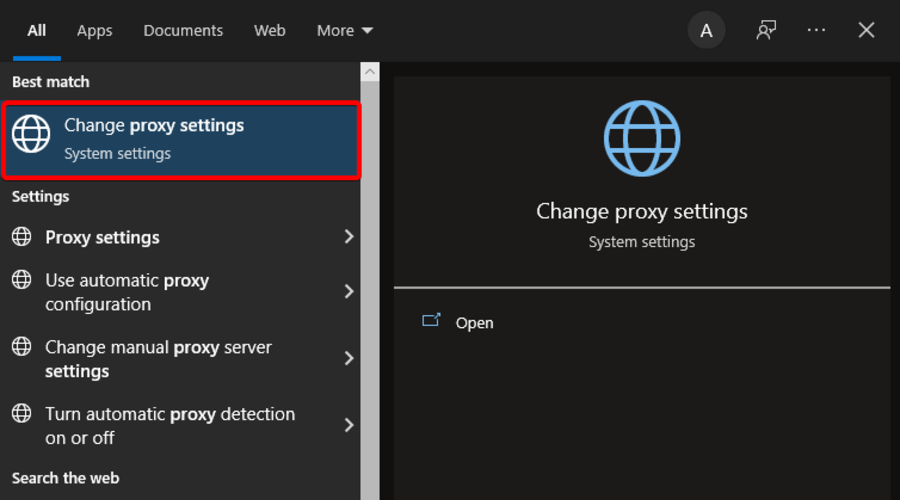
- In the right window pane, make sure that you have turned off the Automatically detect settings option.

- Now, under the Manual proxy settings, turn On the Use a proxy server.

- In the Address field, type the IP address, then in the Port field, type the port.
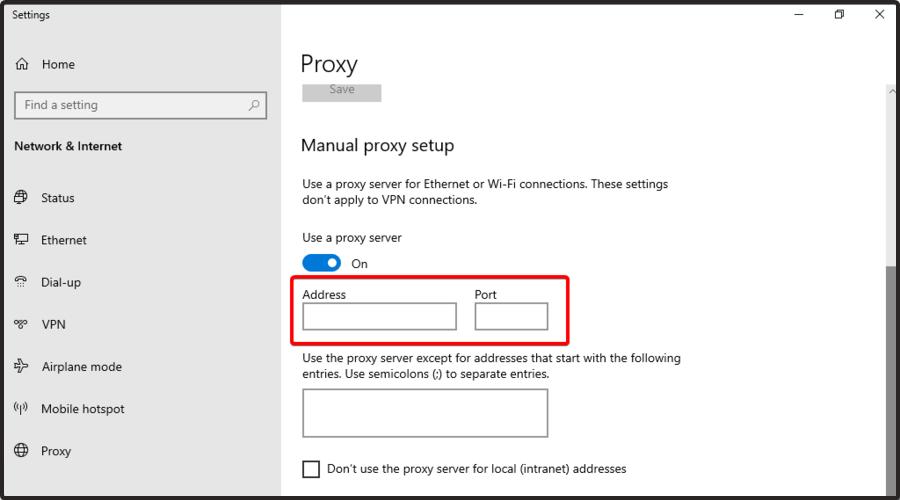
- Click on Save, then close the Settings window.
A proxy server is a server (a computer system or an application) that acts as an intermediary for web requests.
This releases its static/dynamic IP address for you so that you can access other websites using their location.
Once you have entered the IP address and port appropriately you obtained from the VPN service, check your IP address with an IP address checker as IP location and WhatIsMyIPAddress to confirm that your IP address has really been changed.
Netflix error code m7111-5059
The m7111-5059 error code is a common Netflix VPN error many users see. It indicates that the streaming service knows that you’ve changed your virtual location.
But why does Netflix display this error when you try to stream?
Some VPNs simply don’t work with the streaming service. Most of the top options on the market do, so opting for one of them is your best bet. And a good chunk of free and lesser VPNs fail to unblock Netflix content.
Another reason why you may be seeing this error is that Netflix knows that the IP you’re using belongs to a specific VPN server. In this case, switching to another one may fix the issue.
Netflix error code 22004
The 22004 error indicates that the title you’ve chosen is unavailable in the area you’re currently in. This usually happens due to regional licensing agreements and rights.
If you’ve used a VPN to change your location, and you get this error, it means you need to connect to another server. Try different locations until you find one where the content you want to access is accessible.
Let’s say you want to watch Merci Pour Le Chocolat, which is a French exclusive. To do so, you can’t be connected to a server in another country. Once you switch to one in Paris or Marseille, for example, the movie will become available.
Netflix error code UI3012
You’ll see the UI3012 error code when you’re experiencing a connectivity issue. If you see it when not using a VPN, it means something is affecting your internet connection. Resetting your router often helps.
However, this method isn’t something you can count on when you have a VPN on.
Instead, look for a closer or faster server. It’s a good idea to try a few options until you find one that eliminates the error and provides a better streaming experience.
Netflix error code NW-2-5
NW-2-5 error code is another common Netflix VPN problem. Generally, it indicates that the device you want to stream on isn’t connected to the internet.
However, it may also be a sign that your VPN connection is poor. If you believe this is the case, switching the server may help. Try to find a closer or faster one to eliminate the error.
In addition, clearing your Netflix app’s cache may also help get rid of the NW-2-5 error.
In case that doesn’t help either, you can consider picking up a subscription from a more reliable VPN provider.
Related:
Can Netflix tell if you use a VPN?
Yes. Netflix uses web monitoring to detect and block VPNs. Generally, it’s fairly easy to know whether you are on regular traffic or on a VPN.
While your data is encrypted and your real IP is hidden, your VPN IP address can reveal that you’re using a VPN.
In this case, it is likely you will be blocked by Netflix. The streaming service doesn’t allow VPNs to avoid users from accessing restricted (copyrighted) content.
However, if you use a reputable VPN that can make it appear as if you browse on local traffic, you don’t have to worry about Netflix’s monitoring.
How does Netflix block VPN services?
Netflix keeps track of IP addresses associated with VPNs and blocks them. It also prevents other IPs belonging to the same host from accessing its content. Another way it does this is through DNS server location mismatches.
This is why many users report they can’t watch Netflix with VPN.
But how does the streaming giant do this?
When you connect to a VPN server, you’re assigned one of the provider’s IP addresses. Since thousands of customers have already used them, chances are Netflix already knows they belong to a VPN service.
The service keeps a large database of VPN-associated addresses. If it catches you using one of them, chances are it’ll prevent you from streaming.
Not only this, but Netflix continues to actively hunt and block VPN IP addresses. This is mostly because the top providers keep buying and allocating fresh IPs. Some even use residential addresses that are less likely to be blocked.
Another way Netflix identifies VPN use is through DNS server location mismatches. The service’s Android and iOS apps may override your DNS setup and expose your real ISP server. Once Netflix recognizes this, it may block your access to its content.
Can Netflix ban VPN users?
Many users wonder if the Netflix app can ban their access through a virtual private network. Well, if you’re in the same boat, keep in mind that the answer is no.
Even if Netflix’s terms of use, say pretty clearly that they would prefer not to use VPNs, it doesn’t say anywhere that it is illegal.
In case you’ll choose a reliable solution, any of your Netflix experiences would be successful, so you won’t get taken to court or lose your account. With expert software, you won’t have to worry about banning your Netflix activity.
Maybe it’s worth mentioning that if we were in your shoes, we should go for the ExpressVPN option because it can handle any restriction and will always keep your online actions private.
However, the decision is yours, so make sure you choose the best solution for your particular situation.
Finally, we have come up with a practical troubleshooting guide with descriptive solutions for Windows users whose VPN doesn’t work with the Netflix streaming platform.
Keep in mind that you can get Netflix cheaper with VPN software. To discover how you can easily do it, make sure you verify our dedicated article.
Let us know if any of these solutions helped if your VPN was not working with Netflix. Also, do not hesitate to share your experience by leaving a comment in the section below.
User forum
0 messages