Windows 11 VPN Server: Setup and Comparison [2026]
Are you a Windows 11 user and want to set up a VPN server? Or are you already using a VPN service but haven’t tried the built-in VPN feature yet?
Regardless of the situation, you couldn’t be in a better place to find out how to set up a manual VPN connection and connect to a VPN server on your Windows 11 device.
A VPN is widely used nowadays, and rightly so, given the many security and privacy vulnerabilities you’re exposed to daily while using the Internet.
As such, you shouldn’t miss the opportunity to enjoy the many advantages such a service brings to the table.
From securing your devices against tracking, monitoring, surveillance, and cyberattacks to accessing geo-blocked content from anywhere, a VPN is a dependable solution that will protect your sensitive data and help you evade restrictions on online censorship.
Consequently, if you’re interested in creating a VPN server for Windows 11, go through the detailed setup guides below,w where you’ll find step-by-step instructions on how to achieve this.
In addition, you will find important information regarding the differences between a manually-configured VPN and a native VPN app.
We also included certain VPN services that support the respective connection types in the examples provided with different configuration modes.
How does a VPN work?
In case you’re new to the VPN world, you should grasp how VPN services work, what benefits they offer, and why you should use one in the first place.
As its name suggests, a Virtual Private Network (VPN) is a private network connection that extends across the open Internet and allows users to send and receive data as if their devices were connected directly to the private network.
But let’s dispense with the technical stuff and stick to a VPN’s primary purpose. In other words, a VPN is a service aimed at protecting your Internet connection against third-party interference.
➡ Anonymity
For instance, when you connect to the Internet openly, your actual location – based on your IP address – is visible to the online resources you access on the Internet and obviously to the Internet Service Provider (ISP) that assigned it to you.
However, a VPN masks your ISP-assigned IP and replaces it with a new one in a different location, depending on the VPN server you connect to.
Consequently, your digital footprints can no longer be associated with your actual IP address as long as you are connected to a VPN.
A VPN will let you surf anonymously from anywhere using different IP addresses from various locations and countries across the globe.
➡ Privacy and security
Your ISP can also see everything you do online by monitoring your activity. Moreover, websites you access regularly use cookies that can log your activity and online habits and use that information for tracking and advertisement purposes.
Cybercriminals may target your devices and sensitive data as well by launching different types of cyberattacks, such as malware, phishing scams, man-in-the-middle (MitM) attacks, denial-of-service (DoS) and distributed denial-of-service (DDoS) attacks, or Internet of things (IoT) attacks.
Unfortunately, these pose serious security and privacy risks that you should consider to protect yourself. However, you should rest assured since this is when a VPN comes into play.
A VPN redirects all your traffic via a secure tunnel before reaching the final destination. It uses an encryption algorithm and a VPN protocol to determine how the encrypted tunnel is formed.
Thus, the encryption will guarantee total privacy and security while you use the Internet-connected to a VPN server at home or on public Wi-Fi hotspots. After reading through this guide, performing the Windows 11 setup for a VPN server will be logical.
That is to say, no one – including your ISP – will be able to pry into your online affairs anymore. Therefore, trackers, snoopers, government surveillance, and hackers will all be a thing of the past.
➡ Anti-geoblocking
Geo-blocking restricts your access to Internet content based on your geographical location, which can be identified online based on your IP address.
However, since a VPN masks your original IP address and spoofs your actual location, it will help you bypass geo-blocking, no matter where you’re located.
As a result, you’ll manage to access sites, apps, and services unavailable in your area by simply connecting to a VPN server in a country or region where those online resources are available.
Circumventing geo-blocking can also help you get better price deals for certain online services, such as streaming or gaming, as you can simply connect to a location where they are cheaper.
Does Windows 11 have a built-in VPN?
Yes, Windows 11 does include a VPN service that offers a variety of VPN protocols to choose from.
To find more details on this topic, read the first solution mentioned in the section below.
How do I set up a VPN in Windows 11?
When it comes to setting up a manual VPN connection on a Windows 11 operating system, you have two main options: using the built-in VPN or the OpenVPN GUI.
The built-in VPN allows you to connect to a VPN server on Windows 11 by selecting from any of the 4 available connection types or protocols.
On the other hand, the OpenVPN manual setup involves establishing a connection using the OpenVPN GUI with a VPN service supporting the OpenVPN (UDP or TCP) protocol.
Whichever option you will choose, no matter if you go with the OpenVPN server on Windows 11 or the other option, below you can find all the necessary steps you need to follow to establish a manual VPN connection successfully.
1. Use the Windows 11 built-in VPN
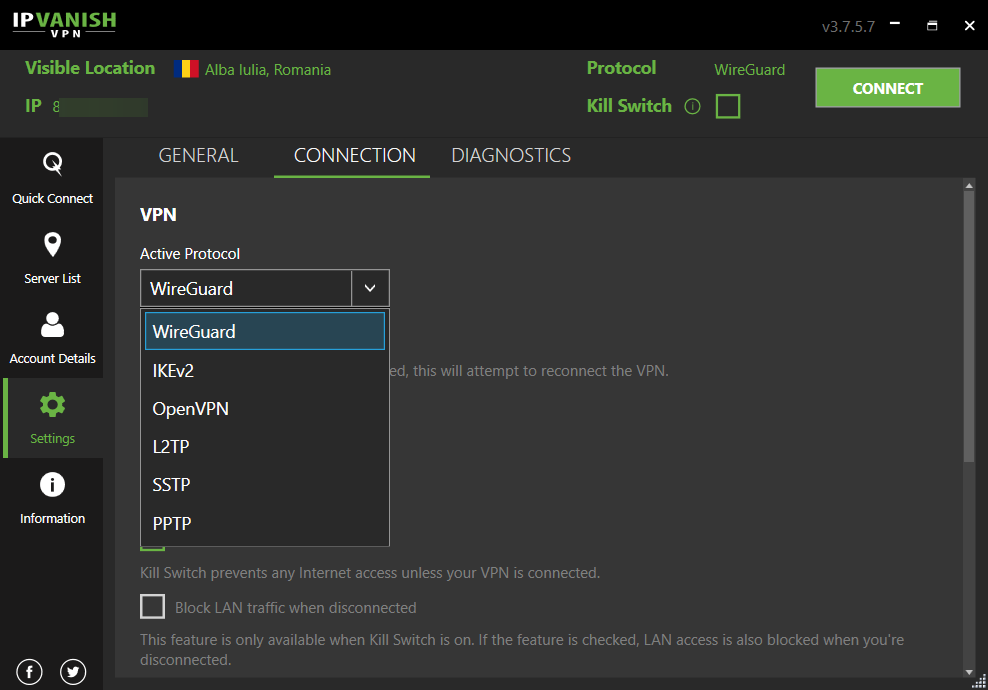
Windows 11 has an easily-configurable and user-friendly built-in VPN client that lets you set up a manual connection with the IKEv2, SSTP, L2TP/IPsec, or PPTP VPN protocols.
IKEv2, SSTP, L2TP/IPsec, and PPTP entail almost identical setup steps within the client, except that IKEv2 involves an extra procedure before setting up the VPN connection.
Before starting the configuration process, use a VPN service that supports the required VPN protocol for that specific connection.
Most of the time, you will find information regarding your provider’s supported protocols for manual configuration on its associated website.
Also, you will need to log into your VPN account and get the server addresses and any other required credentials or configuration files if needed.
1.1. Set up an IKEv2 manual VPN connection
For the IKEv2 manual connection, we used NordVPN since this VPN service supports the IKEv2/IPsec VPN protocol. You can use any VPN as long as it supports this protocol.
Unlike the other connection types, setting up an IKEv2 connection with the built-in VPN involves an additional procedure. Namely, you have to download and install a digital certificate first.
Below, you can see an example of how to set up an IKEv2 manual connection using the built-in VPN and connect to a VPN server on your Windows 11 device.
1.1.1. Install the VPN digital certificate
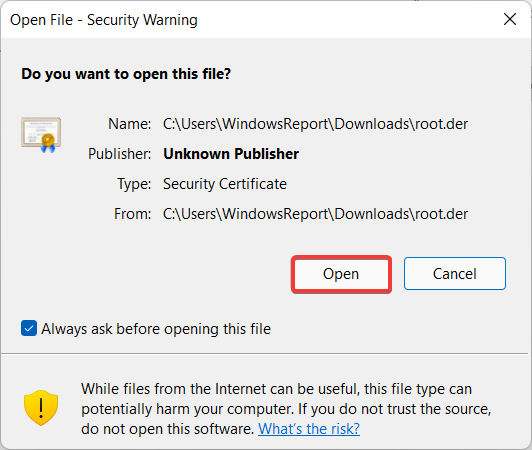
- Download the NordVPN certificate, click on the file, then click Open.
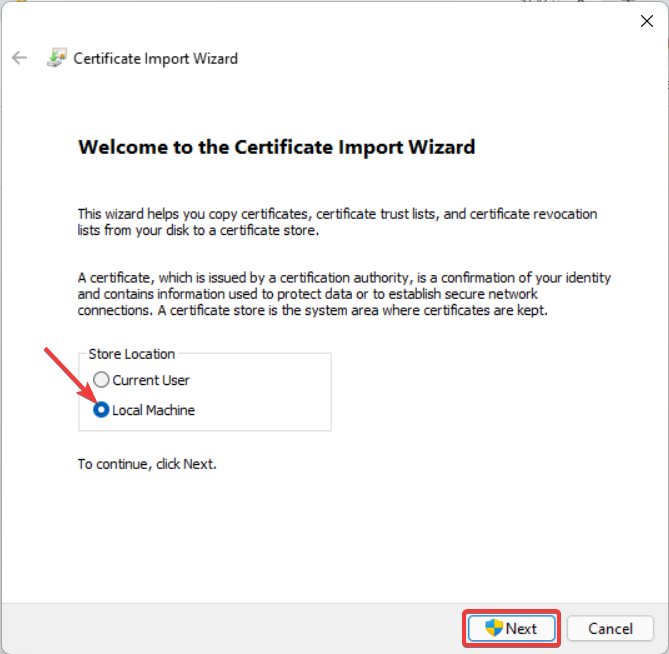
- Click on Install Certificate… in the General tab.

- In the new window, Select Local Machine, then click Next.
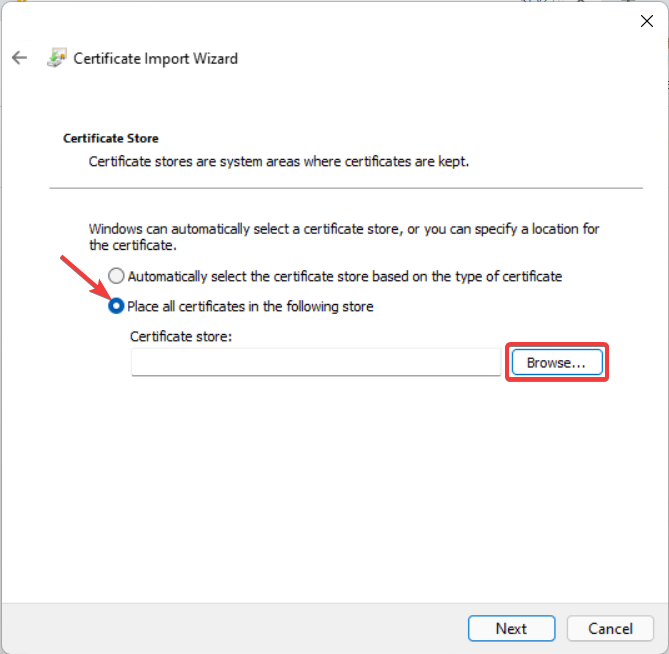
- Select Place all certificates in the following store and click Browse…
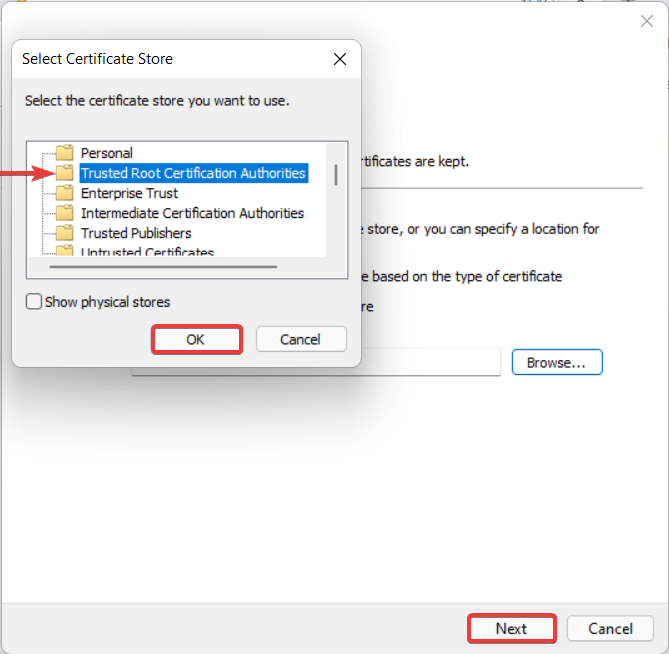
- Select Trusted Root Certification Authorities, click OK, then Next.
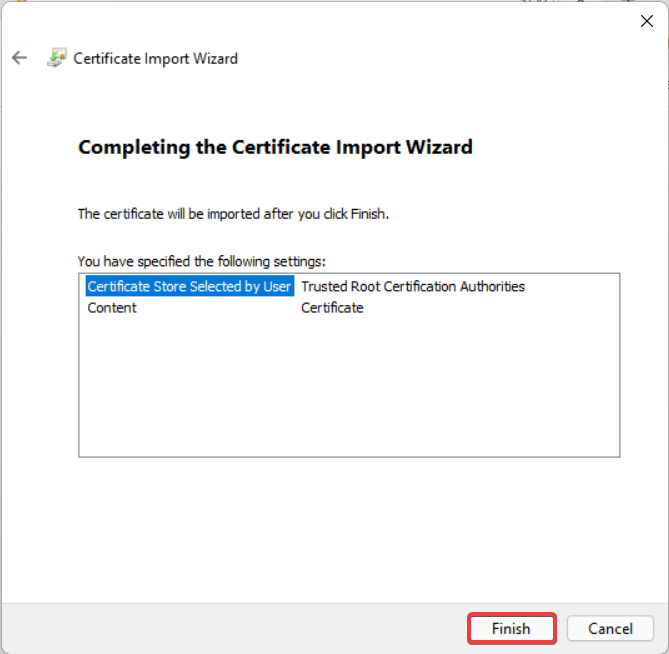
- Finally, click Finish to complete the Certificate Import Wizard process.
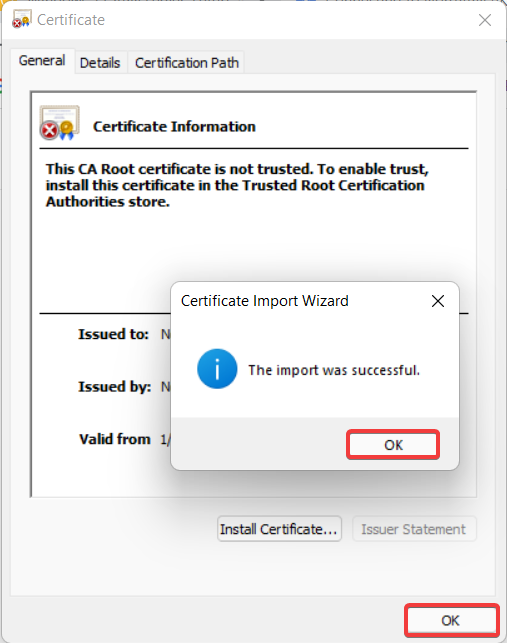
- Click OK in both the Certificate Import Wizard and the Certificate windows.
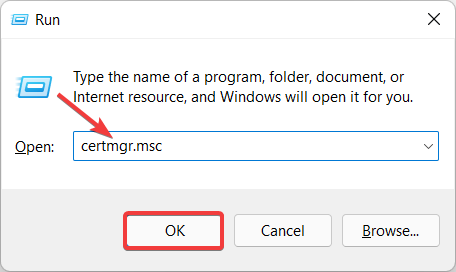
- Press the Windows + R key combination to open the Run dialog box.
- Type certmgr.msc in the box to open the certificates management tool.
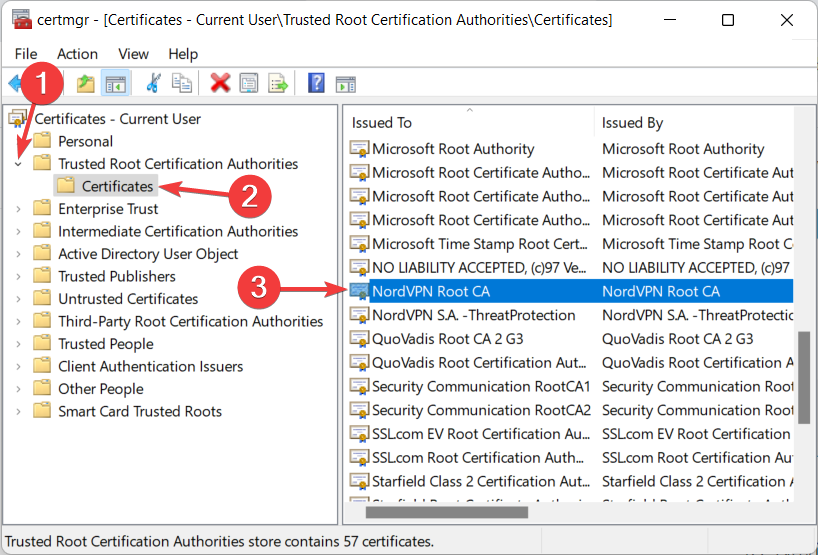
- Go to Trusted Root Certification Authorities, click on Certificates, then scroll down to find NordVPN Root CA.
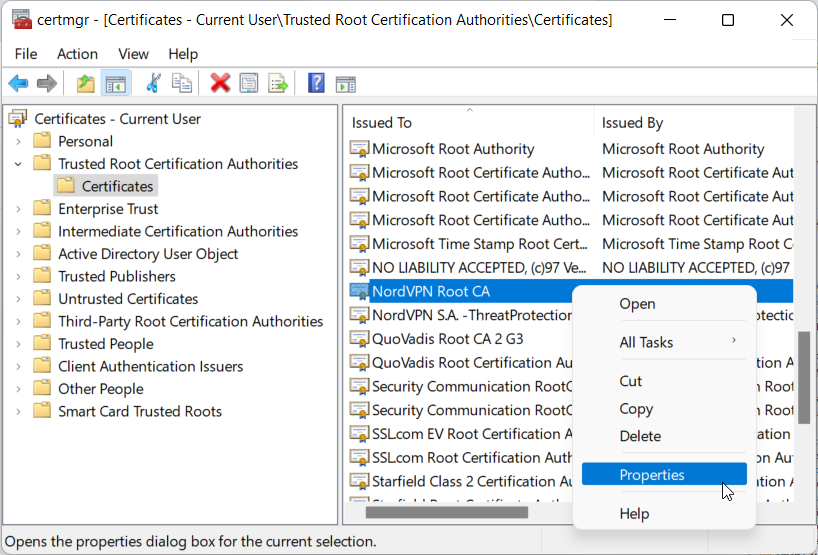
- Right-click on NordVPN Root CA and select Properties.
- Check the Enable only for the following purposes option in the General tab.
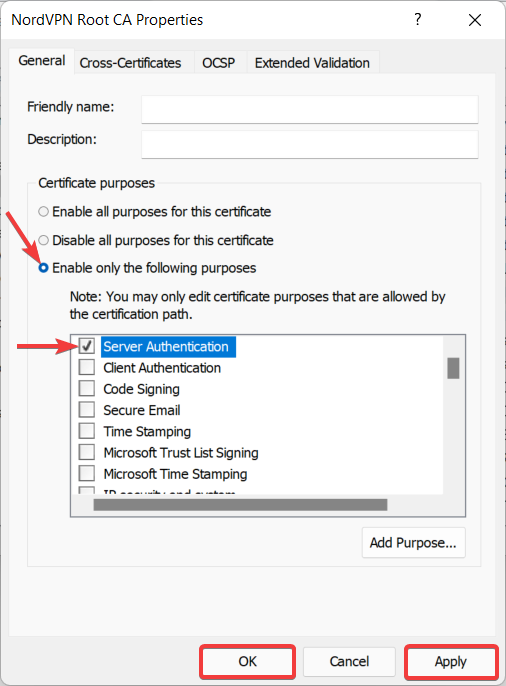
- Uncheck all the boxes except the Server Authentication box.
- Click OK, then Apply.
1.1.2. Set up the IKEv2 VPN connection
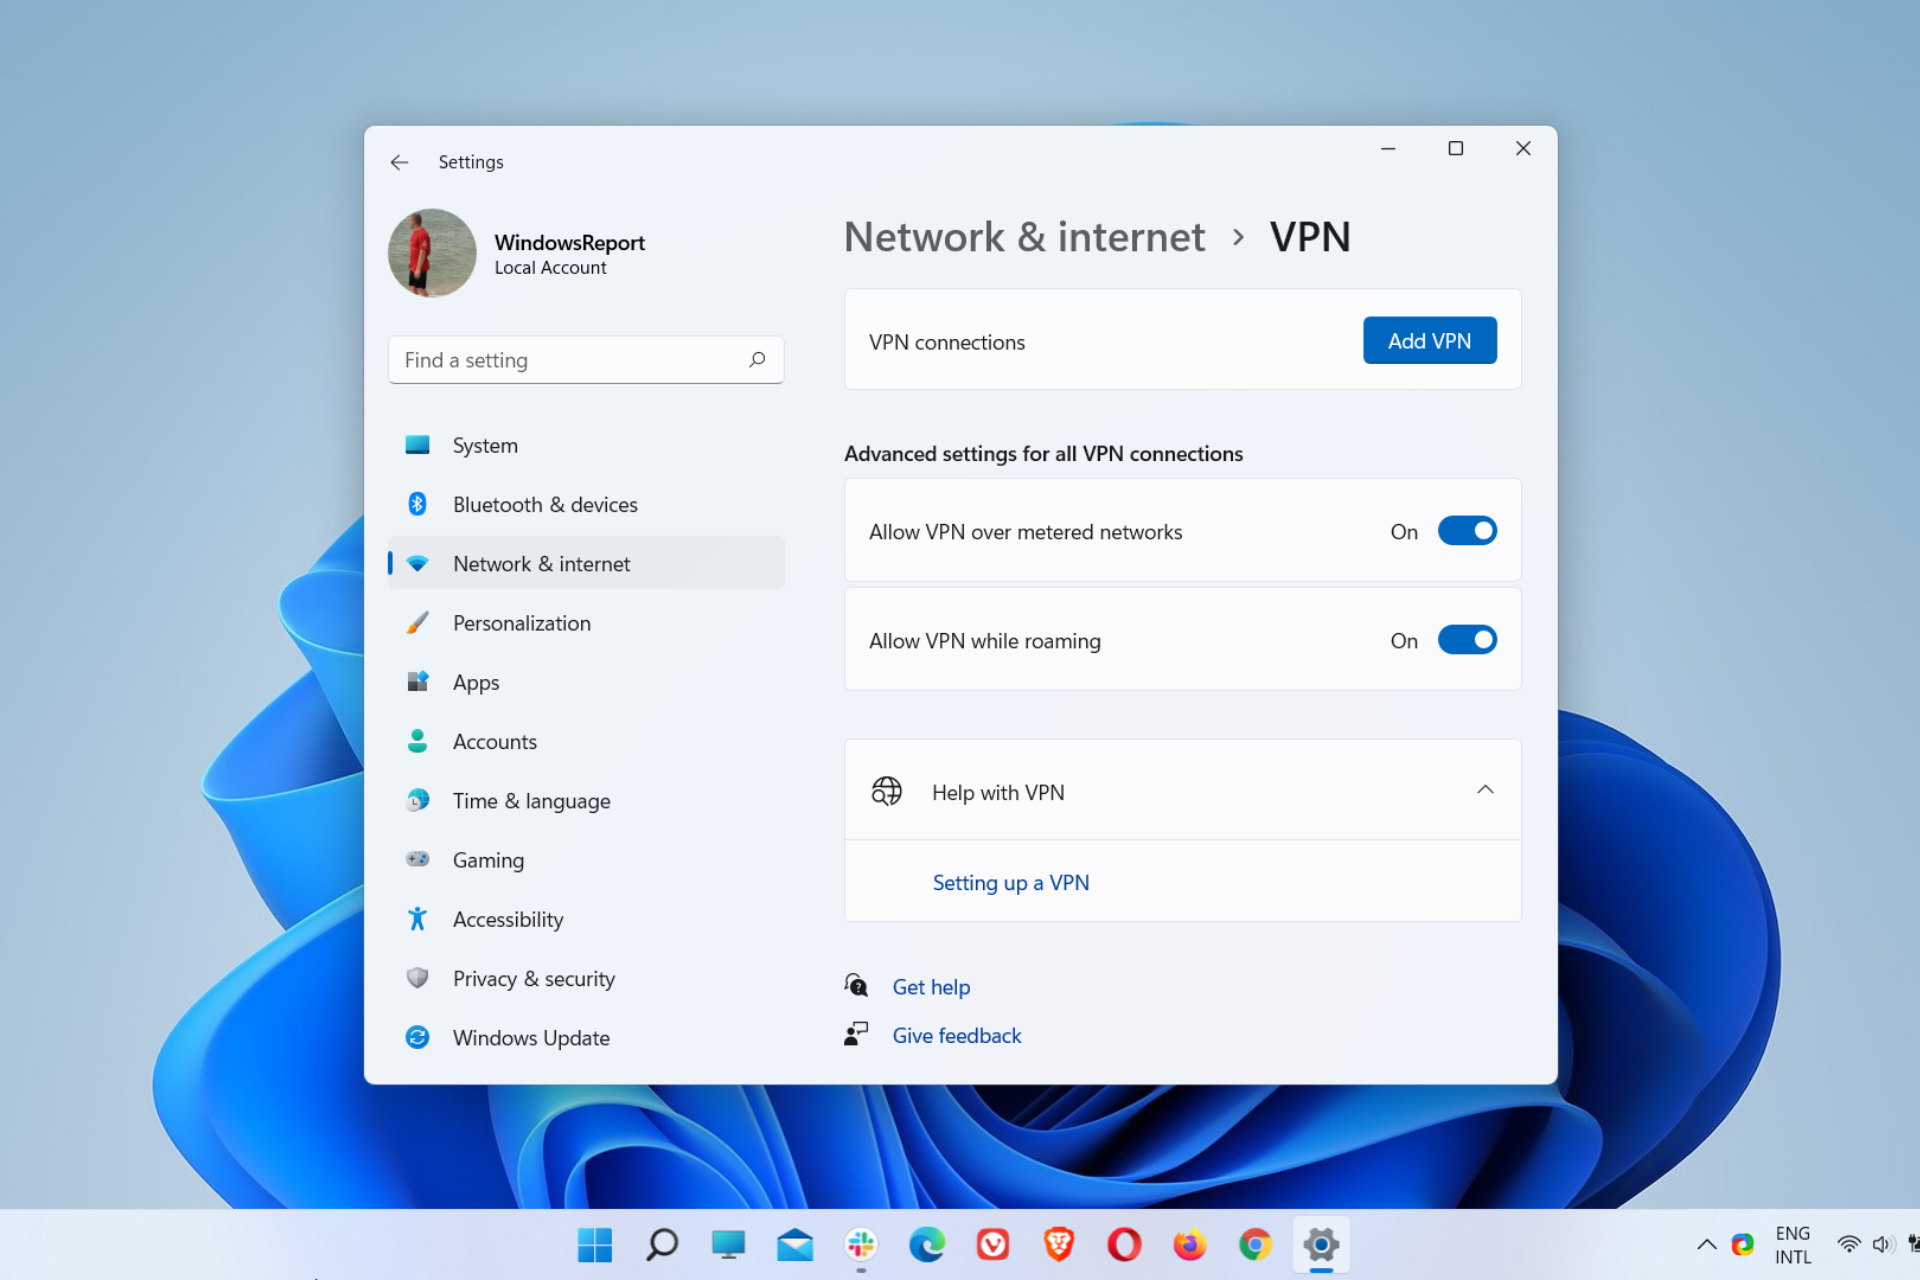
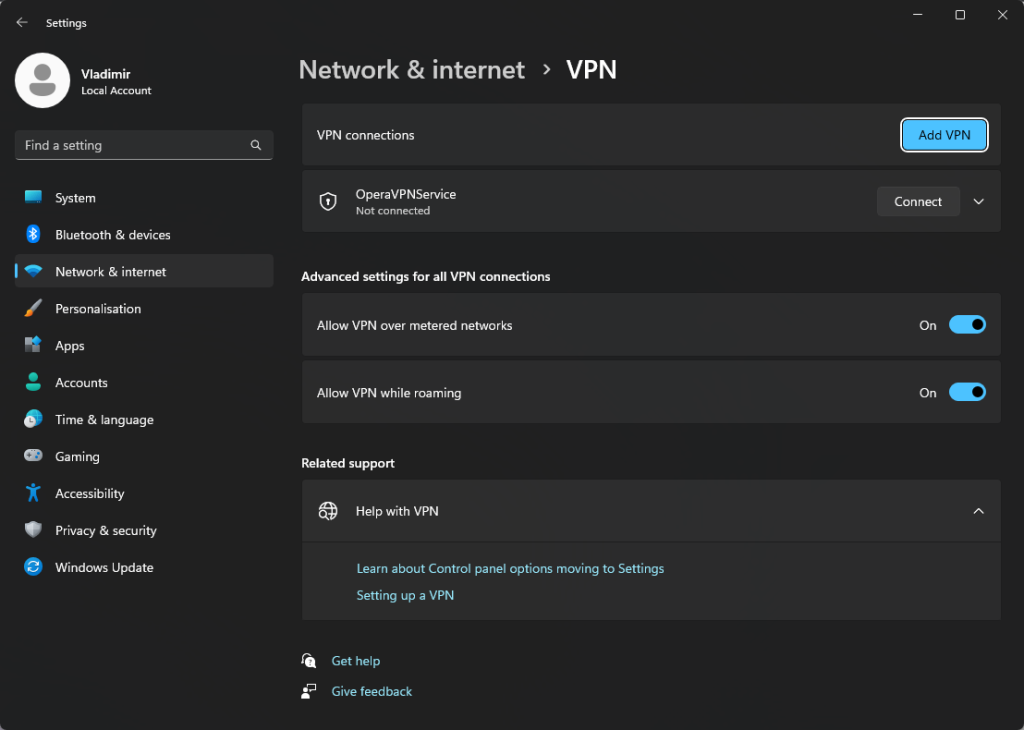
- Press the Windows + I key combination to open Settings.
- Go to Network & Internet, then click on VPN.
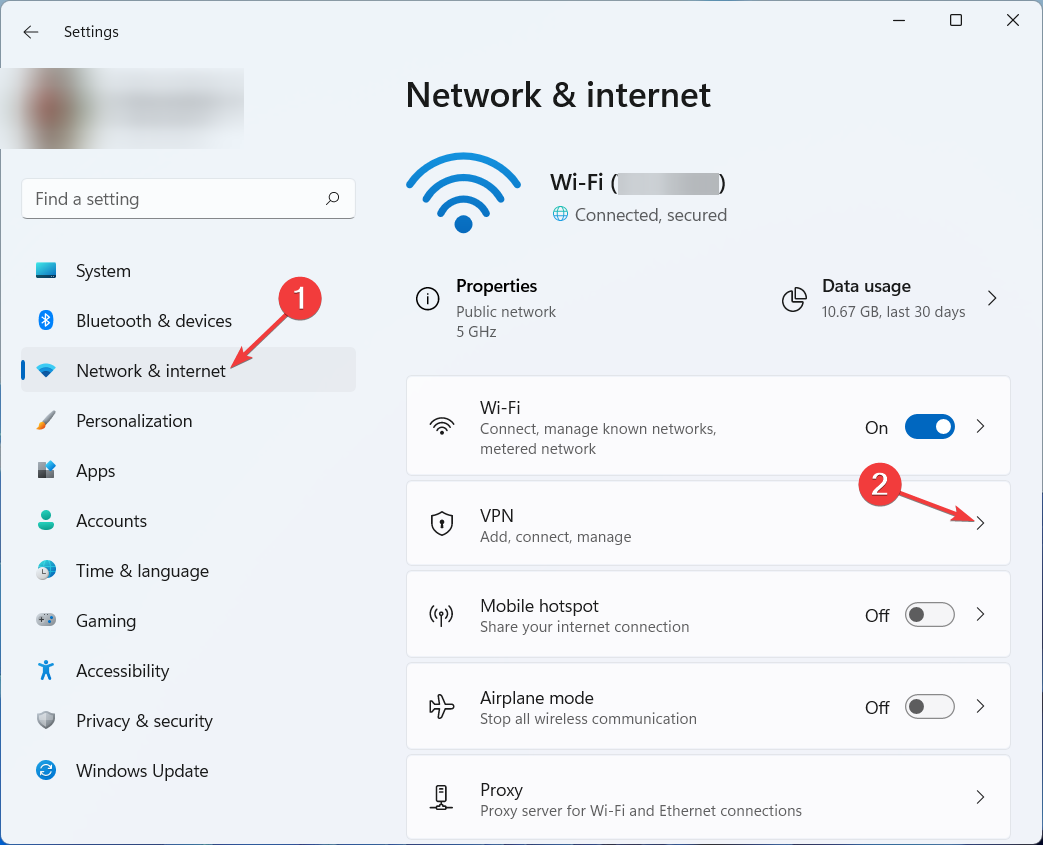
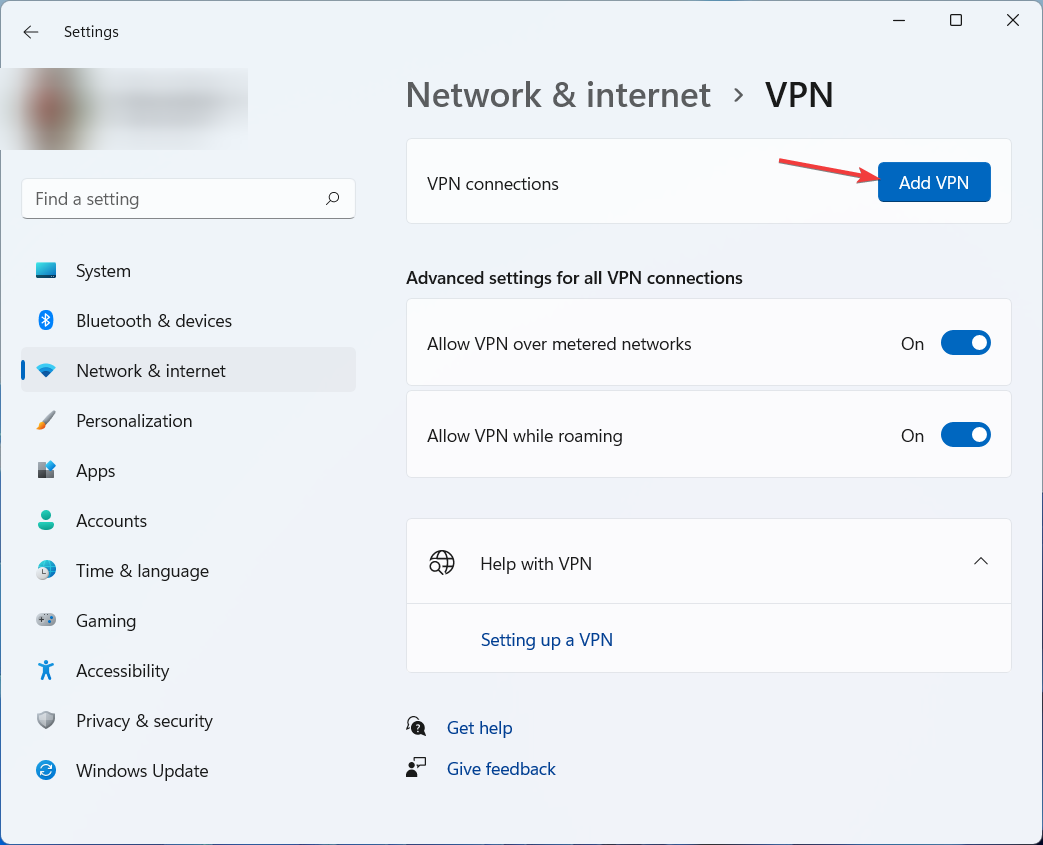
- Click on Add VPN next to VPN connections.
- Head to your account to find the service credentials for the manual setup.

- Choose Windows (built-in) as the VPN provider.
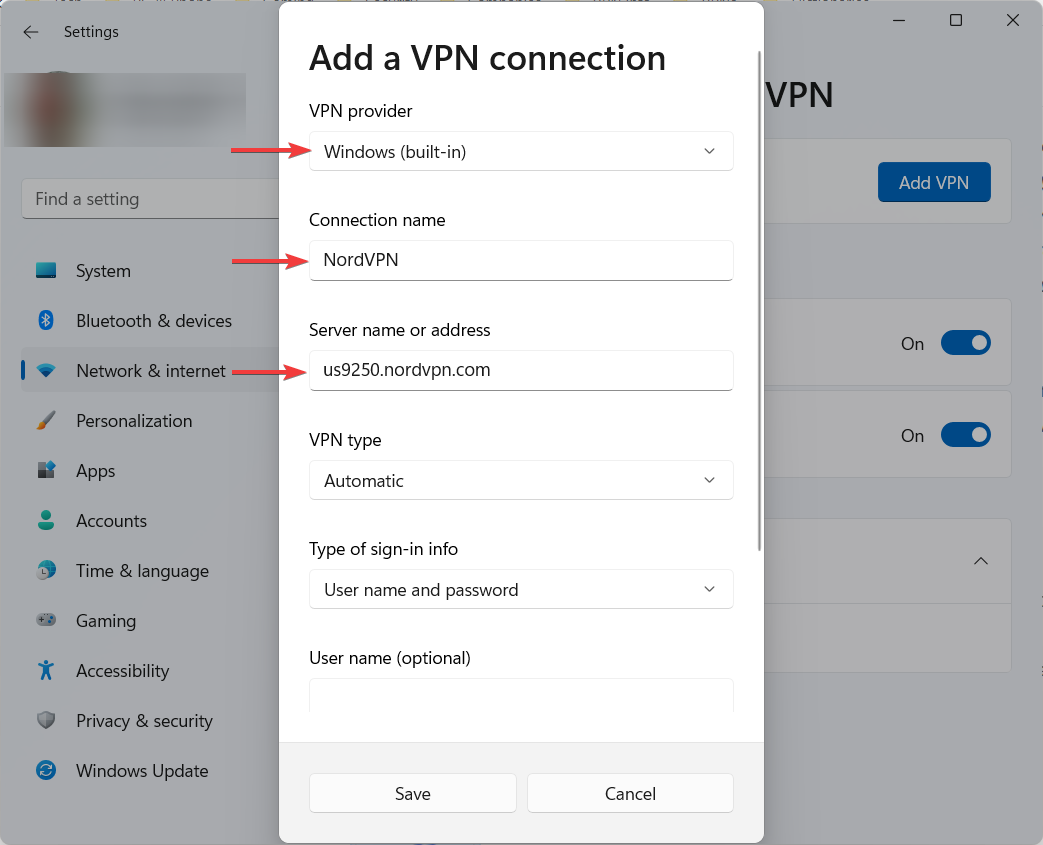
- Enter the Connection name and the VPN Server name or address.
- Choose IKEv2 for the VPN type.
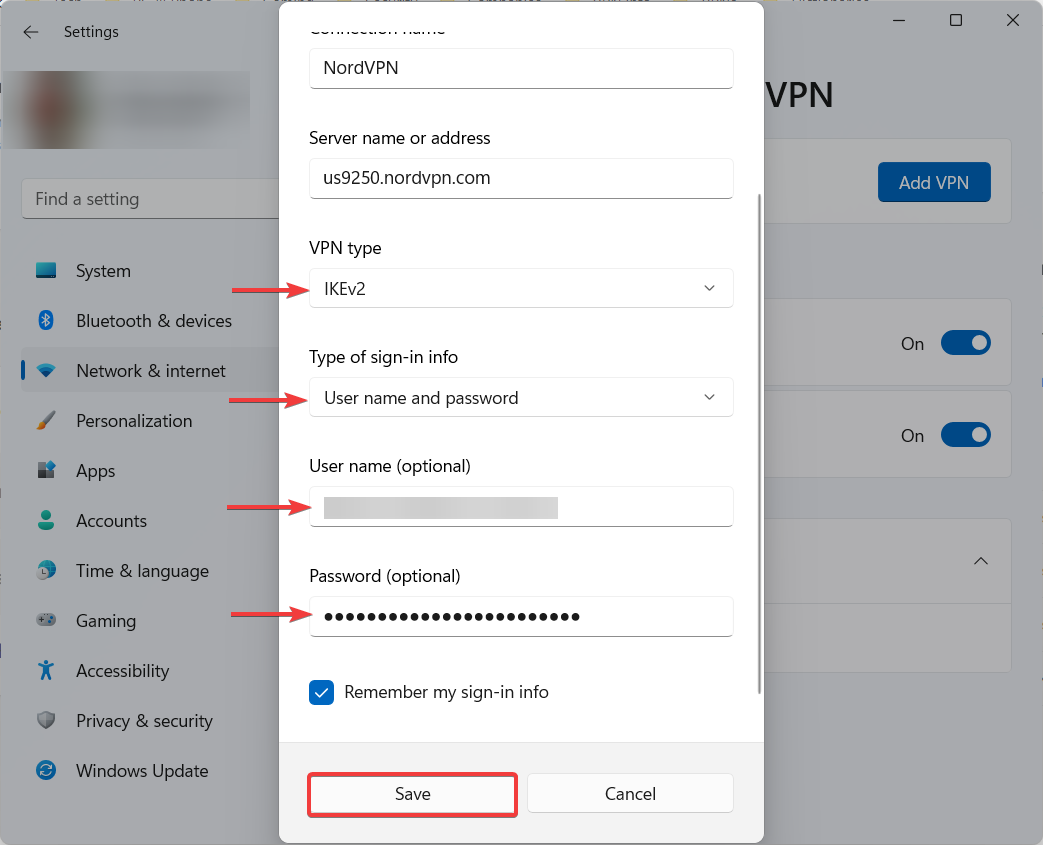
- Select the Type of sign-in info (this is usually the User name and password).
- Enter the corresponding sign-in credentials and click Save.
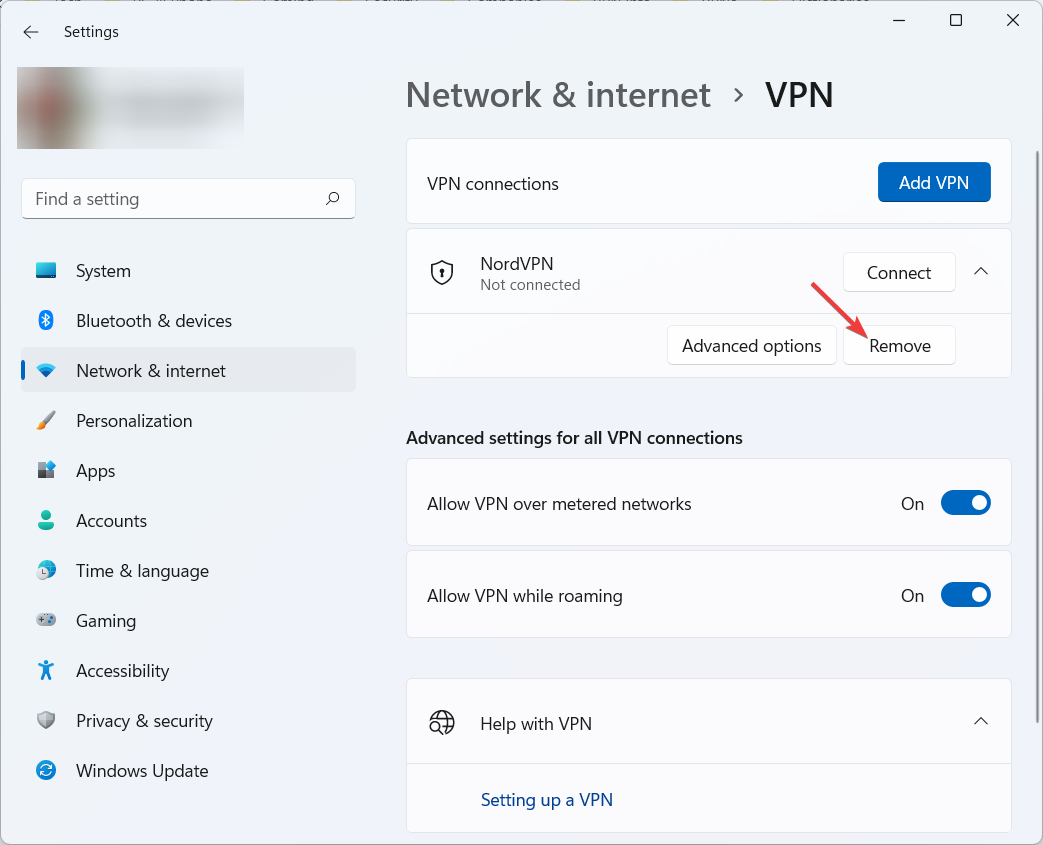
- Find the new VPN connection and click Connect.

- Now you’ve successfully established an IKEv2 VPN connection.

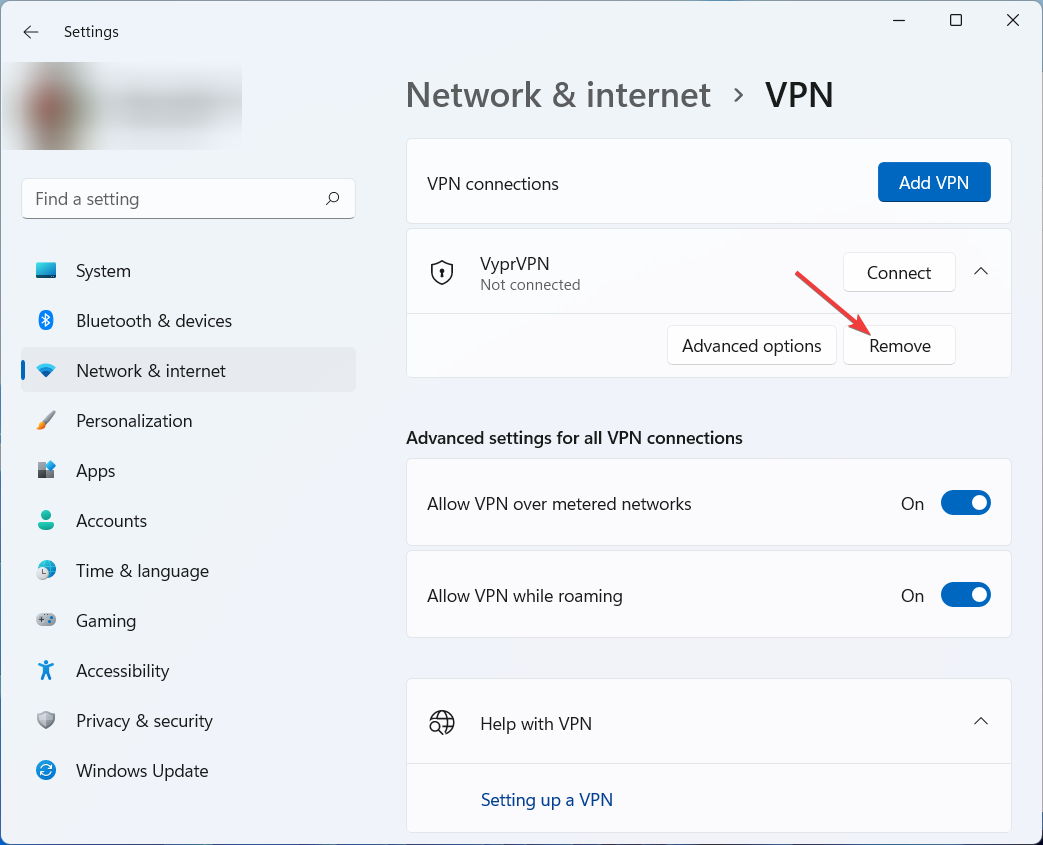
- If you want to remove the connection, click on it, then click Remove.
Internet Key Exchange version 2 (IKEv2) is a VPN protocol jointly developed by Microsoft and Cisco. It is the successor of IKEv1 and supports different encryption algorithms.
IKEv2 generally works with Internet Protocol Security (IPsec) – a group of protocols and algorithms used to establish encrypted connections between devices.
This protocol is fast and very good for privacy and security, being one of the market’s most advanced and dependable VPN protocols.
IKEv2 can be easily set up on compatible platforms. It is very popular with mobile devices since it can successfully reconnect during temporary connection drops or switching between mobile connections (e.g., from cellular data to Wi-Fi).
1.2. Set up an SSTP manual VPN connection
Setting up an SSTP connection from the built-in VPN client for Windows 11 is relatively easy. All you have to do is follow the steps below, and you’ll manage to connect to a VPN server on Windows 11 right away.
Before proceeding, be sure to have the VPN server name or address at your disposal, with the username and password associated with your VPN account.
Sometimes you may be unable to connect to a VPN server using the SSTP protocol. This may be due to the Windows firewall. As such, you can disable it for a while and try reconnecting again.
- Press the Windows + I key combination to open Settings.
- Go to Network & Internet, then click on VPN.
- Click on Add VPN next to VPN connections.
- Choose Windows (built-in) as the VPN provider.
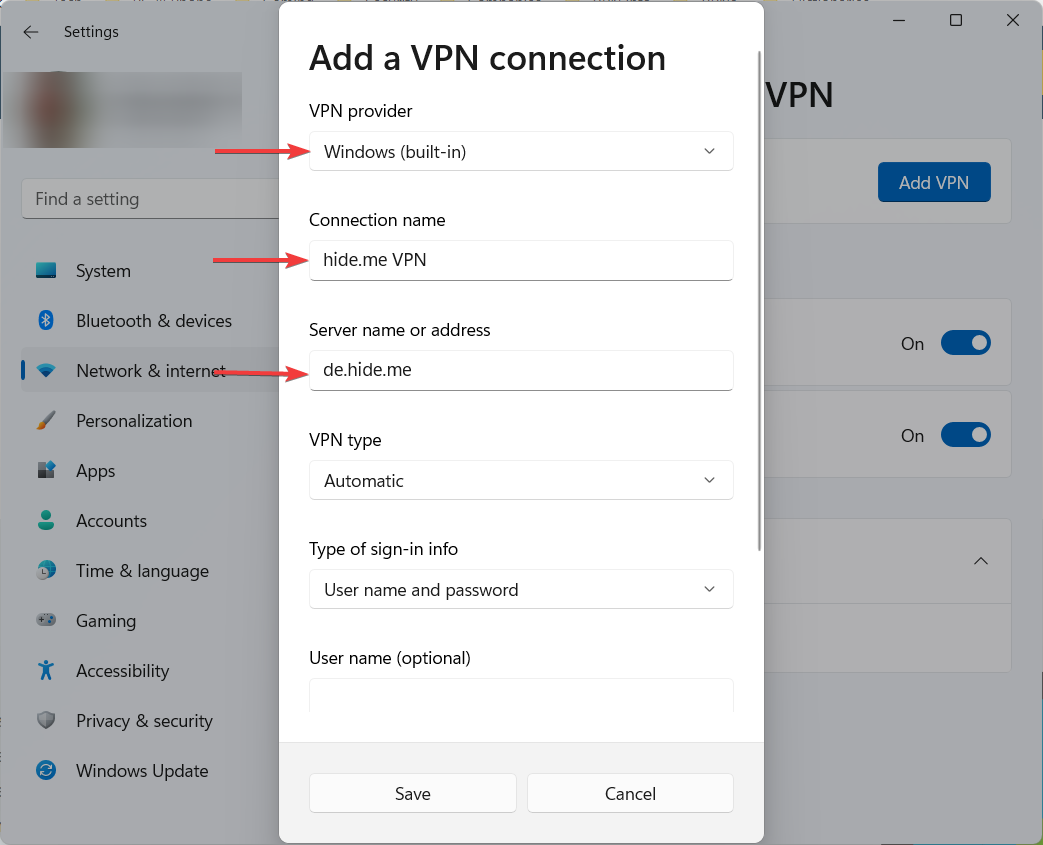
- Enter the Connection name and the VPN Server name or address.
- Choose Secure Socket Tunneling Protocol (SSTP) for the VPN type.
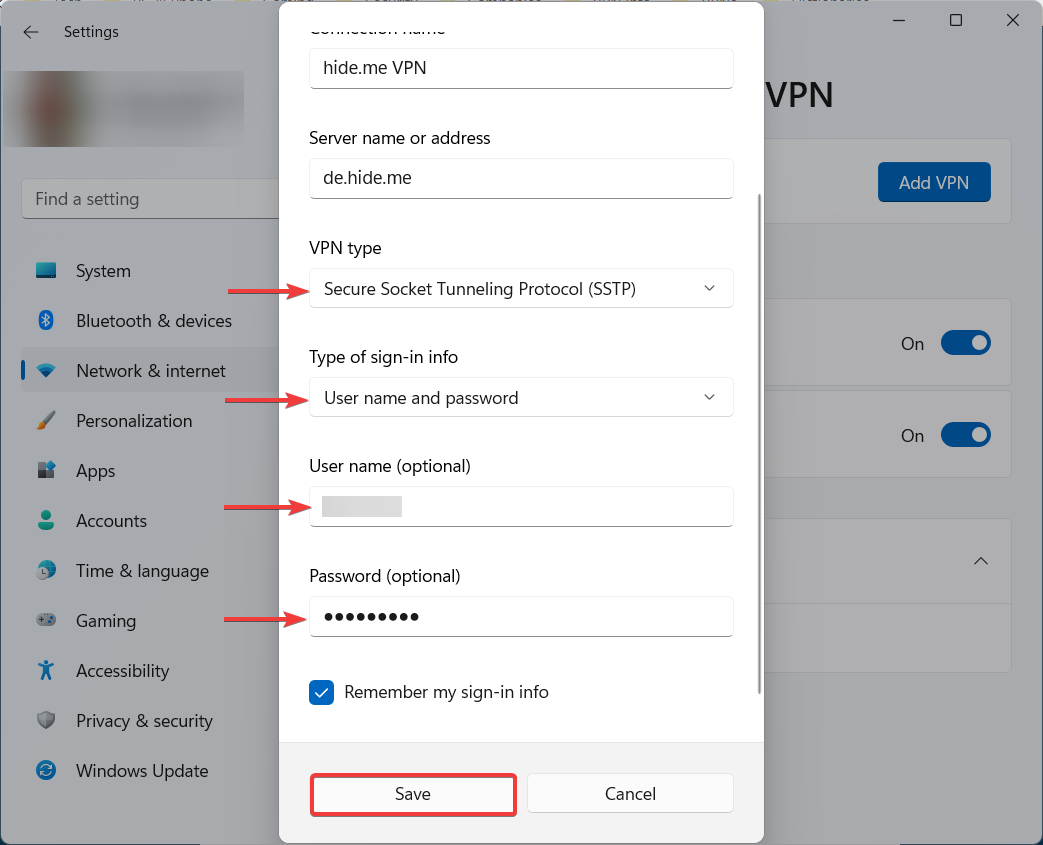
- Select the Type of sign-in info (this is usually the User name and password).
- Enter the corresponding sign-in credentials and click Save.
- Find the new VPN connection and click Connect.

- Now you’ve successfully established an SSTP VPN connection.
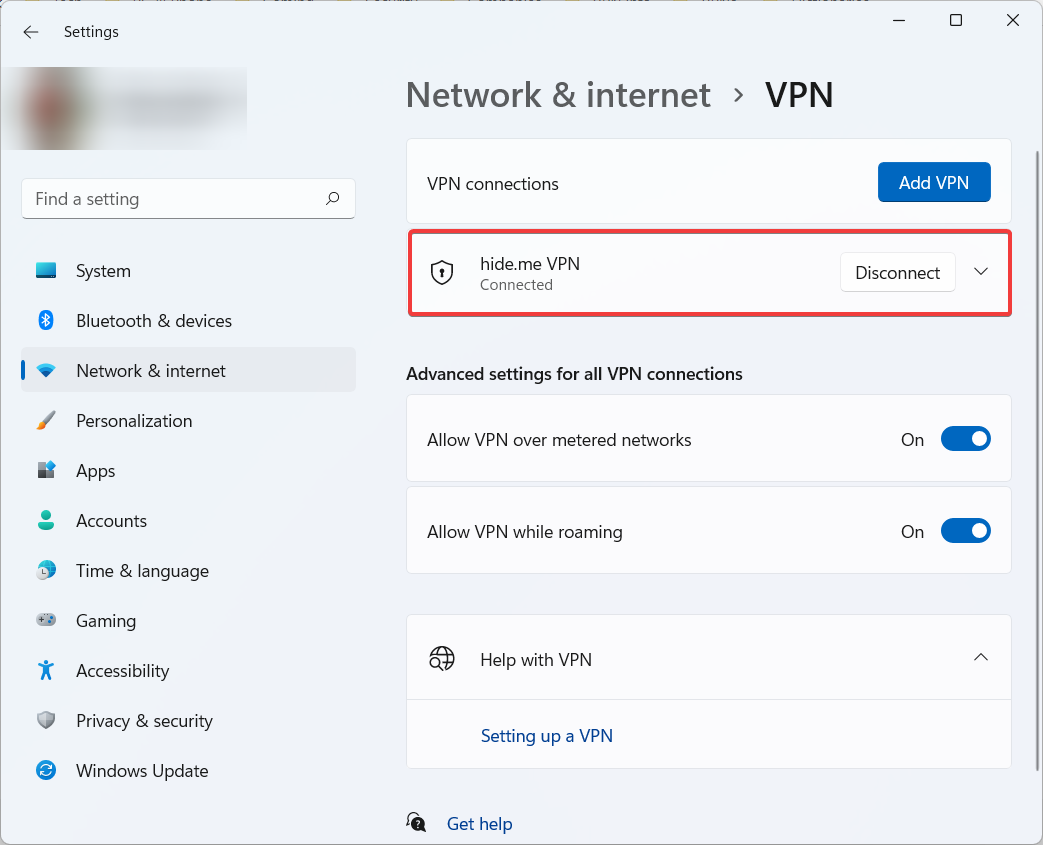
- If you want to remove the connection, click on it, then click Remove.

The Secure Socket Tunneling Protocol (SSTP) is a proprietary protocol developed by Microsoft, meaning that no one outside Microsoft can access its code.
SSTP was first introduced with Windows Vista and was mainly conceived for Windows OS, even though it works on Linux.
Ever since it appeared, it has been continuously integrated into every Windows version and is very easy to set up using the built-in VPN.
SSTP uses 2048-bit SSL/TLS certificates for authentication and 256-bit SSL keys for encryption. Since it supports AES-256 encryption, SST is considered a very secure protocol.
1.3. Set up an L2TP/IPsec manual VPN connection
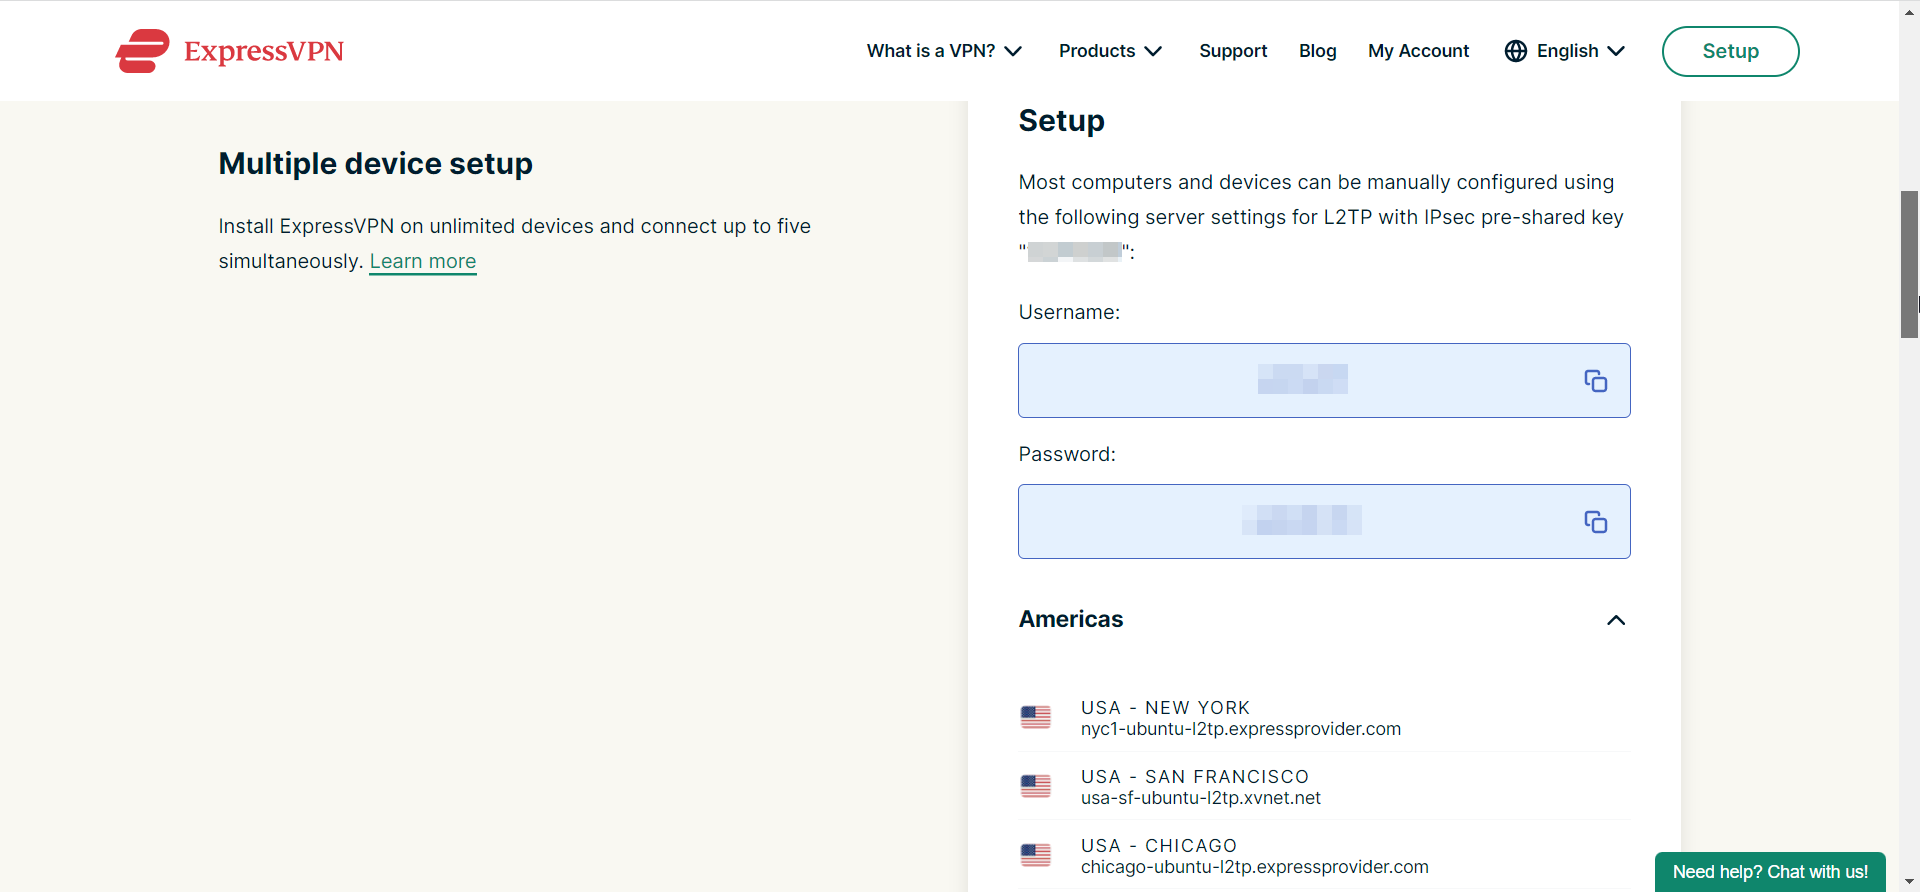
In the example below, we used ExpressVPN to set up an L2TP/IPsec VPN connection. This service supports the L2TP/IPsec protocol for manual and automatic connections.
However, although ExpressVPN is among the few VPNs that allow an L2TP/IPsec manual connection, you can find other services supporting this connection type.
No matter what VPN you use, follow the general steps below to configure the manual setup and connect to a VPN server on your Windows 11 device.
- Press the Windows + I key combination to open Settings.
- Go to Network & Internet, then click on VPN.
- Click on Add VPN next to VPN connections.
- Go to your account to find the server address, pre-shared key, and service credentials for the L2TP/IPsec manual setup.
- Choose Windows (built-in) as the VPN provider.
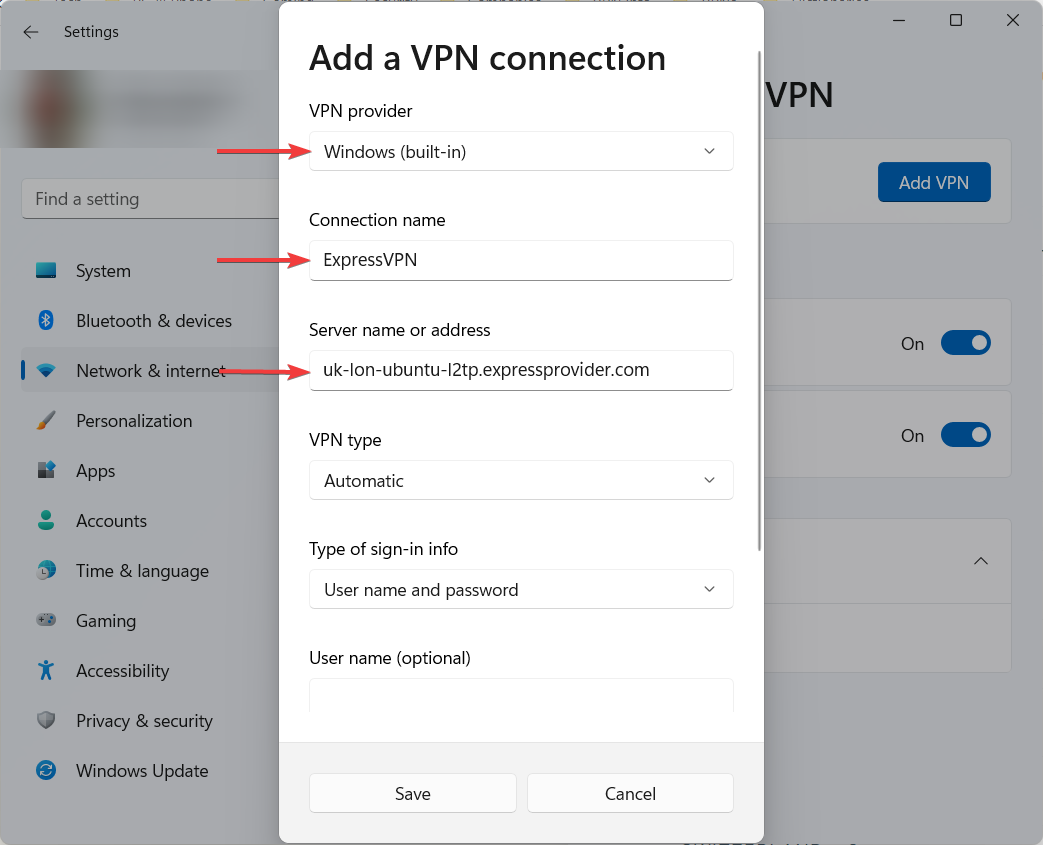
- Enter the Connection name and the VPN Server name or address.
- Choose L2TP/IPsec with a pre-shared key for the VPN type and enter the Pre-shared key.
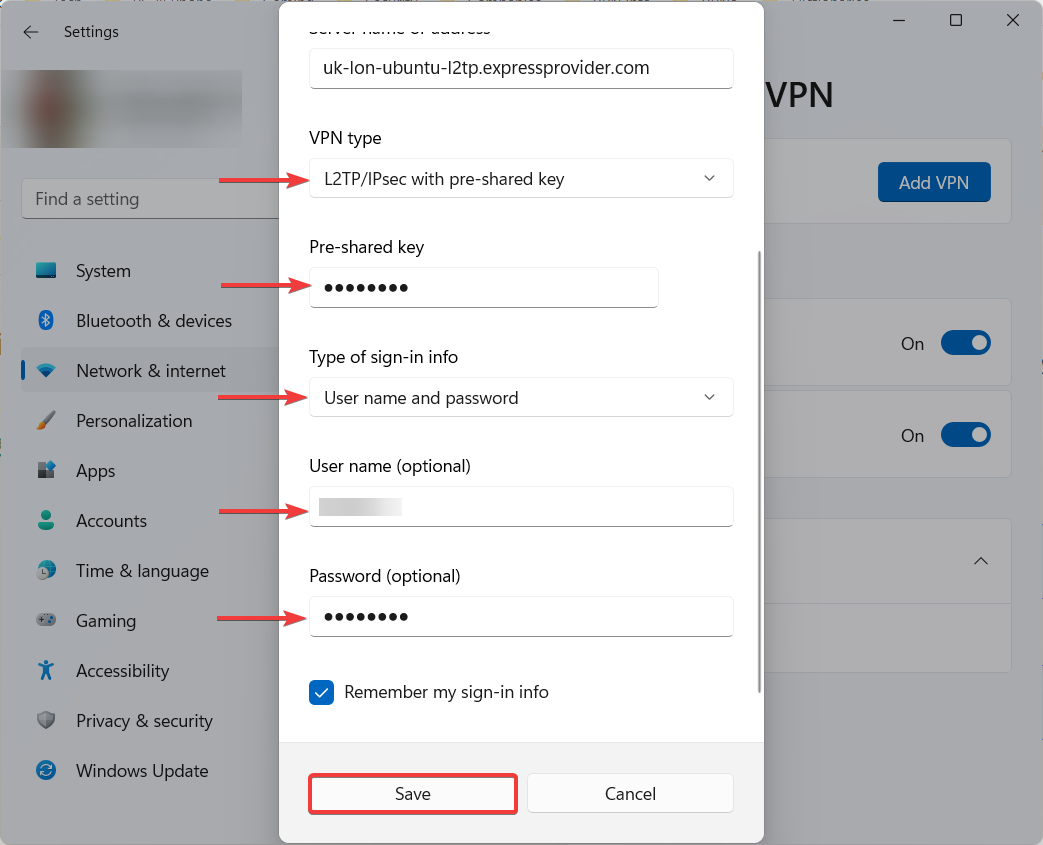
- Select the Type of sign-in info (this is usually the User name and password).
- Enter the corresponding sign-in credentials and click Save.
- Find the new VPN connection and click Connect.
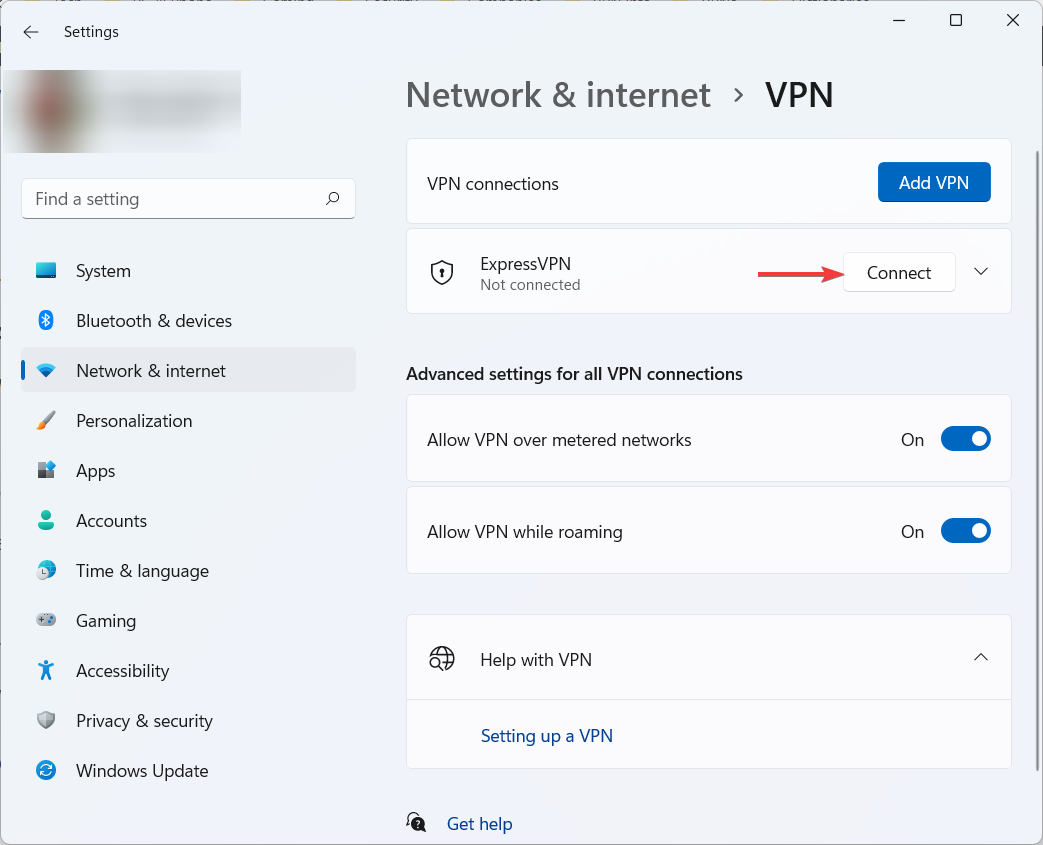
- Now you’ve successfully established an L2TP/IPsec VPN connection.
- If you want to remove the connection, click on it, then click Remove.

The Layer Two Tunneling Protocol (L2TP) is a tunneling protocol that Microsoft and Cisco built as an alternative to the deprecated PPTP protocol.
It does not provide encryption, so it works with Internet Protocol Security (IPsec) to provide AES-256 encryption. The protocol is usually referred to as L2TP/IPsec.
L2TP/IPsec is very popular and widely available on all major platforms, easily configurable. However, firewalls can easily block it since it runs on fewer ports.
1.4. Set up a PPTP manual VPN connection
As with SSTP, connecting to a VPN server on Windows 11 from the built-in VPN using the PPTP protocol is a straightforward task, the configuration steps being virtually identical.
All you need are the VPN server name or address and the username and password you use when logging into your VPN account, and you should be all set.
Also, since PPTP provides weaker security, your firewall could block it. Therefore, you may temporarily turn off the Windows Defender Firewall to prevent connection errors.
- Press the Windows + I key combination to open Settings.
- Go to Network & Internet, then click on VPN.
- Click on Add VPN next to VPN connections.
- Choose Windows (built-in) as the VPN provider.
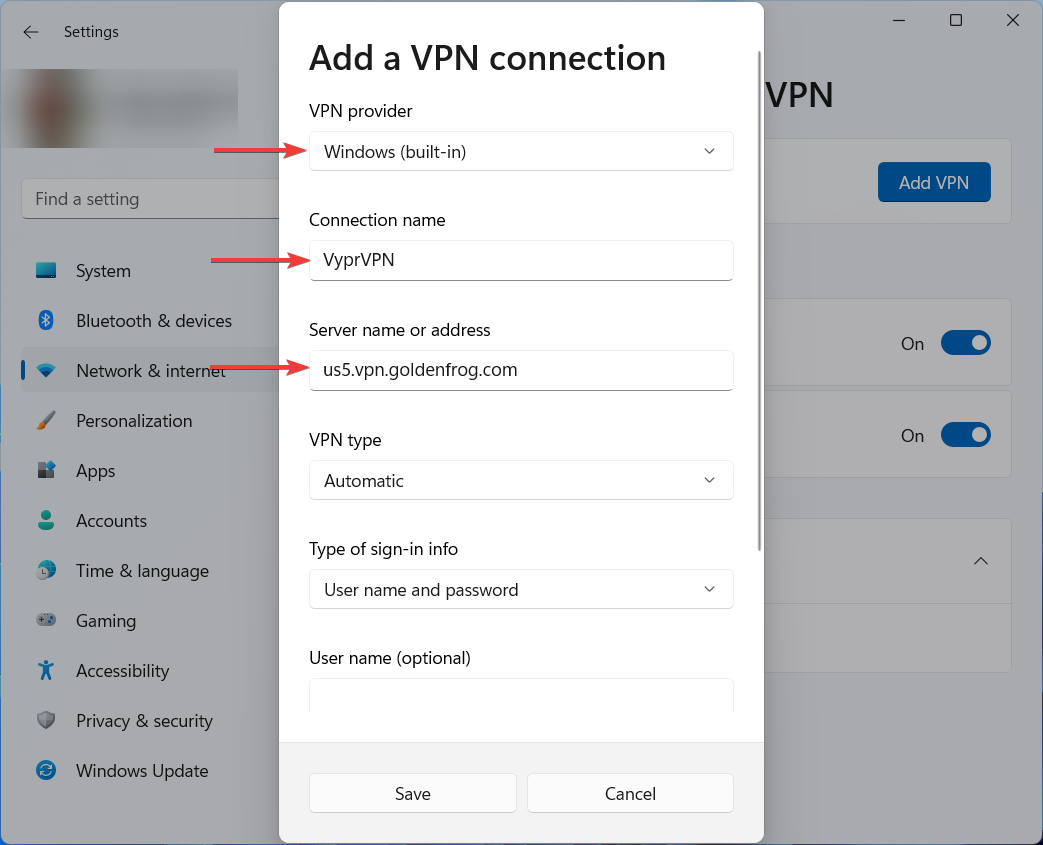
- Enter the Connection name and the VPN Server name or address.
- Choose Point-to-Point Tunneling Protocol (PPTP) for the VPN type.
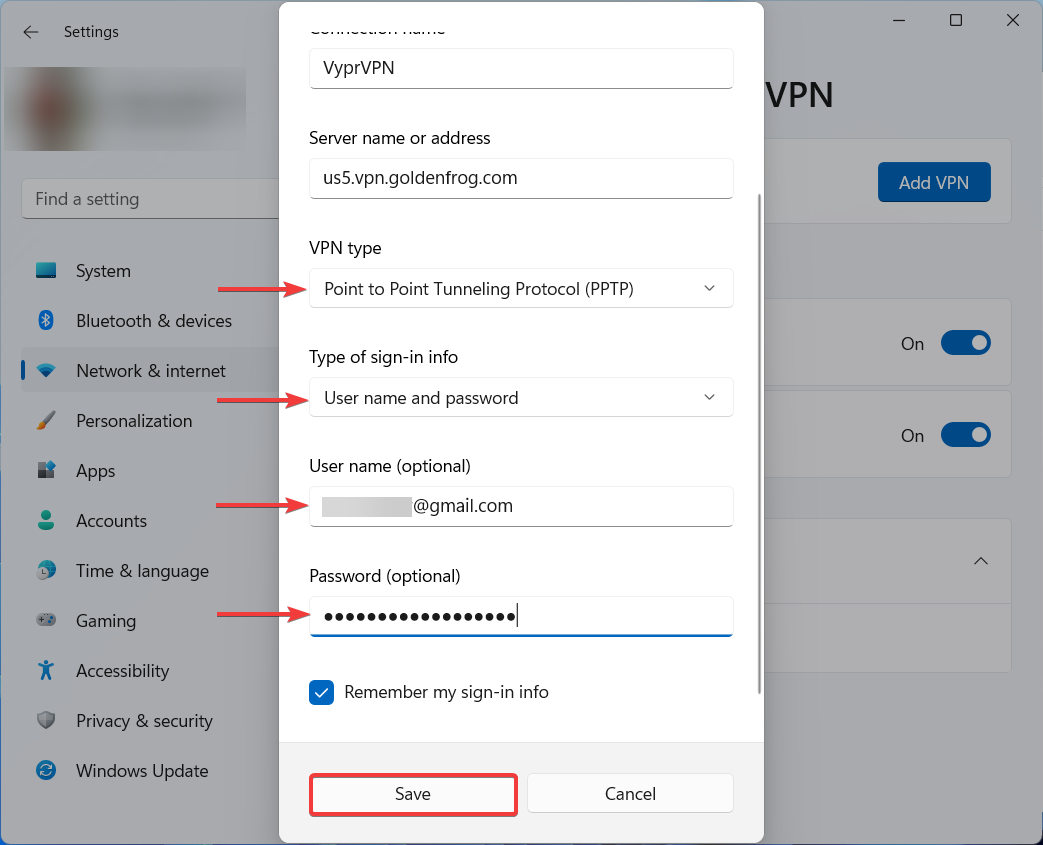
- Select the Type of sign-in info (this is usually the User name and password).
- Enter the corresponding sign-in credentials and click Save.
- Find the new VPN connection and click Connect.
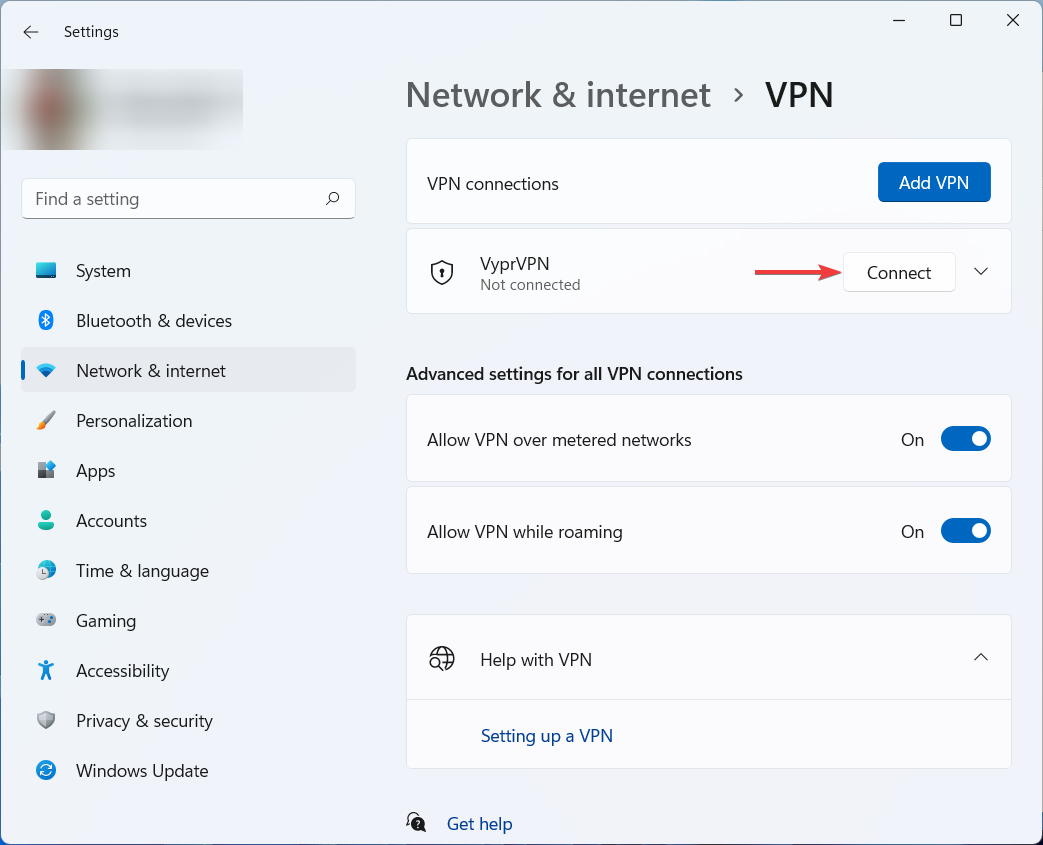
- Now you’ve successfully established a PPTP VPN connection.
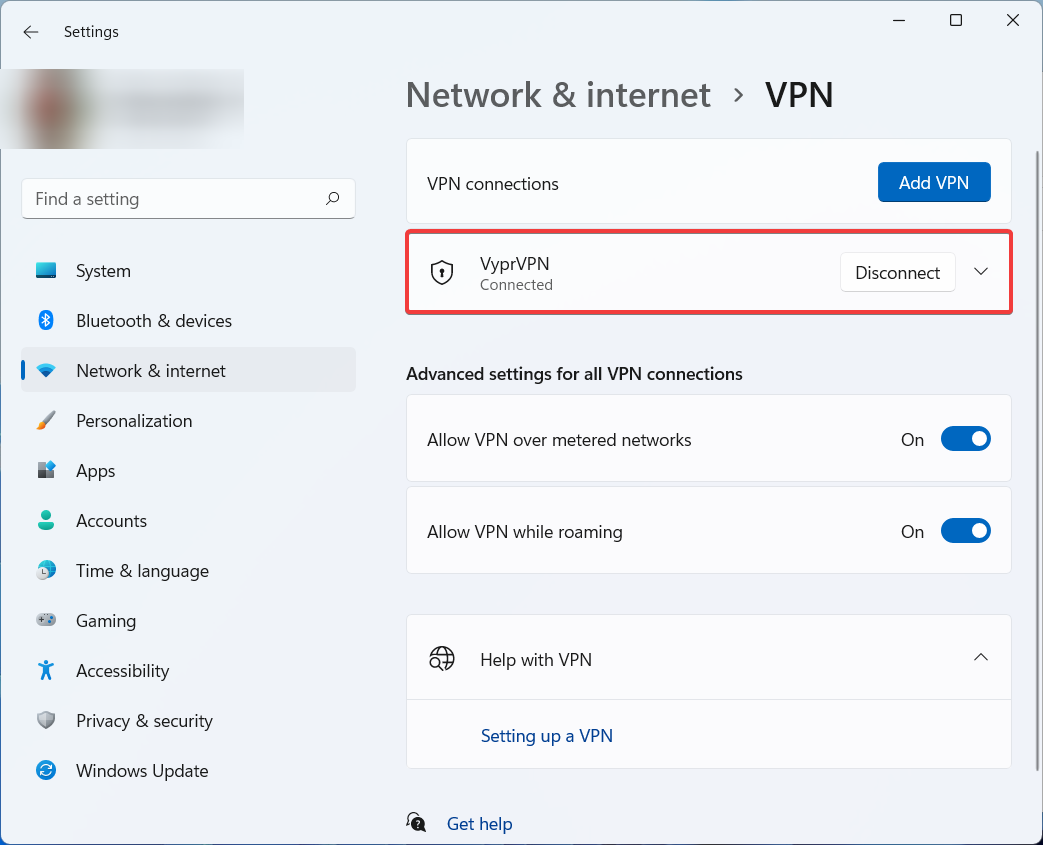
- If you want to remove the connection, click on it, then click Remove.
Microsoft developed the Point-to-Point Tunneling Protocol (PPTP), one of the oldest VPN protocols available on the market.
This protocol is widely supported and can be set up on any platform using the built-in feature. Unfortunately, it uses Microsoft Point-to-Point Encryption (MPPE) and outdated MS-CHAP v2 authentication.
PPTP is the fastest of all VPN protocols in the industry. However, this comes at a cost for security, as it utilizes weak encryption that can be easily cracked.
Unfortunately, the PPTP protocol has a history of security flaws and can be easily blocked by ISPs, admins, or network firewalls.
2. Set up a manual VPN connection using OpenVPN
Setting up a manual VPN connection with the OpenVPN protocol is a more complex – but not difficult – process than the other connections using the built-in VPN.
It involves 4 stages if you want to add DNS leak protection. These stages are: downloading and installing the OpenVPN GUI, adding the server configuration files, setting up DNS leak protection, and finally, connecting to a VPN server on your Windows 11 PC.
We used NordVPN to establish an OpenVPN manual connection with the OpenVPN GUI in our example. This VPN service uses the OpenVPN protocol and allows a manual setup too.
Many top VPN services support the OpenVPN protocol, and therefore you should follow the general steps below carefully regardless of your VPN provider, and you should be all set.
2.1. Download and install the OpenVPN GUI
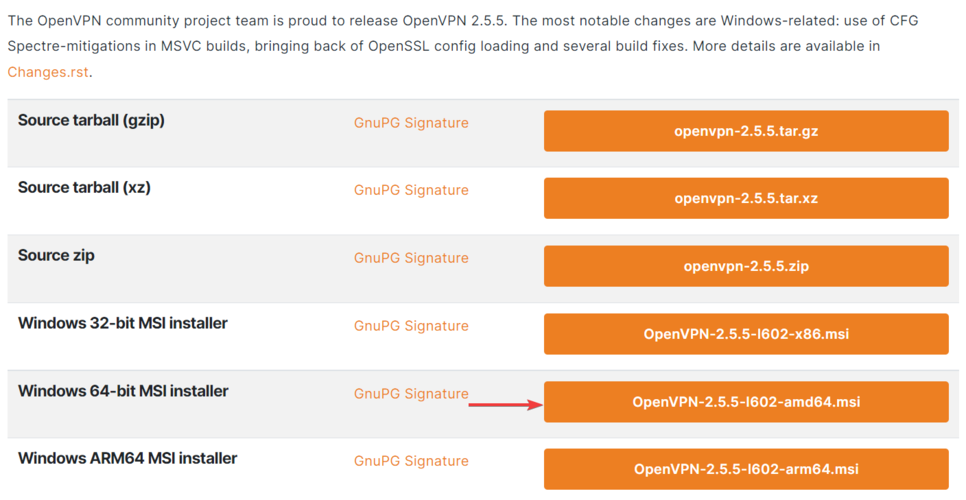
- Download the OpenVPN GUI version for your OS.
- Open the file and click on Install Now.
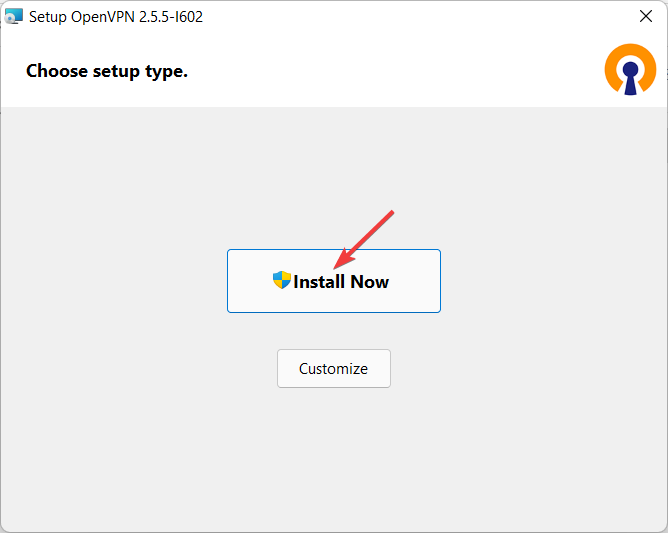
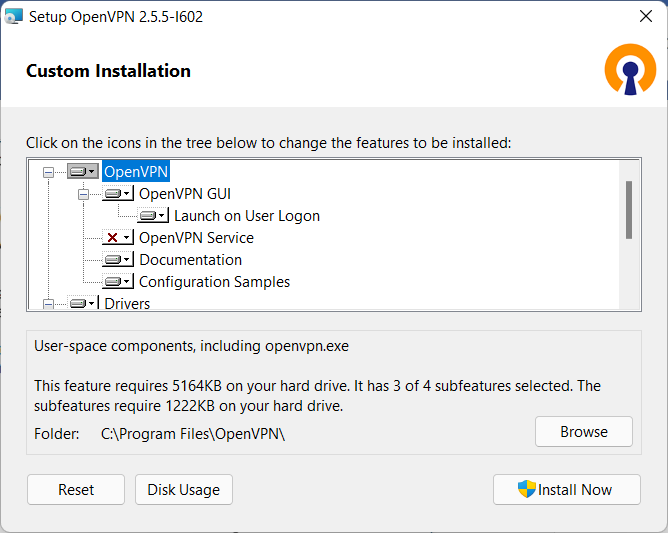
- Alternatively, you can select Customize for Custom Installation.
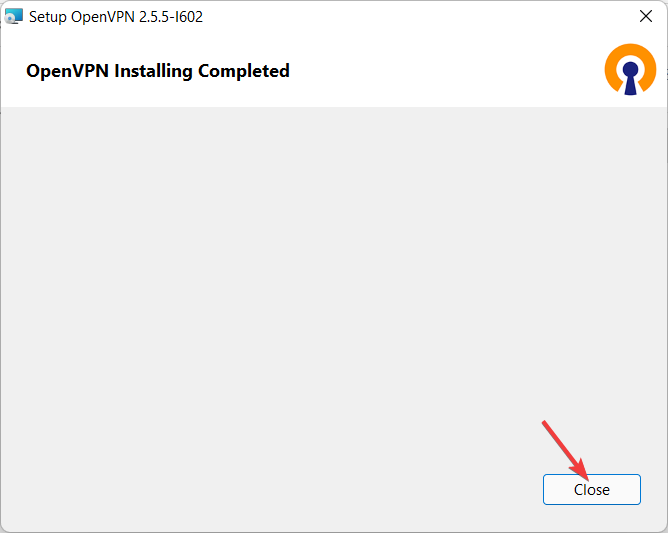
- Wait for the installation to complete.
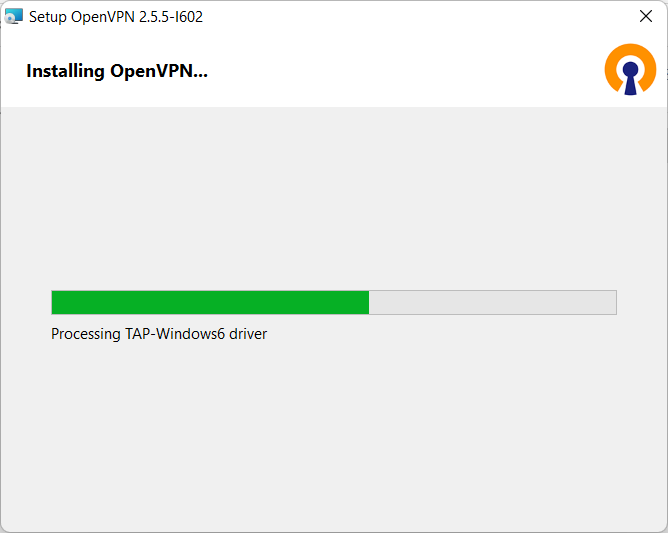
- Once the installation is completed, click Close.
2.2. Add the server configuration files to OpenVPN
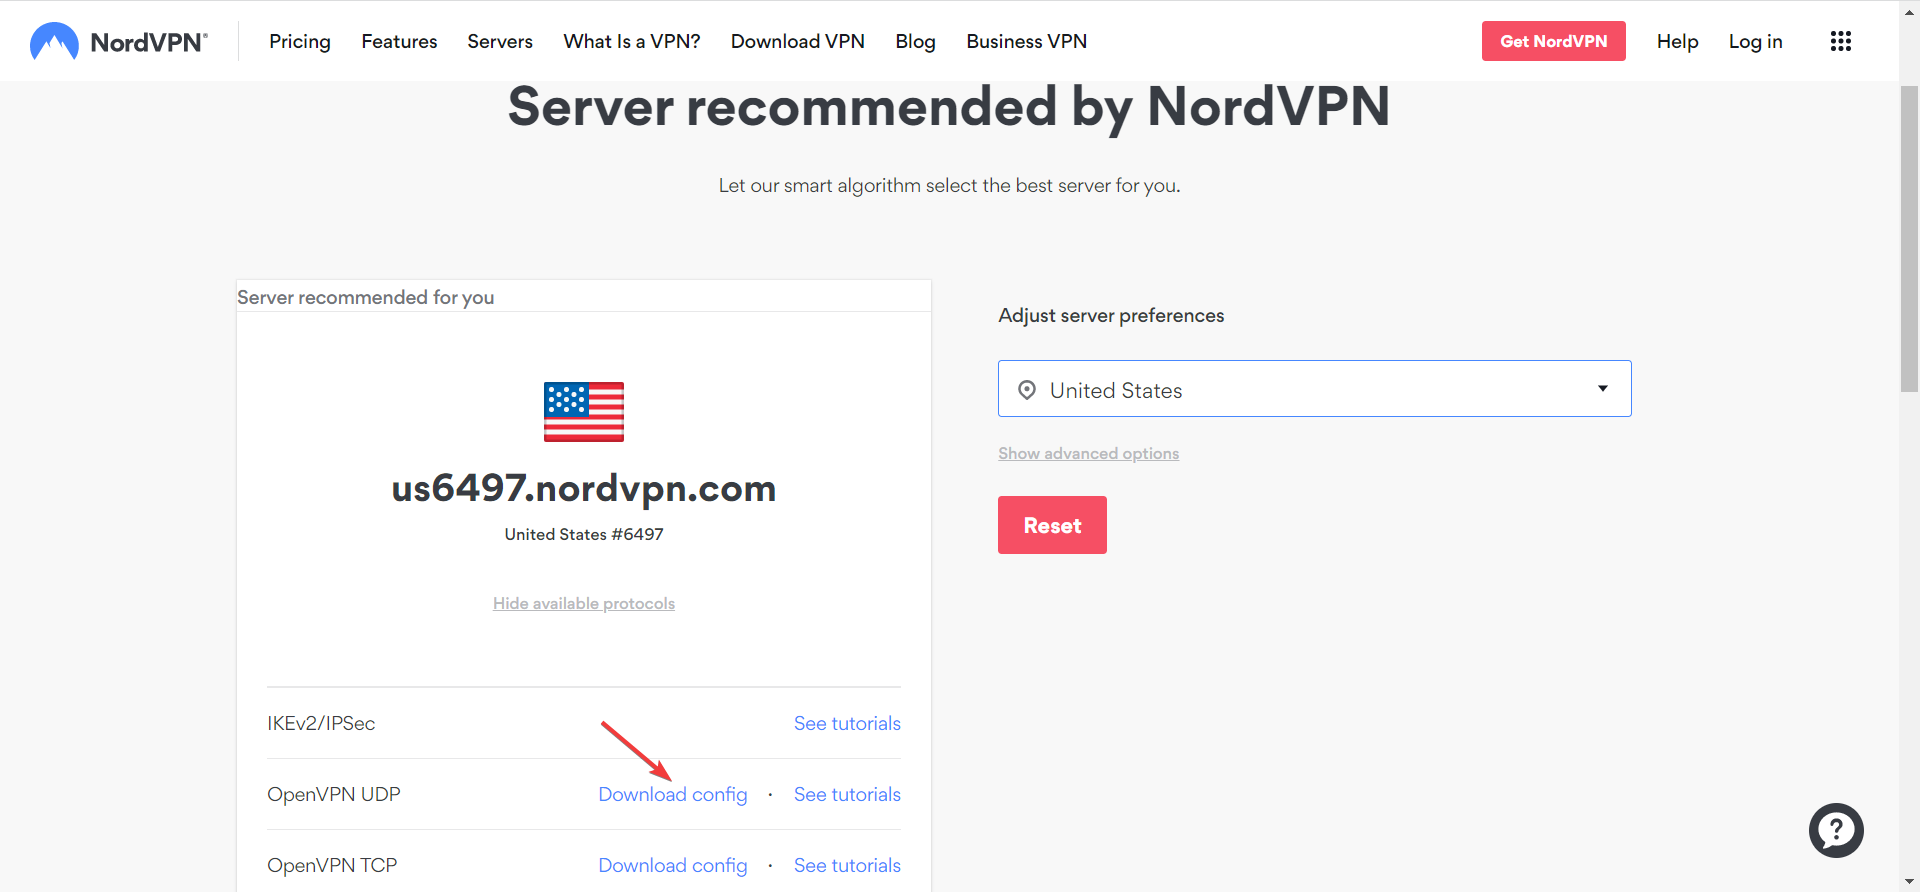
- Log into your VPN account and download the configuration files.
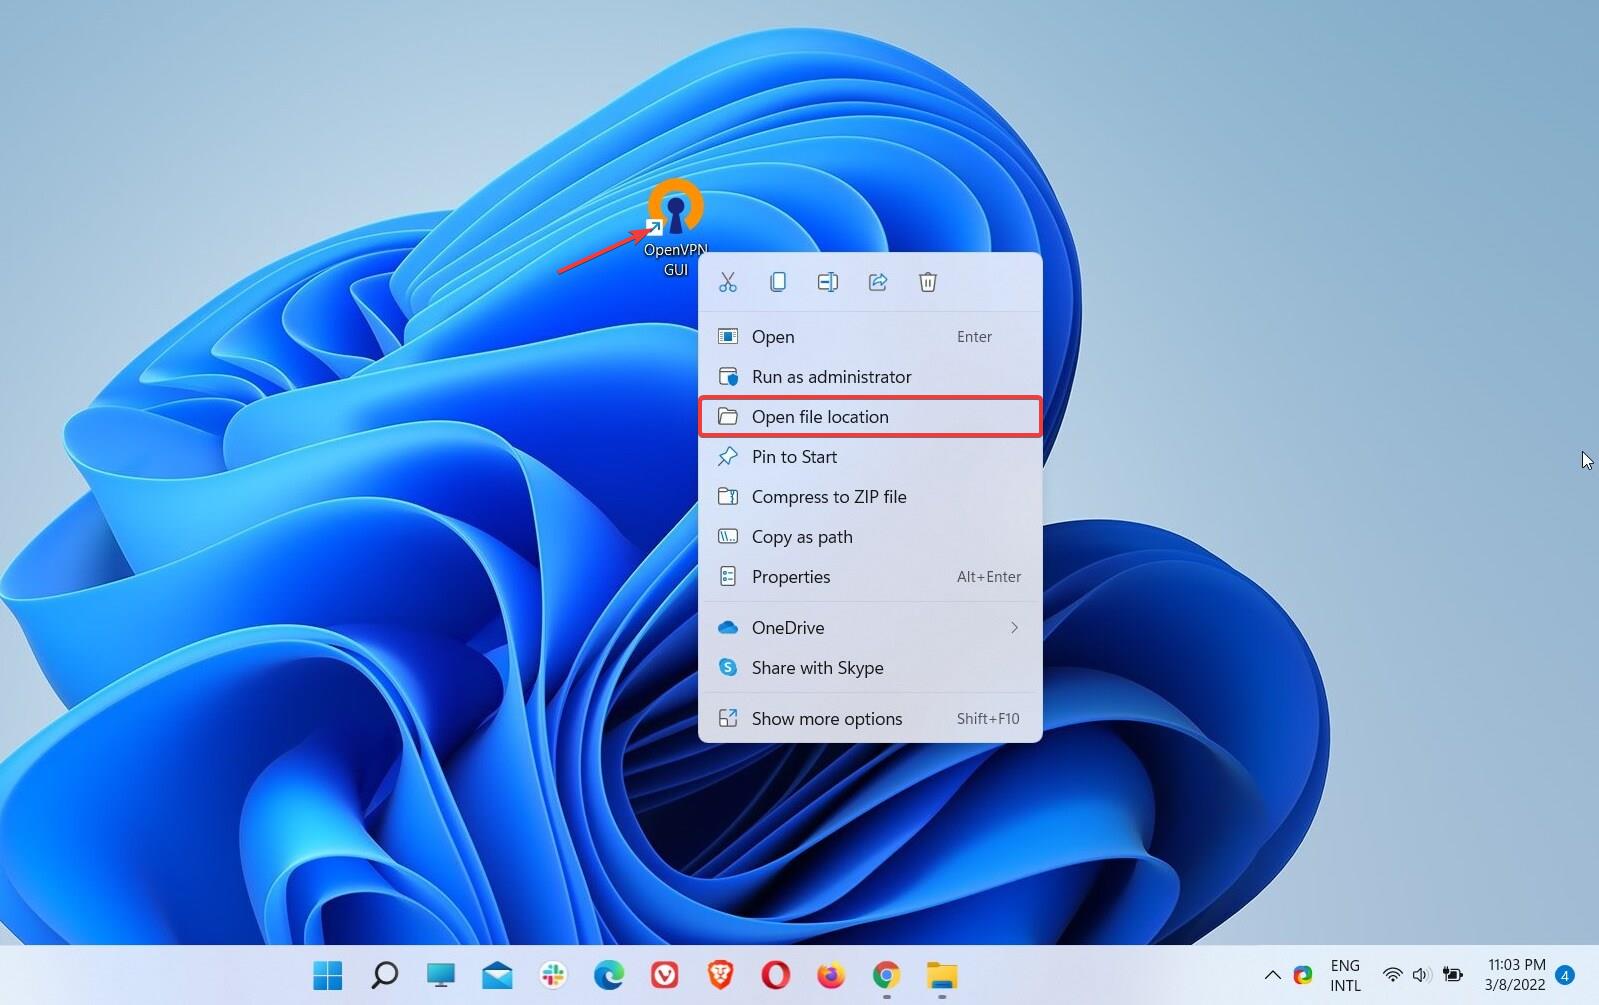
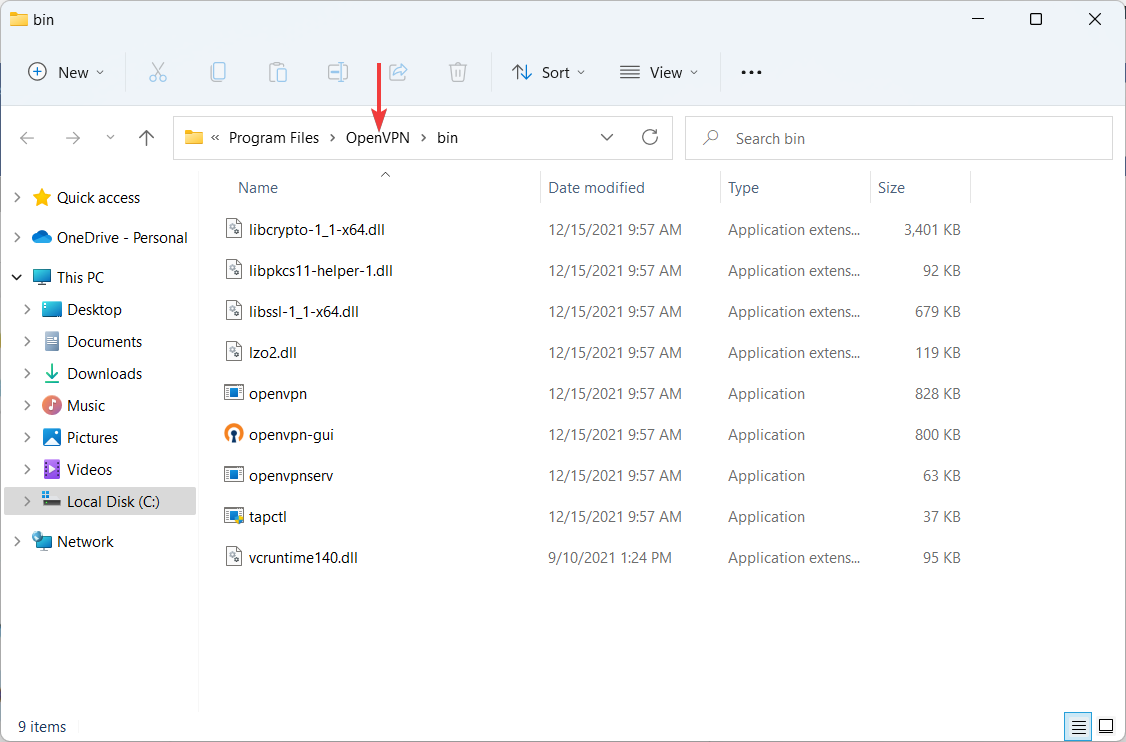
- Right-click the OpenVPN GUI desktop shortcut, then click on the Open file location.
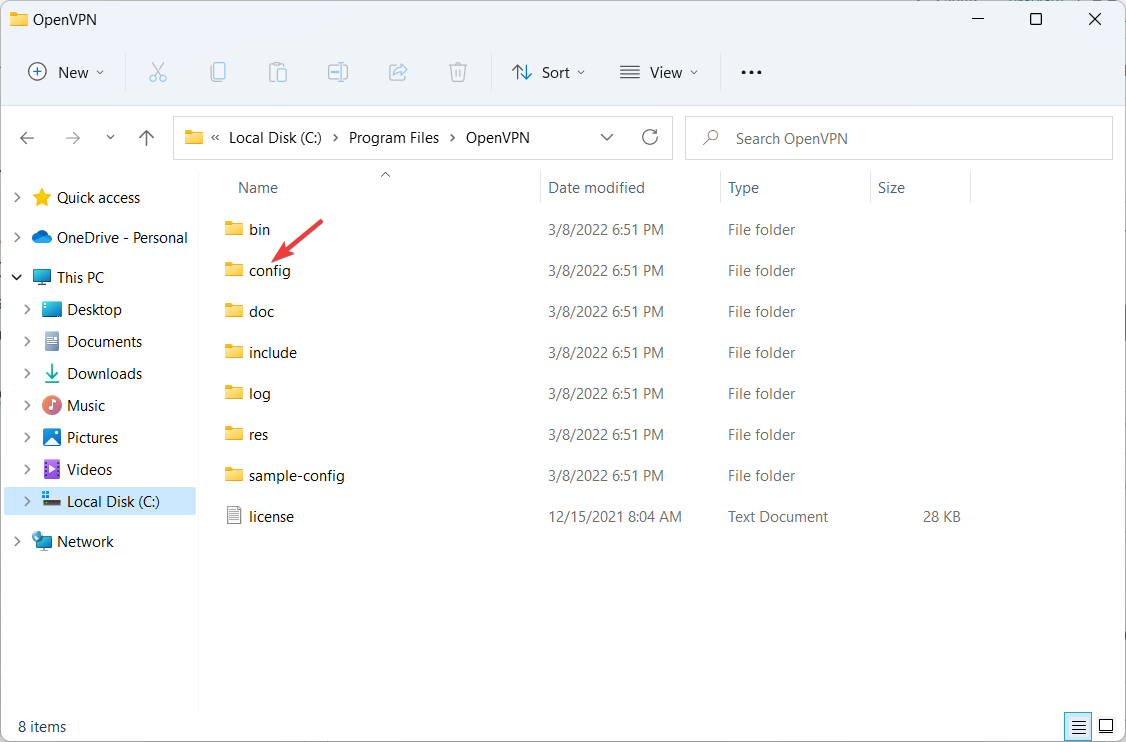
- In the navigation bar, click OpenVPN to go to the main folder.
- Double-click on the config folder.
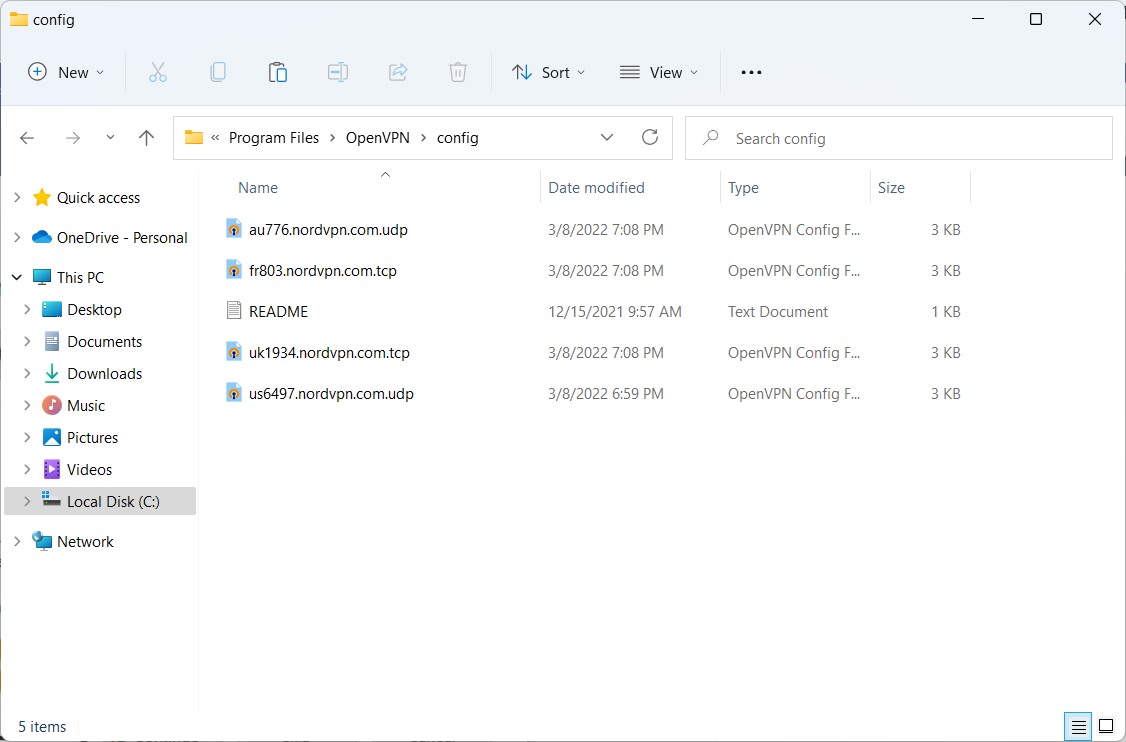
- Copy the downloaded OpenVPN configuration files into the config folder.
2.3. Set up DNS leak protection
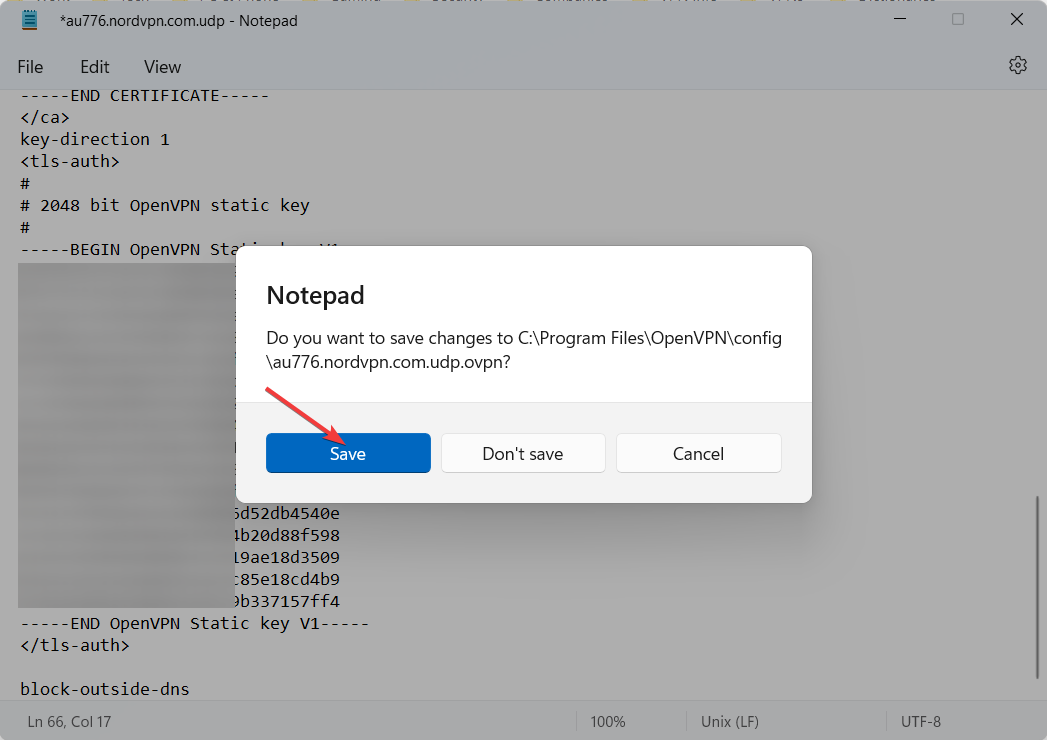
- In the config folder, right-click on the OpenVPN configuration file.
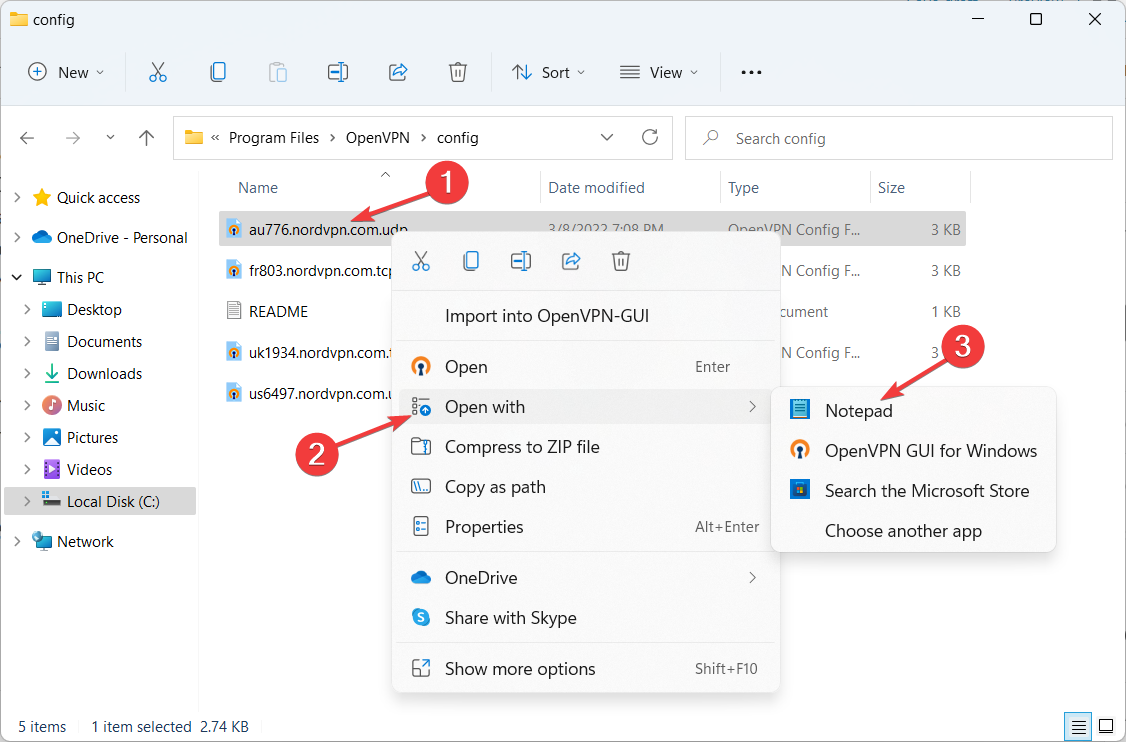
- Go to Open with and select Notepad or any other text editor.
- Scroll to the bottom and paste this line: block-outside-dns. Do not change anything else.

- Close the editor and click Save.
2.4. Establish a VPN connection
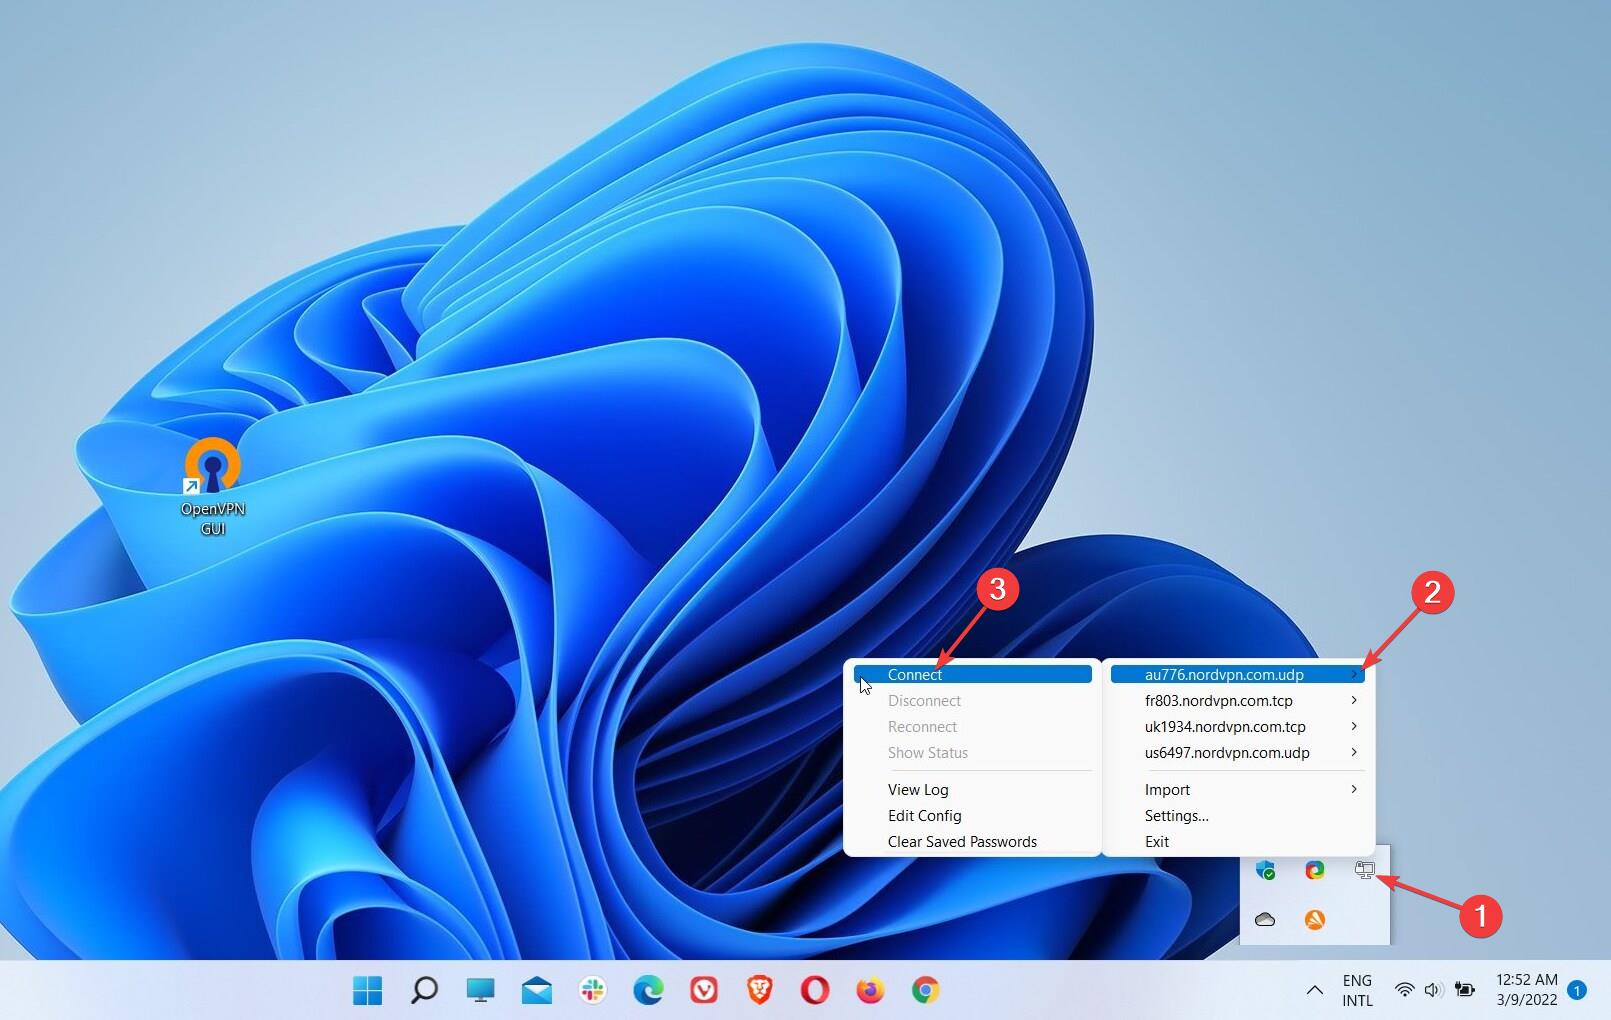
- Double-click the OpenVPN GUI shortcut on your desktop.

- This will start the application in the system tray.
- Right-click on the OpenVPN icon, go to the servers and click Connect.
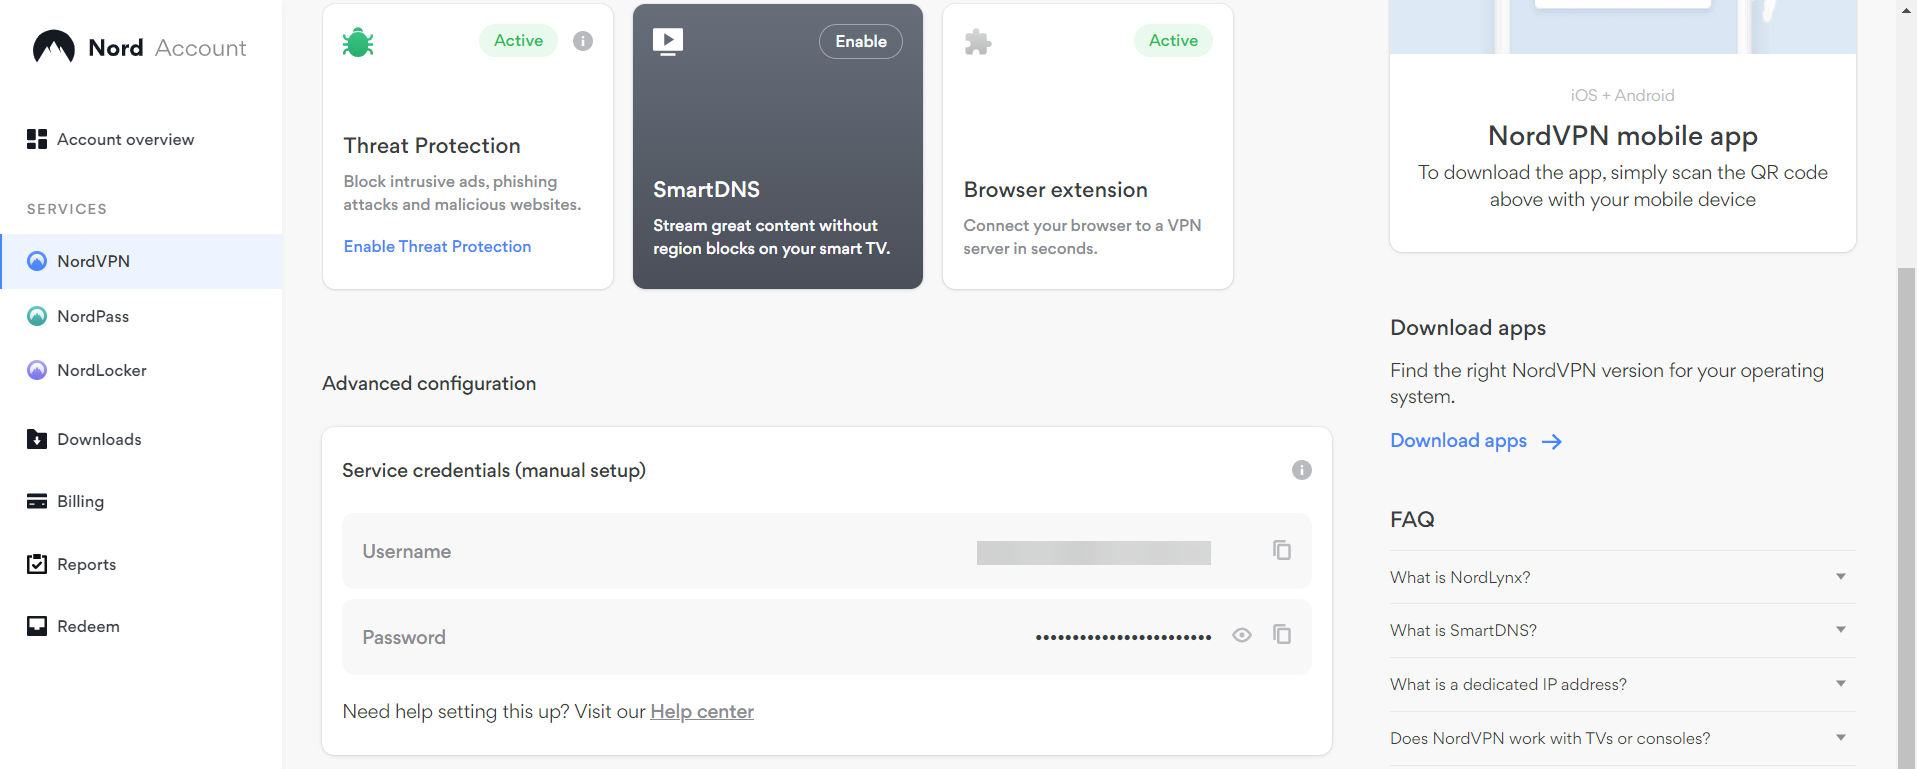
- Find your VPN provider’s service credentials for the manual setup. These are different from your account credentials.
- Enter the Username and Password, then click OK.
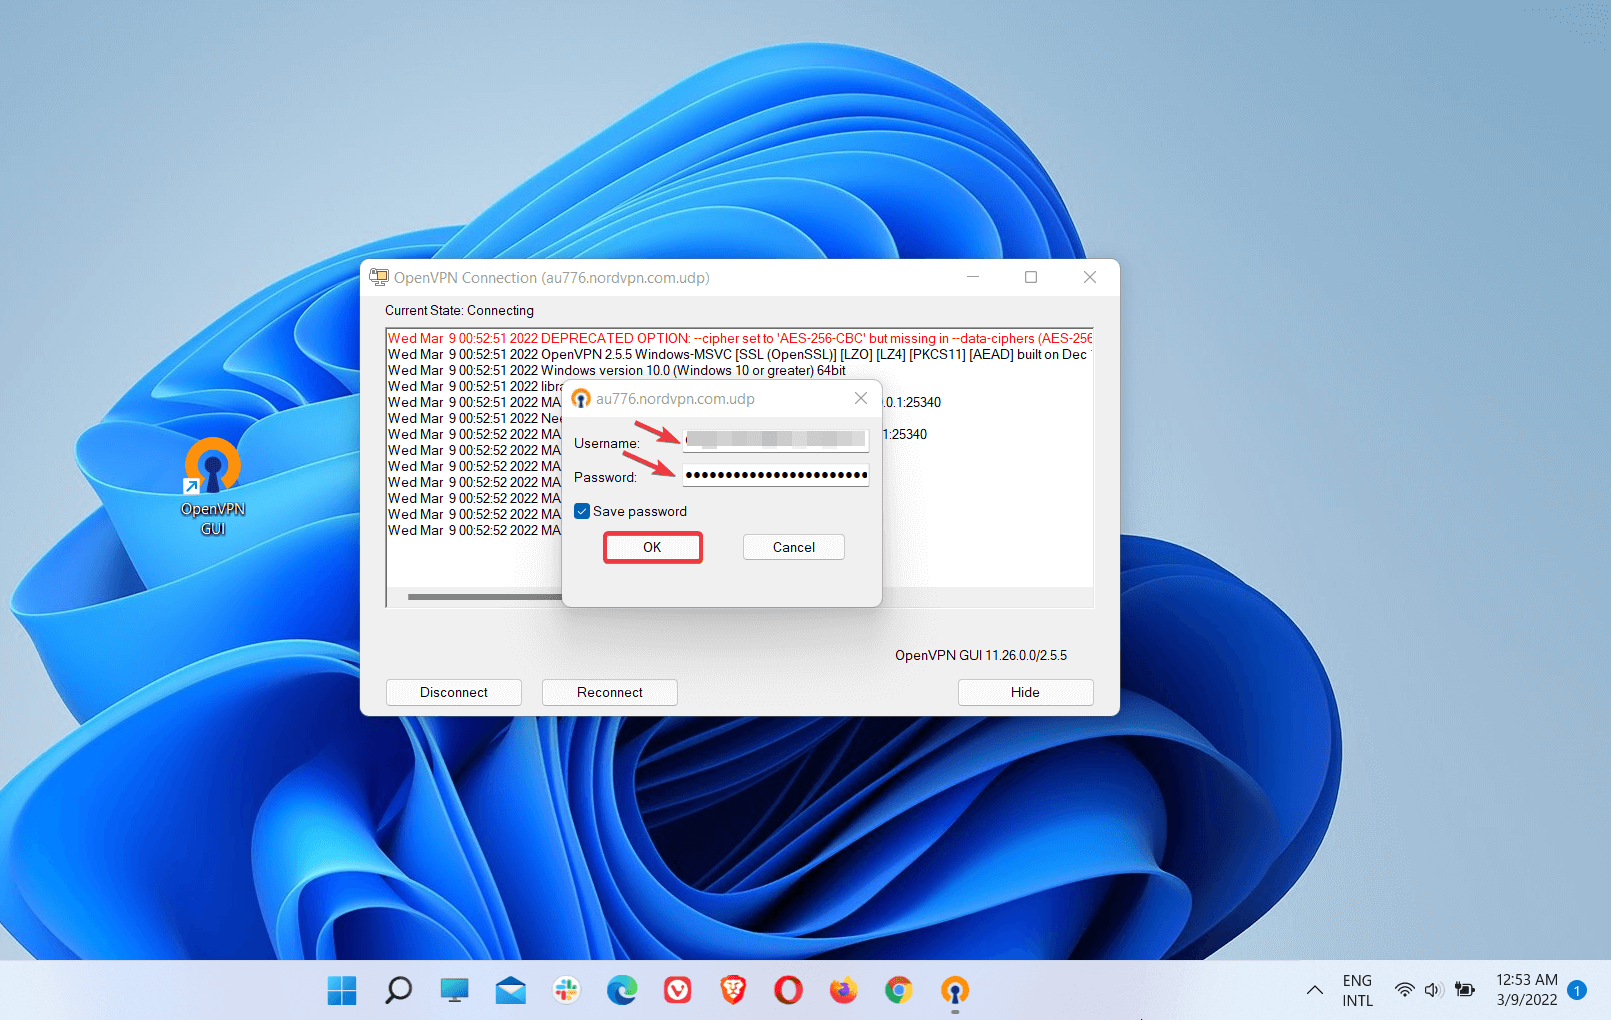
- A notification will appear in the bottom right corner showing the connection status.
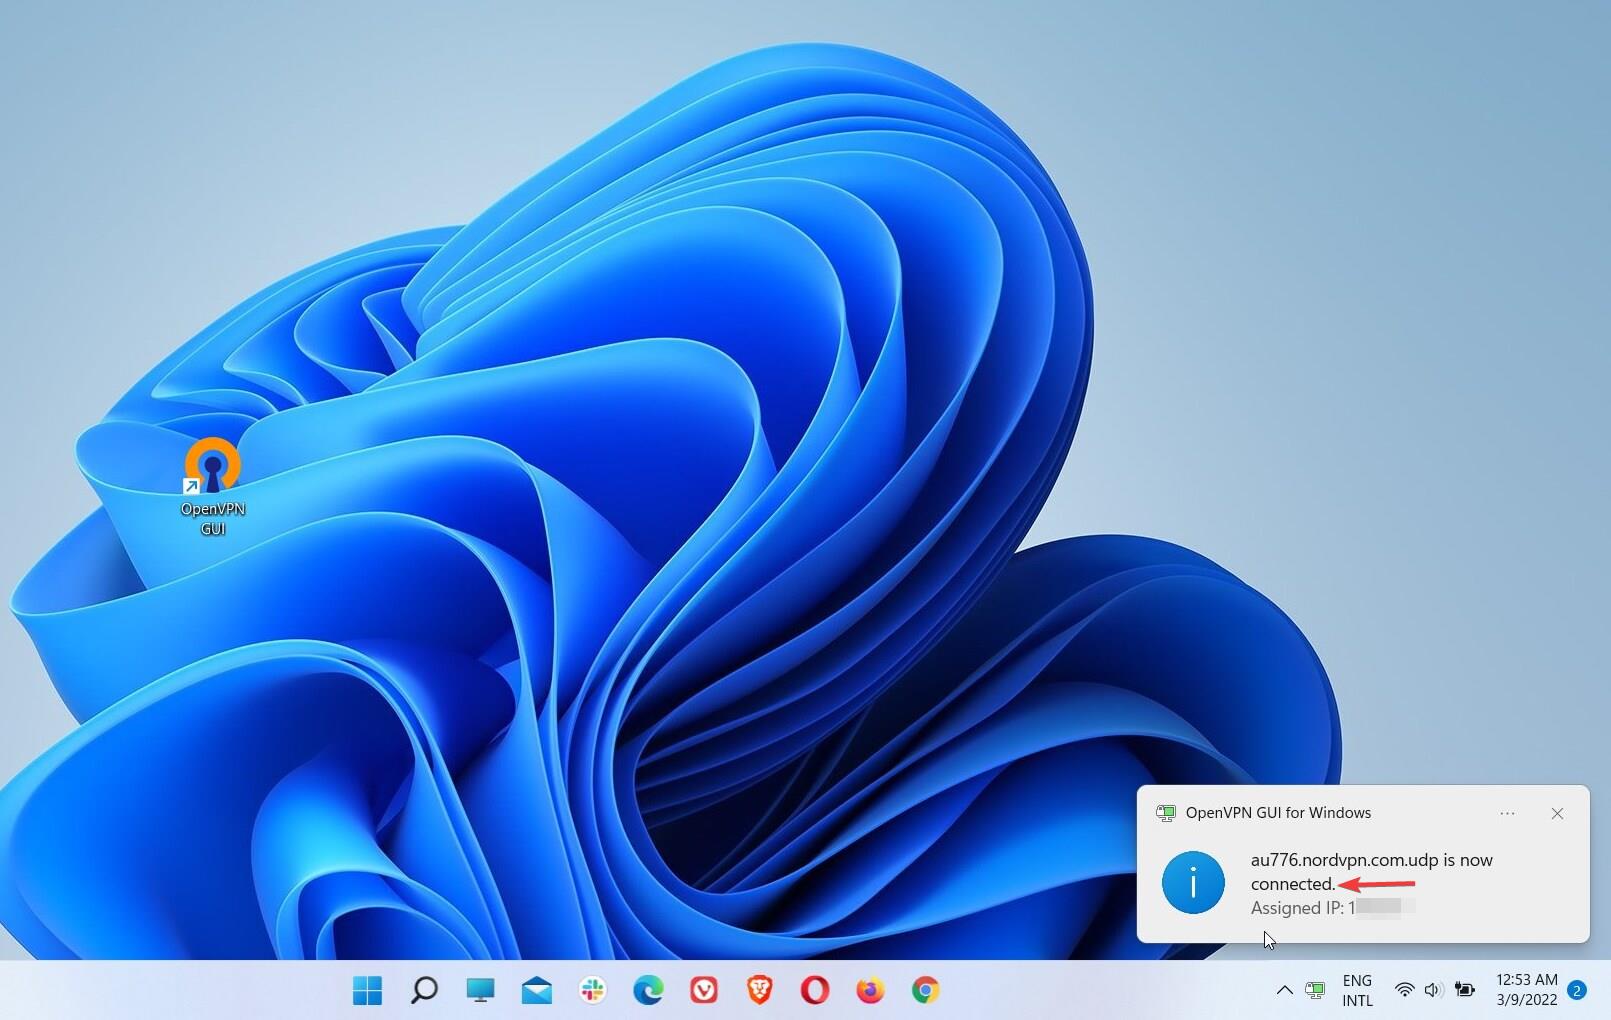
- If you want to disconnect, right-click on the app icon, go to the servers, and click Disconnect

OpenVPN is a prevalent VPN protocol currently widely supported by many well-reputed VPN providers on the market, with some using it as the default protocol.
This protocol is open source, meaning users and developers can access its source code to check for security flaws or other vulnerabilities.
OpenVPN is free for all platforms and can be configured for various ports and encryption types. Although it can use different cryptographic algorithms, the Advanced Encryption Standard (AES) symmetric-key algorithm is recommended.
The AES-256-bit key encryption with 2048-bit RSA authentication is the most advanced and secure encryption algorithm supported by OpenVPN.
This encryption type is practically unbreakable and resistant even to brute-force attacks. It is considered the industry standard, as many top intelligence and military agencies use it.
OpenVPN works with either the UDP (User Datagram Protocol) or TCP (Transmission Control Protocol), which you can choose during manual setup or directly from the VPN app.
UDP is generally faster and more efficient, whereas TCP is slower but more reliable since it allows the retransmission of lost data packets to ensure that your data will be delivered fully and in the correct order.
Overall, OpenVPN is a fast, highly secure, and very reliable VPN protocol.
What VPN should I use for manual configuration?
Many top VPN providers support different types of manual setup, and OpenVPN is the most widely supported. Regardless of the VPN service you plan to use, check in advance to find information regarding the supported connection types.
NordVPN allows manual configuration for IKEv2/IPsec with the Windows 11 built-in VPN and OpenVPN using the OpenVPN GUI application.
It uses OpenVPN, IKEv2/IPsec, and NordLynx VPN protocols. However, IKEv2/IPsec is only available with the macOS and iOS native apps for automatic connection.

NordLynx is a proprietary VPN protocol developed and used exclusively by NordVPN. It works over UDP or TCP and is only available with the dedicated NordVPN apps.
The service operates under the jurisdiction of Panama, which is known for its privacy-friendly laws.
NordVPN comes with easy-to-use native apps for Windows, macOS, Linux, Android, iOS, and browser extensions for Chrome, Firefox, and Edge. It can also be configured on a VPN-compatible router to secure all devices connected to your network.
Regarding speed, NordVPN was the fastest VPN according to our multiple VPN server speed tests. It guarantees blazing-fast connection speeds for the smoothest browsing experience.
Using NordVPN on Windows 11 takes care of your privacy and sensitive data with next-generation AES with 256-bit military-grade encryption.
This encryption is recommended by the NSA and is resistant even to brute-force attacks. In addition, it ensures total protection against ISP monitoring, government surveillance, and hackers.
As far as other features are concerned, NordVPN includes the following: Kill Switch, Split tunneling, Dark Web Monitor, CyberSec (ad and malware blocker), Threat Protection, Obfuscated servers, Double VPN, Onion Over VPN, Private DNS, Smart DNS, Dedicated IP, and P2P.
More about NordVPN:
- 5,200+ servers in 60 countries
- Strict no-logs policy
- Connect up to 6 devices
- 30-day money-back guarantee
- 24/7 live chat and email customer service

NordVPN
NordVPN is very fast, secure, and reliable. Plus, it provides downloadable VPN clients for every popular OS and device.What are the differences between a manually-configured VPN and a regular VPN app?
➡Interface
The Windows 11 built-in VPN client and the OpenVPN GUI have an easy-to-use interface, allowing you to connect to a VPN server on your Windows 11 device with just a few clicks.
This can be easily noticed from the multiple screenshots used in the above configuration processes for the different VPN connection types.
VPN apps from top-notch providers also have user-friendly graphical user interfaces (GUI). However, they are more complex in design, given that they have additional features and settings.
Nonetheless, even if you’re using a VPN app for the first time or you’re not a tech-savvy person, you should be able to easily navigate through the settings and features in the VPN native client and connect to a VPN server without any hassle.
➡Configuration
The configuration process is one of the main differences between a manual VPN connection and a regular one using a dedicated VPN app.
Setting up a manual connection in Windows 11 shouldn’t be hard as long as you follow each step accordingly. Unfortunately, there’s a misconception that more steps mean a more complicated task.
Since a manual setup involves extra steps, some users may be discouraged from trying this connection type for fear of messing things up.
With the information presented here, that should no longer be the case. However, there are slight chances you would get stuck or encounter errors if you stick to our guides.
So, whether you use the Windows 11 built-in VPN client with any of the IKEV2, SSTP, L2TP, IPsec, or PPTP VPN protocols, or the OpenVPN GUI to establish a manual connection with the OpenVPN protocol, our comprehensive setup guides should serve you a good purpose in every instance.
As for automatic VPN connections using native VPN apps available for different operating systems and devices, things tend to be easier since fewer steps are required. Therefore, there’s a lower probability that you would omit something or do anything wrong.
For instance, setting up a VPN app on your Windows 11 device is straightforward. All you need to do is download the app from your VPN provider’s website, install it on your PC, and connect.
Later, you will find an example of setting up a direct VPN connection on Windows 11 by downloading and installing the VPN client on your device.
All in all, whether you choose a manual or automatic VPN connection for Windows 11, our configuration guides will help you enjoy the benefits of using a VPN in any situation.
➡Servers
VPN servers are physical or virtual servers configured to host and deliver VPN services. They use hardware and software that allow a secure connection between the VPN client and the server.
When you connect to a VPN server, your entire traffic is rerouted through that server. Besides, a secure tunnel will be created to encrypt your data.

Moreover, the quality of the infrastructure VPN servers relies upon influences your connection speed.
Consequently, a top-of-the-line VPN service is defined by an extensive server network, with fast and secure VPN servers spread across multiple locations worldwide.

If you want to connect to a VPN server on Windows 11 using the built-in VPN, you can add a single server name or address per connection.
Therefore, if you wish to connect to other server locations or countries, you must set up a separate manual connection for each location or country.
On the other hand, a manual VPN connection with OpenVPN lets you add multiple configuration files for different locations.
However, even though you can add as many countries or locations as you like, you won’t be able to manually change servers.

One big difference between a manual and an automatic VPN connection is that the latter allows you to switch between servers directly.
Moreover, many VPN apps have a quick connect option that automatically connects you to the optimal location for speed.
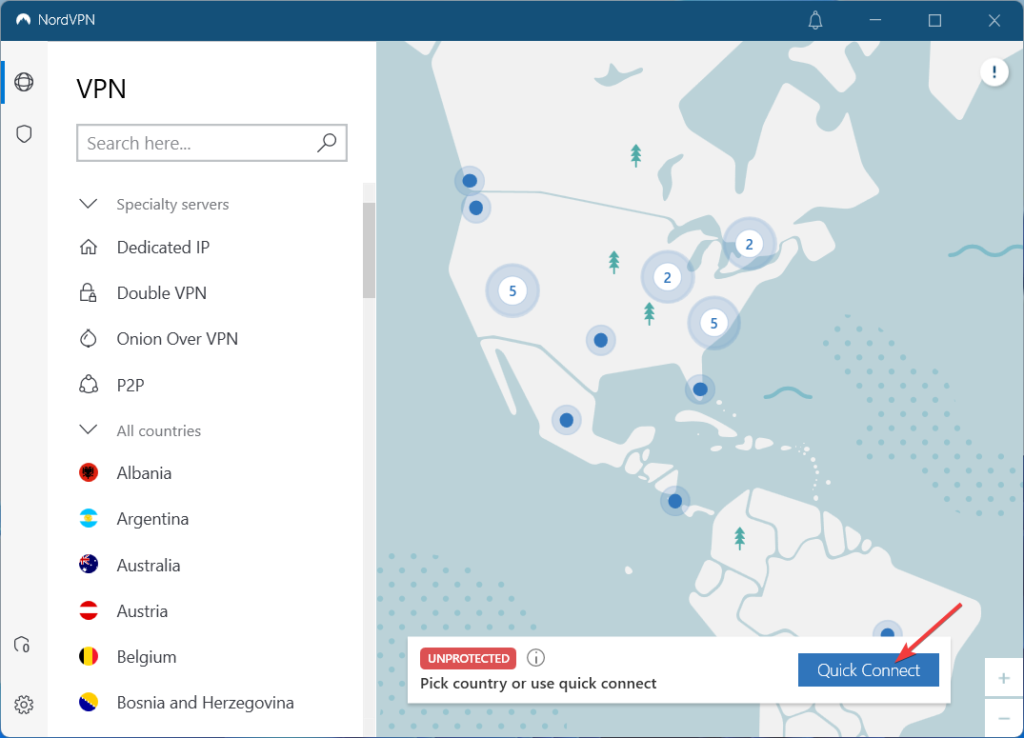
This is advantageous, especially when you don’t need to connect to a specific location to evade geo-blocks.
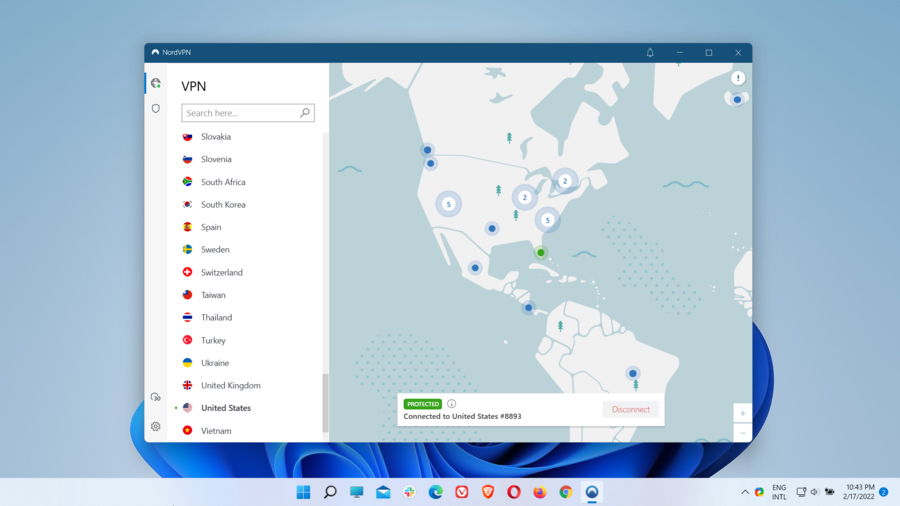
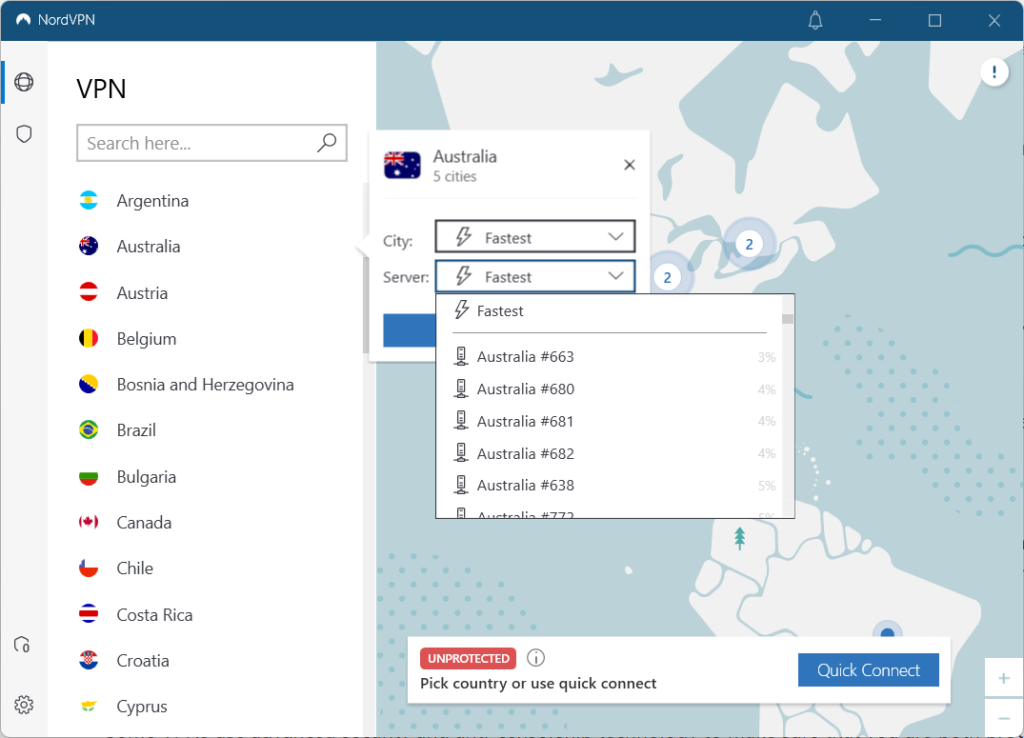
Also, NordVPN allows you to connect to the fastest server in the quickest location or the most secured servers in a particular location (city).
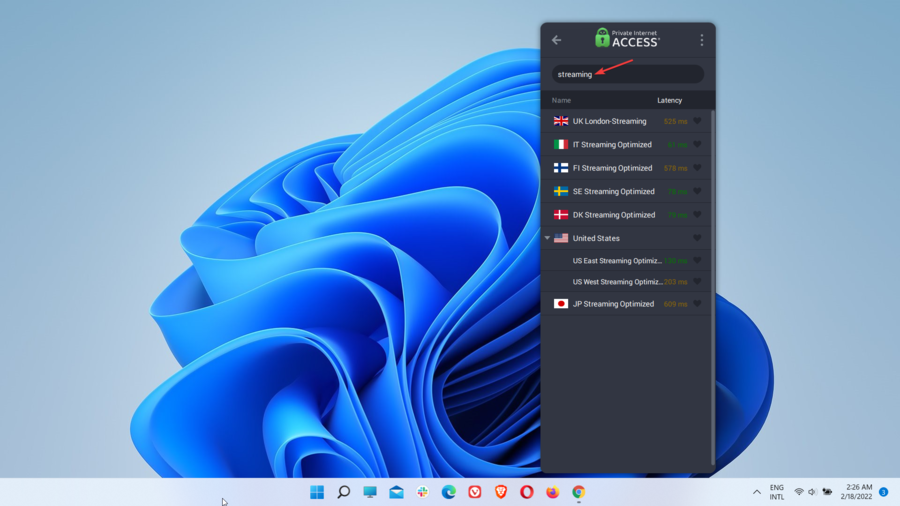
VPN services such as Private Internet Access, NordVPN, CyberGhost VPN, and ProtonVPN provide specialized servers for streaming, gaming, or torrenting (P2P).
➡Encryption
Encryption distinguishes VPN services from other online circumvention tools.
VPN protocols determine what encryption type will be used for your connection, with each protocol using its encryption algorithm. Also, protocols can support various encryption types.
Some protocols use powerful encryption. Others, such as PPTP, are outdated, use poor encryption, and have a history of security vulnerabilities.
The Advanced Encryption Standard (AES) is a symmetric-key encryption algorithm that uses the same key to encrypt and decrypt your data. It is the strongest encryption currently available and is used by many reliable VPN providers.
AES comes with three block ciphers that encrypt and decrypt data in blocks of 128 bits using cryptographic keys of 128, 192, and 256 bits. For example, AES-256 uses a 256-bit key length.
The longer the secret key, the harder it will be for someone to crack it with a brute-force attack. For example, although AES-256 is technically stronger than AES-128, the latter is secure and can’t be broken even with a brute-force attack using current technology.

Also, AES encryption uses different cipher modes necessary for its implementation. The following are the most common cipher modes used by the AES.
- ECB – Electronic Code Book mode
- CBC – Cipher Block Chaining mode
- CFB – Cipher Feedback mode
- OFB – Output Feedback mode
- CTR – Counter mode
- GCM – Galois/Counter mode
The difference between a manual VPN connection and a native app is that when you may choose one protocol, only you set up the former – you’ll use a single encryption type.
However, some VPN providers offering different encryption types allow you to change it (the key length and block cipher) directly from the VPN app.
In general, AES-256-GCM encryption is the most powerful. Thus, if you prioritize security over speed, you should choose this encryption type if available.
➡Protocols
VPN protocols are rules and instructions that determine data routes between a user’s device and the VPN server.
They combine transmission protocols and encryption standards that allow you to establish secure communication with the VPN server.
These VPN protocols are essential since they affect both speed and security. Therefore, they represent a relevant indicator of the overall performance of a VPN service.
When setting up a manual VPN connection using the built-in VPN, you must select the VPN protocol beforehand to determine what connection type you’ll use.
As such, you won’t be able to switch VPN protocols once a connection is established. If you wish to use a different protocol, you’ll need to set up a new connection with a new protocol.
Also, when setting up a manual connection with the OpenVPN GUI, the OpenVPN protocol is the only VPN protocol available for this connection type.
Various types of protocols differ in terms of encryption and speed. Below is a list of the most common VPN protocols currently available.
- OpenVPN (UDP and TCP)
- L2TP/IPsec (Layer 2 Tunneling Protocol)
- IKEv2/IPsec (Internet Key Exchange version 2)
- SSTP (Secure Socket Tunneling Protocol)
- PPTP (Point-to-Point Tunneling Protocol)
- SoftEther VPN
- WireGuard
Some VPN providers developed their proprietary protocols used exclusively by their VPN services. The following are proprietary VPN protocols developed by some popular VPNs.
- NordLynx (NordVPN)
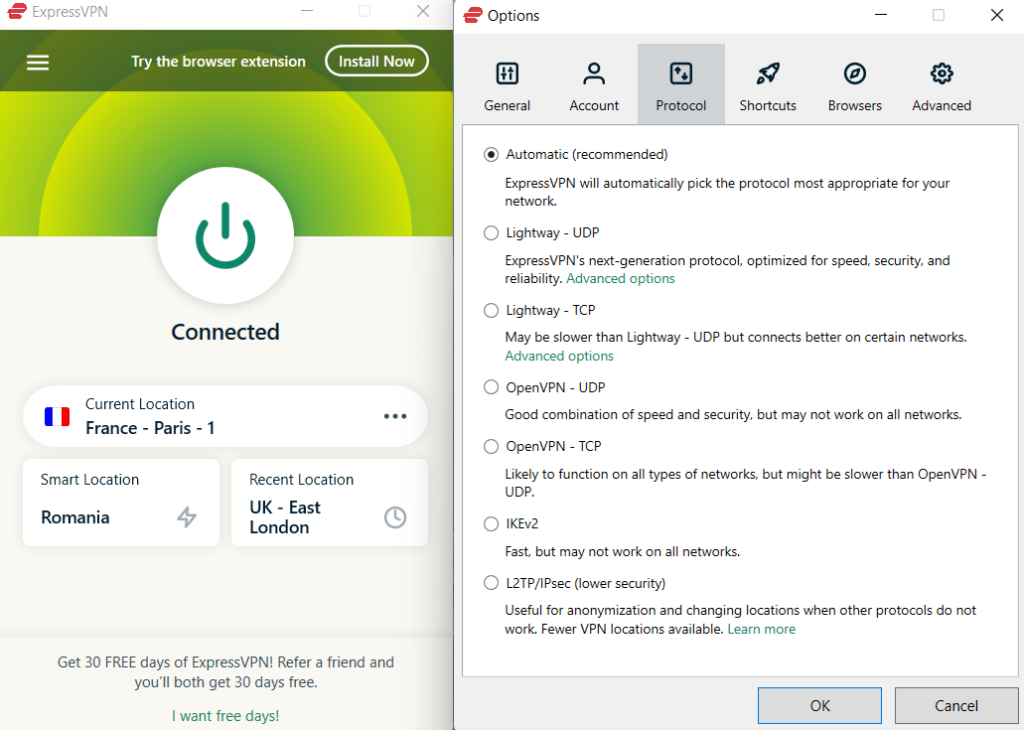
- Lightway (ExpressVPN)
- Chameleon (VyprVPN)
Before setting up a manual VPN connection using the Windows 11 built-in VPN and the OpenVPN GUI, we’ve already described the first five popular VPN protocols.
They are the only ones on the list that support manual configuration in Windows 11. You can also choose these protocols to connect to a Windows 11 VPN server from a VPN app.
➡Features
The following advanced VPN features are handy, taking your privacy, security, or anti-censorship protection to the next level.
Nonetheless, they are available exclusively for native VPN apps, so you won’t be able to use them with a manual VPN connection.
Also, remember that not every VPN provider includes all the features below. Even if it has them all or only a few, the ones included may not be available for each VPN app.
For instance, a particular provider can make the split tunneling feature available on Android only and not on Windows operating systems.
However, all-around VPNs include all of the features described below, and a few providers even make them available for all their native clients.
Consequently, if you find the following VPN features useful and wish to enjoy them while connected to a VPN server on Windows 11, you should pick a VPN service that offers them and then download the appropriate VPN app for your OS.
✅Kill switch
If your VPN connection drops unexpectedly, your traffic will no longer be protected. Only a split second of VPN interruption would be enough for your data to leak on the open Internet.
Fortunately, a VPN kill switch – as long as it’s used correctly – can ultimately reduce the risk of IP (location) and sensitive data leaks when your VPN is experiencing connection problems.
By enabling the kill switch, your VPN client will automatically prevent unprotected connections by blocking Internet traffic from going outside the VPN secure tunnel.
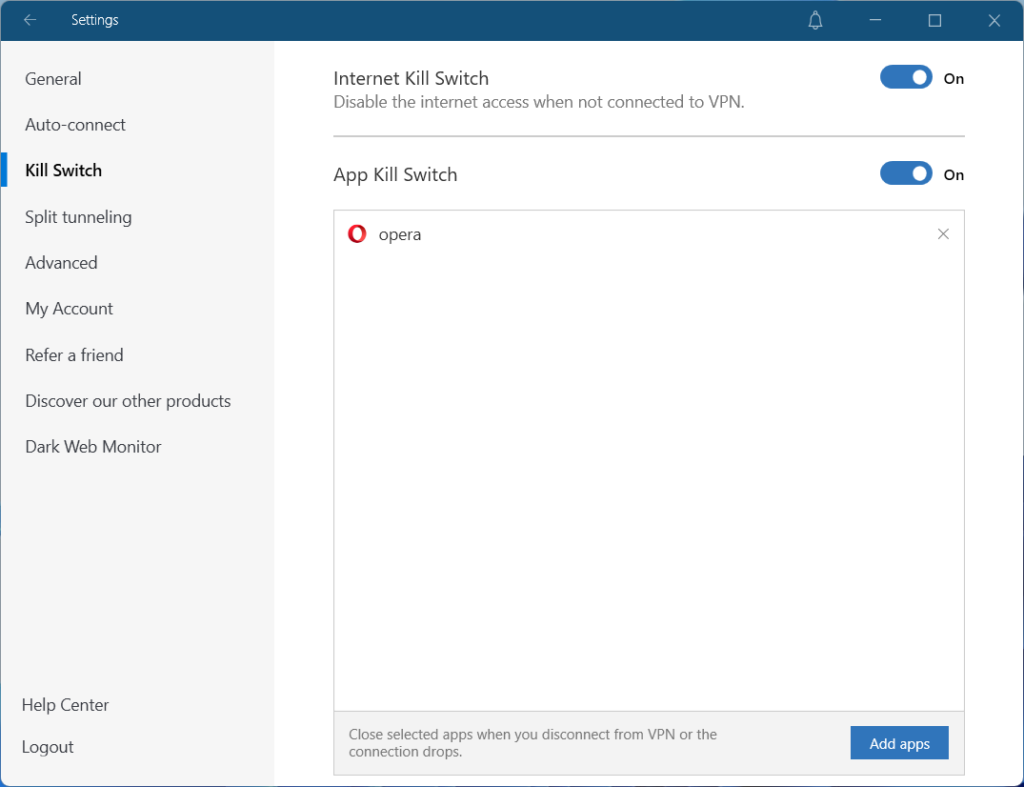
Depending on your VPN, the kill switch may have different configuration options. For example, it can stop traffic when the VPN connection drops or when the VPN is turned off.
While most VPNs come with a kill switch that works system-wide, some allow you to restrict its range to the application level, meaning that you can choose to activate it for specific apps only.
✅Ad blocker
You may have already found what an ad blocker is or even used one as a browser extension to filter content showing up in your browser.
As its name suggests, an ad blocker shields your browser by blocking annoying ads, banners, pop-ups, tracking, and malware.
However, regular ad blockers only block all of the above on the browser. On the other hand, VPN ad blockers block ads and malicious websites on browsers and apps.

Besides, they can increase browsing speeds, be slowed down by ads and pop-ups, and protect you against phishing attempts in certain instances.
Reliable and well-reputed VPN providers include an ad and malware-blocking feature in their VPN clients that can be activated with just a few clicks.
✅Split tunneling
Did you know that you can surf the Internet using two different IP addresses without switching VPN servers? The split tunneling feature is the one that allows that.
In other words, even if your VPN is on, you don’t need to use it for your entire Internet traffic, as you can simply split your connection depending on the online activity type.
On the one hand, you can connect to a VPN server to get a different IP in a specific location to access region-blocked content or to secure your device while accessing untrusted websites.
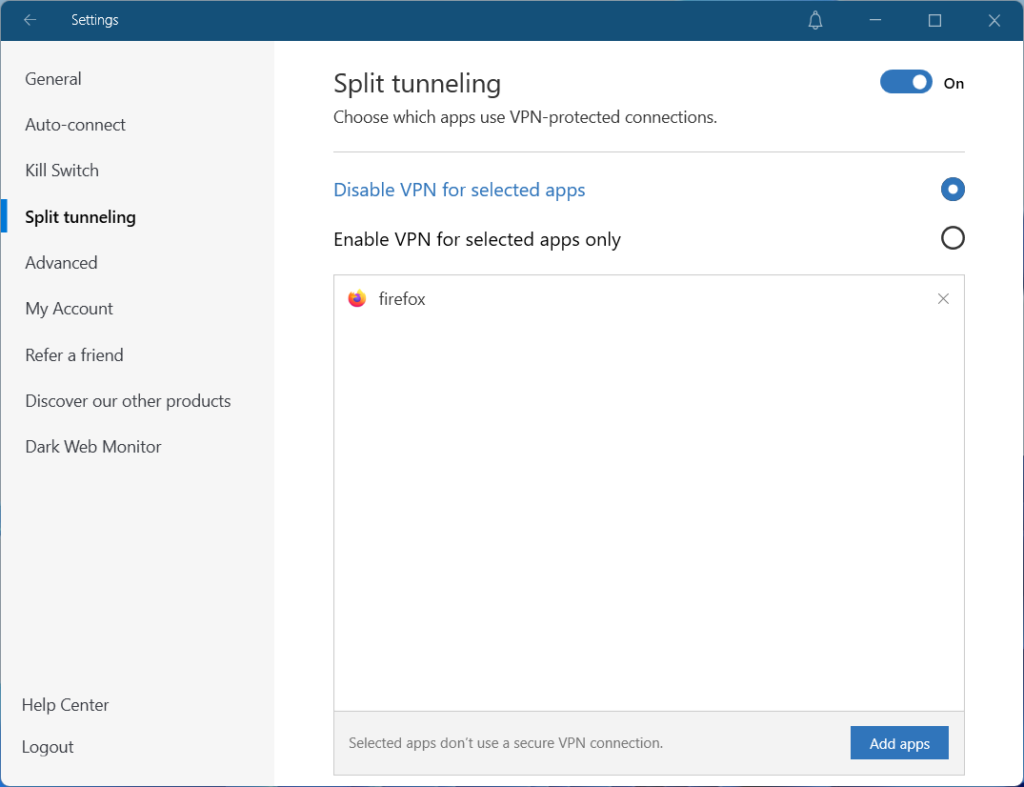
Conversely, you can still use your actual IP address without encrypting your traffic if you want to access local content or websites you trust.
Therefore, split tunneling lets you set up rules to determine which apps or IP addresses will go through or bypass the VPN connection. The options can vary from provider to provider.
✅Obfuscation
Obfuscation is a unique VPN feature that only a few VPN providers offer. However, it can be beneficial for bypassing Internet restrictions and censorship.
You already know that when you’re connected to a VPN, your ISP cannot monitor your activity and see what you do or visit online due to encryption.
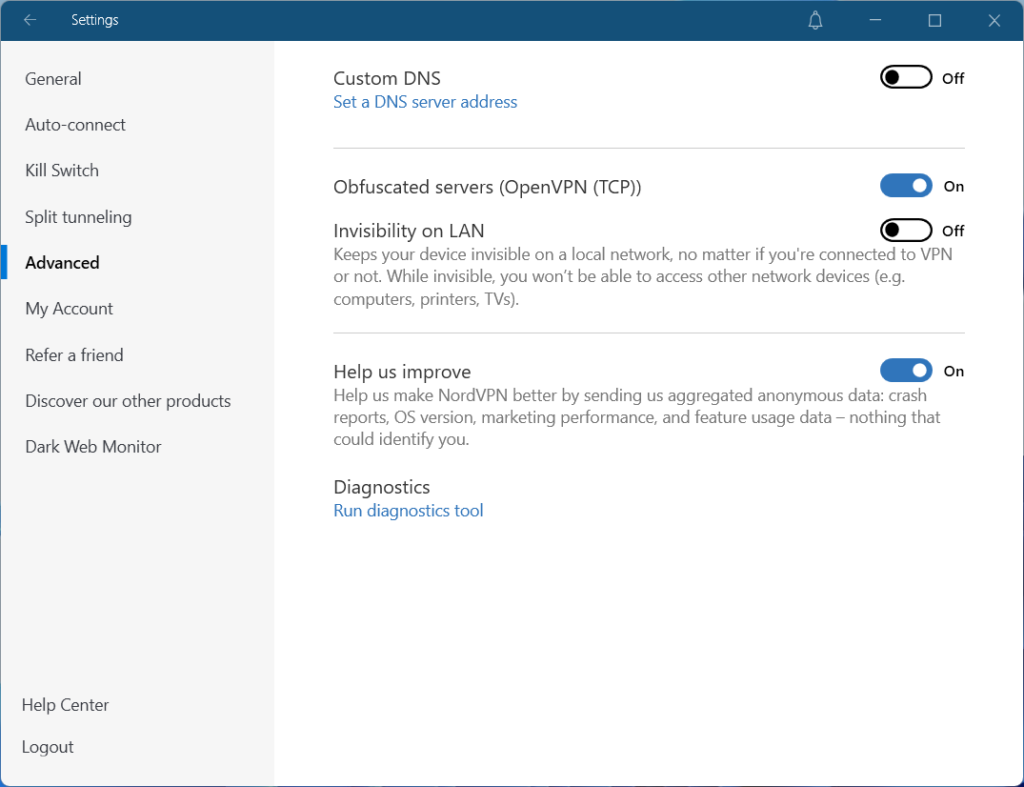
However, your ISP can see that you’re using a VPN by inspecting your data packets. But, obfuscation can change the packets so they can’t be recognized via deep packet inspection (DPI).
That is to say, it will disguise your VPN traffic as regular ISP traffic, and therefore no one will manage to detect your VPN use anymore.
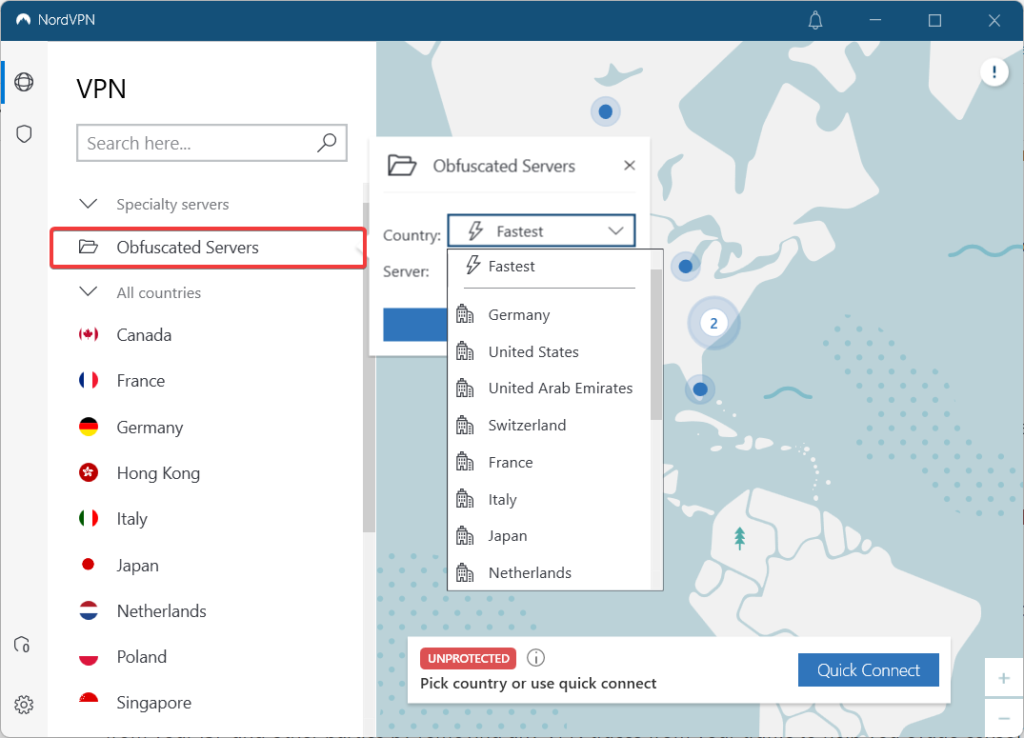
Internal networks, ISPs, or certain countries can implement VPN blocks. Nonetheless, by enabling the obfuscation feature, you will be able to get around VPN-blocking firewalls and use a VPN in areas with solid restrictions and censorship.
The obfuscation feature can be found under different names depending on the VPN provider and can be easily activated from the native VPN client.
✅Multi-hop
Although a strong VPN secures your traffic through advanced encryption, multi-hop adds an extra layer of security and privacy.
Double VPN is the feature because it encrypts your data twice by rerouting it via a second VPN server. The two VPN servers are usually located in different countries.
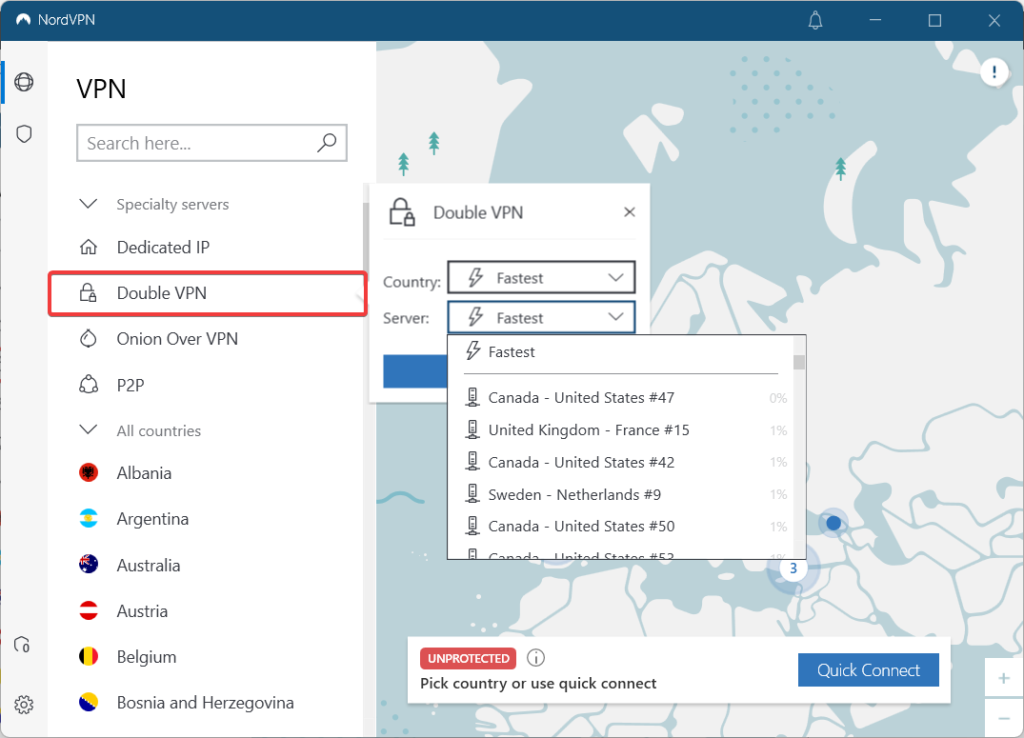
With multi-hop or double VPN, you will benefit from the utmost anonymity, privacy, and security, whether you’re using the Internet at home, on public Wi-Fi, or in a foreign country.
For example, multi-hop will ensure total protection if you’re living in or traveling to a country with heavy censorship and want to evade tracking or government surveillance.
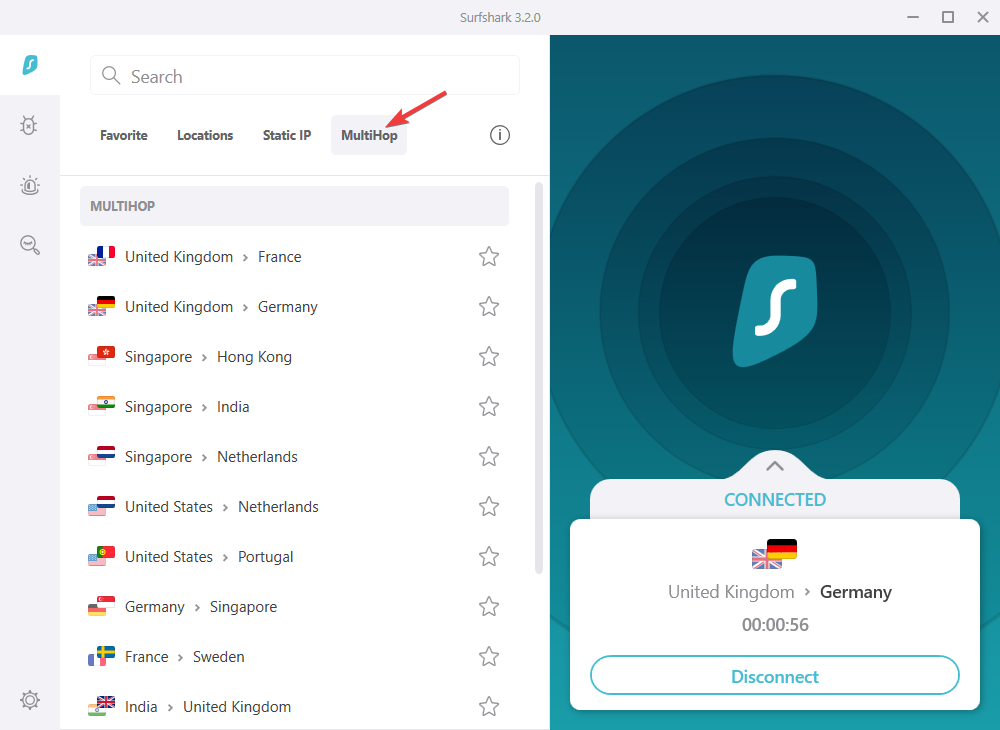
Sometimes, multi-hop can also increase your speed because a direct route does not necessarily entail the fastest connection. So, using two different routes may create a quicker path.
Establishing a multi-hop or double VPN connection is pretty straightforward. First, you must enable the feature in the VPN app, choose a pair of VPN servers, and connect to them immediately.
How to establish a direct VPN connection using a native VPN app?
As you’ve seen above, connecting to a Windows 11 VPN server using a manual connection involves a complex process. However, this doesn’t necessarily mean it is also complicated.
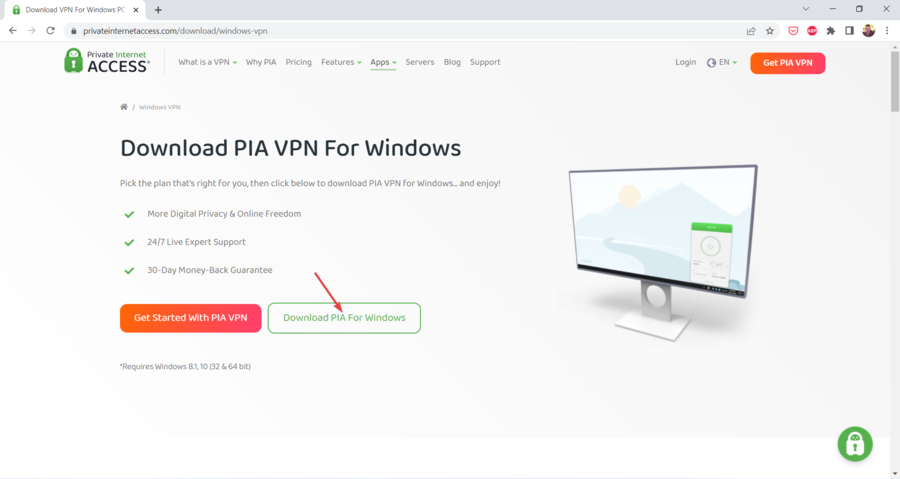
In the following example, we set up an automatic VPN connection by downloading and installing the Private Internet Access (PIA) native app on a Windows 11 device.
- First, get a VPN subscription, then download the VPN client.
- Find the downloaded file, click on it, and follow the installation instructions.
- Next, launch the VPN app and log in with your credentials.
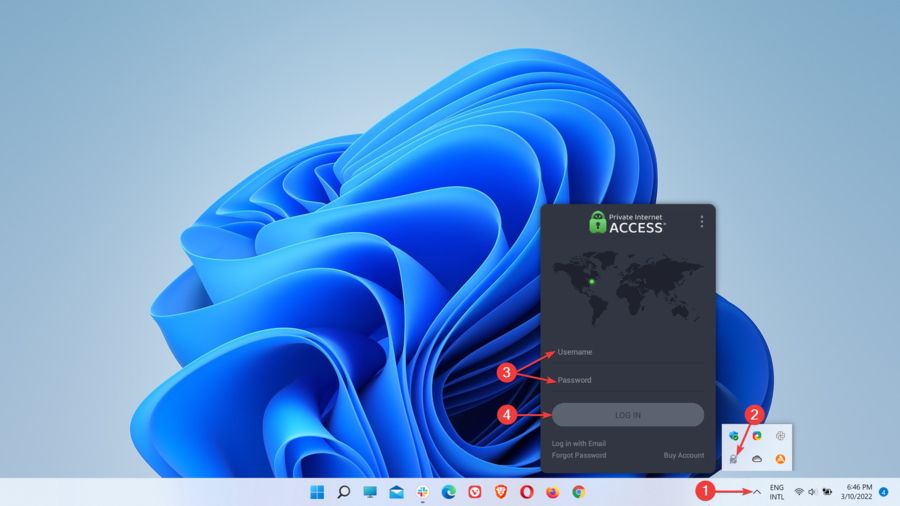
- Next, go to the list of available servers.

- Select a server and click on it.
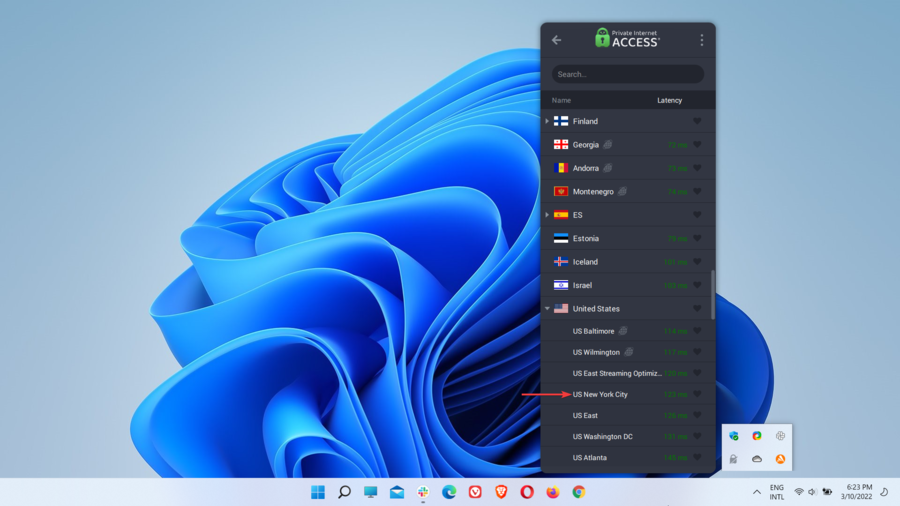
- Finally, connect to the chosen VPN server.
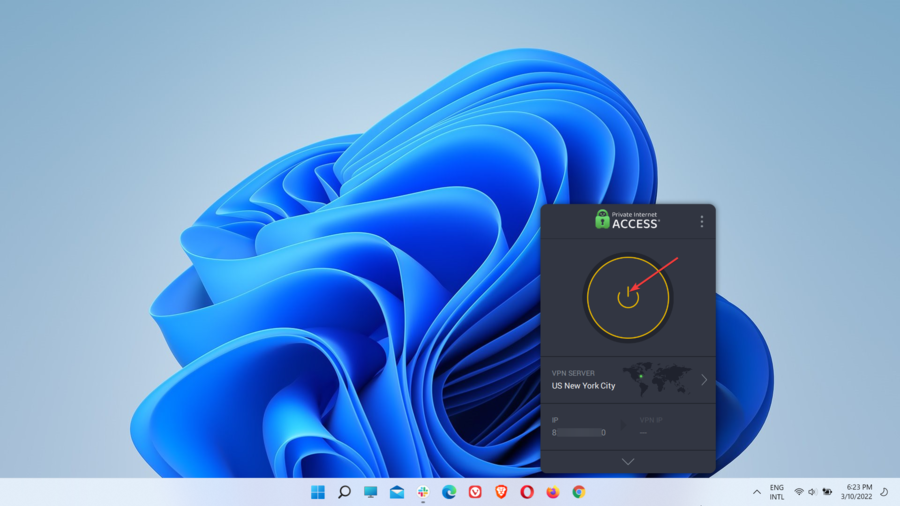
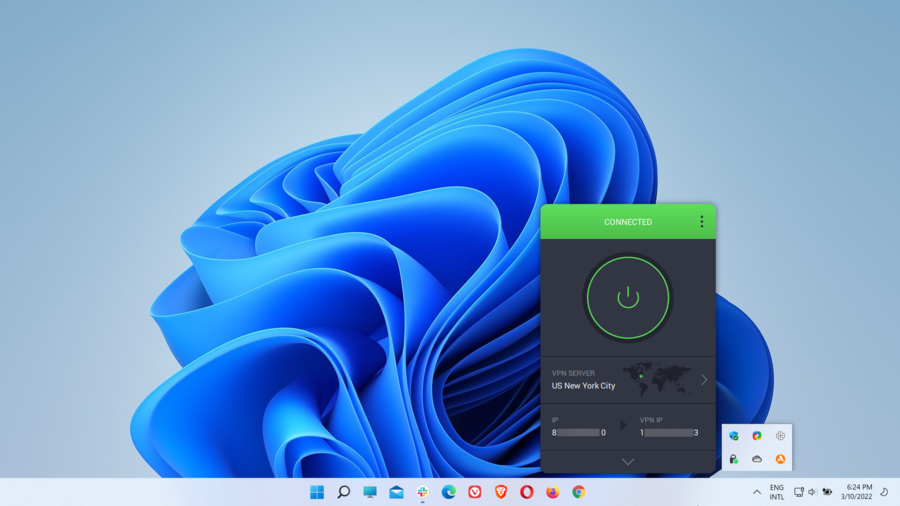
- The automatic connection should now be established.
A few things about Private Internet Access
Private Internet Access (PIA) is owned by Kape Technologies and registered in the USA.
PIA provides dedicated applications (clients) for all the major operating systems and platforms, including Windows, macOS, Linux, Android, and iOS.

With 29,650 servers in multiple locations across 84 countries, PIA offers the largest network of VPN servers of all providers on the market.
So, if you set up the Windows 11 native app on your PC, you’ll manage to quickly connect to any available VPN servers with just a few clicks. Furthermore, with this app, you will never have issues like your Windows 11 VPN not working for external reasons.

The PIA servers are also very fast, passing multiple speed tests with flying colors. So, whether you’re interested in general browsing, bypassing geo-blocking, streaming, gaming, or torrenting, just connect to the best VPN server location for your specific activity, and you’ll be all set.
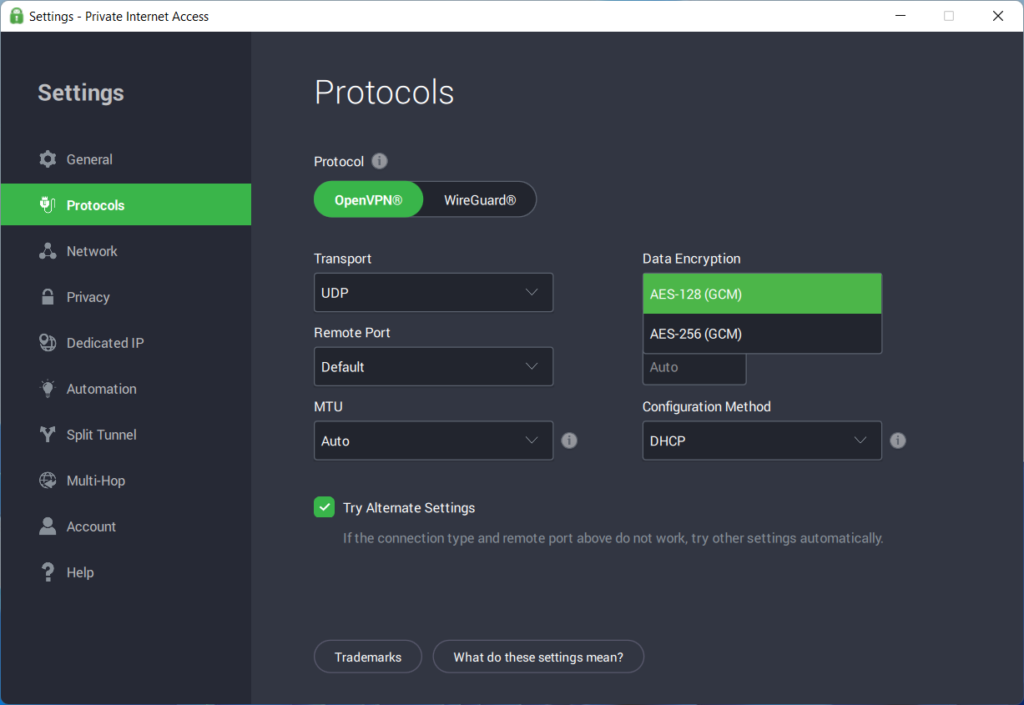
The VPN redirects your traffic using AES-128 (GCM) or AES-256 (GCM) military-grade encryption.
PIA uses the OpenVPN (UDP or TCP) and WireGuard VPN protocols to determine how the VPN tunnel is formed.
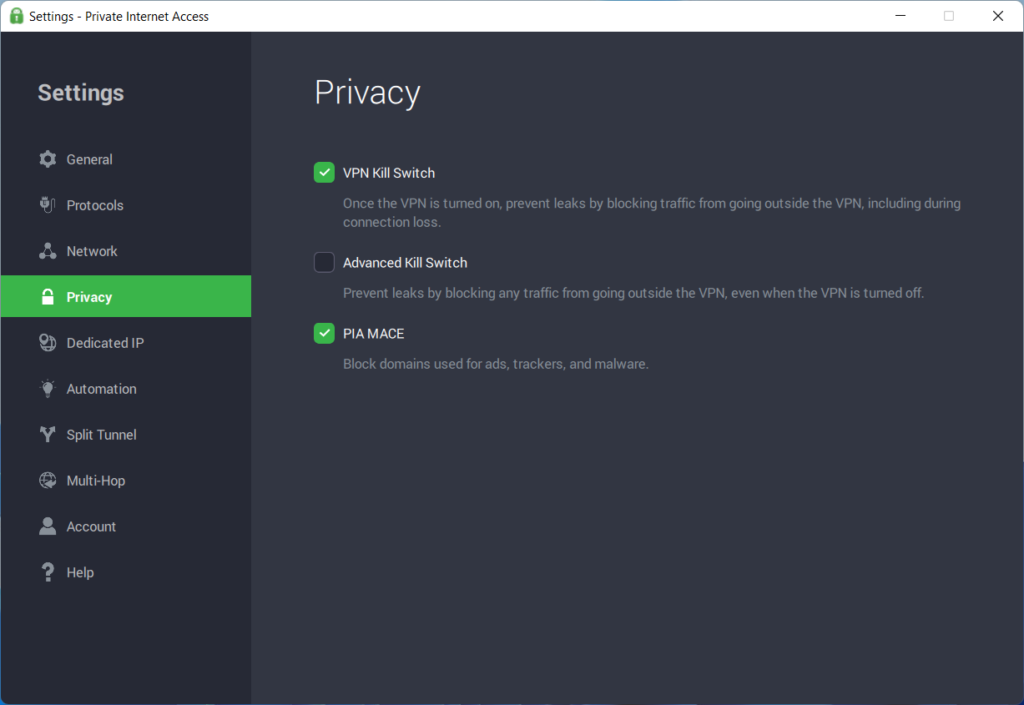
Moreover, PIA comes bundled with many other helpful VPN features, such as Kill Switch, PIA MACE (ad and malware blocker), Split Tunnel, Multi-hop and Obfuscation, Request Port Forwarding, PIA DNS, Smart DNS, Dedicated IP, and P2P support.
Extra PIA features:
- Strict no-logs policy
- Simultaneous access on up to 10 devices
- Risk-free 30-day money-back guarantee
- 24/7 live chat and email customer support

Private Internet Access
PIA is a fast, secure, and feature-rich VPN service with native apps for the most popular platforms. Plus, it has the most significant number of VPN servers.Should I use a manual VPN connection or a VPN app?
Before choosing between a manual VPN connection with the built-in VPN or the OpenVPN GUI or an automatic connection using a native app, you need to consider a few things.
While both connection methods allow you to use a VPN effectively and connect to a VPN server on Windows 11, you can use one, depending on the situation.
Below, we’ll address the main advantages of using each setup method and when you should choose one instead of the other.
Switching providers or reconfiguring your client? For a smooth transition, see our step-by-step guide on how to change VPN settings or providers.
Why use a manual setup?
- Can’t download and install the native VPN app on your device.
- You are unable to connect to a VPN server on your Windows 11 device.
- The device you use doesn’t support VPN apps (that’s not the case with Windows 11).
- Your VPN provider doesn’t offer native VPN apps for your OS (very rare with Windows 11).
- You’re experiencing connectivity errors with your VPN client that can’t be fixed after basic or even advanced troubleshooting.
Why use a native app setup?
- Easy-to-use application interface and support for all major operating systems.
- Connect to the fastest VPN server with one click using the quick connect option.
- Switch between countries or servers to connect to your chosen server with a few clicks.
- Find the best VPN servers and locations based on distance, ping, server load, or the built-in speed test. Some reliable VPNs include these performance indicators.
- Choose different encryption types (if available) or change VPN protocols or ports for the best connection or basic troubleshooting.
- Ensure DNS leak protection and prevent accidental exposure of sensitive data during connection loss with the help of a VPN kill switch.
- Enjoy other useful security, privacy, or anti-censorship VPN features, such as ad and malware blocker, split tunneling, multi-hop, and obfuscation.
Related:
Final thoughts
We hope that the information presented in the configuration guides will help you set up a hassle-free manual VPN connection using the Windows 11 built-in VPN.
If you want to connect to a VPN server on your Windows 11 device using a manual connection with the OpenVPN GUI, our inclusive OpenVPN guide will also help you.
If, in the unfortunate event, you deal with connection issues and still can’t connect after multiple attempts, remember that you always have the option of using a native VPN app or client.
As you’ve already seen above, a VPN app will significantly simplify things for you. Plus, it will also let you use other important VPN features that are not available with a manual setup.
Last but not least, no matter how you want to connect to a VPN, make sure to use a service that has a good reputation that is backed by multiple testing and positive reviews.
The VPNs included as examples in the manual setup guides, and those in the extensive comparison between manually-configured VPNs and regular VPN apps are all very reliable.
It’s also worth mentioning that, in most cases, they allow specific connection types with a premium VPN subscription only. Besides, most of the features available in the native VPN apps are also premium.
You should disregard free VPN services for Windows 11 or cheaper alternatives with a questionable reputation. This is because they usually rely on poor infrastructures and are also very limited in connection support, server availability, security, privacy, and other features.
Read our disclosure page to find out how can you help VPNCentral sustain the editorial team Read more

Improve this guide


User forum
0 messages